Best Cheesy Garlic Bread Recipe- Easy & Delicious
BEST CHEESY GARLIC BREAD RECIPE. Ah, cheesy garlic bread. Just the words themselves conjure up visions of golden-brown perfection, that irresistible aroma filling your kitchen, and the sheer, unadulterated joy of that first warm, gooey bite. It’s a universally adored comfort food, a staple at family dinners, impromptu gatherings, and even just a solo movie night. But what elevates a good cheesy garlic bread to the BEST CHEESY GARLIC BREAD RECIPE? It’s that perfect balance: the crisp exterior yielding to a pillowy soft interior, infused with a potent punch of roasted garlic and a generous blanket of melty, bubbly cheese. This isn’t just bread; it’s an experience. It’s the ultimate sidekick to any meal, or let’s be honest, a glorious main event in its own right. Get ready to impress yourself and everyone lucky enough to share it.
BEST CHEESY GARLIC BREAD RECIPE
There are few things in this world more comforting and universally loved than a warm, gooey, cheesy garlic bread. It’s the ultimate side dish, the perfect accompaniment to pasta, soup, or just about anything your heart desires. And while store-bought options are convenient, nothing truly compares to the flavor and aroma of homemade. Today, I’m going to share with you my go-to recipe for the best cheesy garlic bread, using a secret weapon that takes it from good to absolutely phenomenal. Get ready to impress yourself and everyone you serve this to!
The magic in this recipe lies in a few key elements: the quality of your garlic, the richness of your butter mixture, and the perfect balance of cheese. We’re not just slathering some plain butter and garlic on bread here; we’re creating a flavor explosion that will have everyone asking for seconds. The use of King’s Hawaiian Origin extractal Sweet Rolls, kept in their full sheet form, provides a wonderfully soft and slightly sweet base that complements the savory garlic and cheese beautifully. If you can’t find them, a good quality French baguette will also work wonders.
Ingredients:
Instructions:
1. Roasting the Garlic for Ultimate Flavor:
This is our first crucial step and it’s where we build a deep, complex garlic flavor. Preheat your oven to 400°F (200°C). Take your 8-10 garlic cloves and place them on a small piece of aluminum foil. Drizzle them with 2 tablespoons of olive oil and add a tiny pinch of salt. Wrap the foil tightly to create a little packet. Place this packet on a baking sheet and roast for about 20-25 minutes, or until the garlic cloves are soft and fragrant. Once roasted, carefully unwrap the packet and let the garlic cool slightly. You’ll find that roasting mellows out the harshness of raw garlic and brings out a wonderfully sweet and nutty flavor. Squeeze the softened roasted garlic cloves out of their skins directly into a bowl. This is your roasted garlic base!
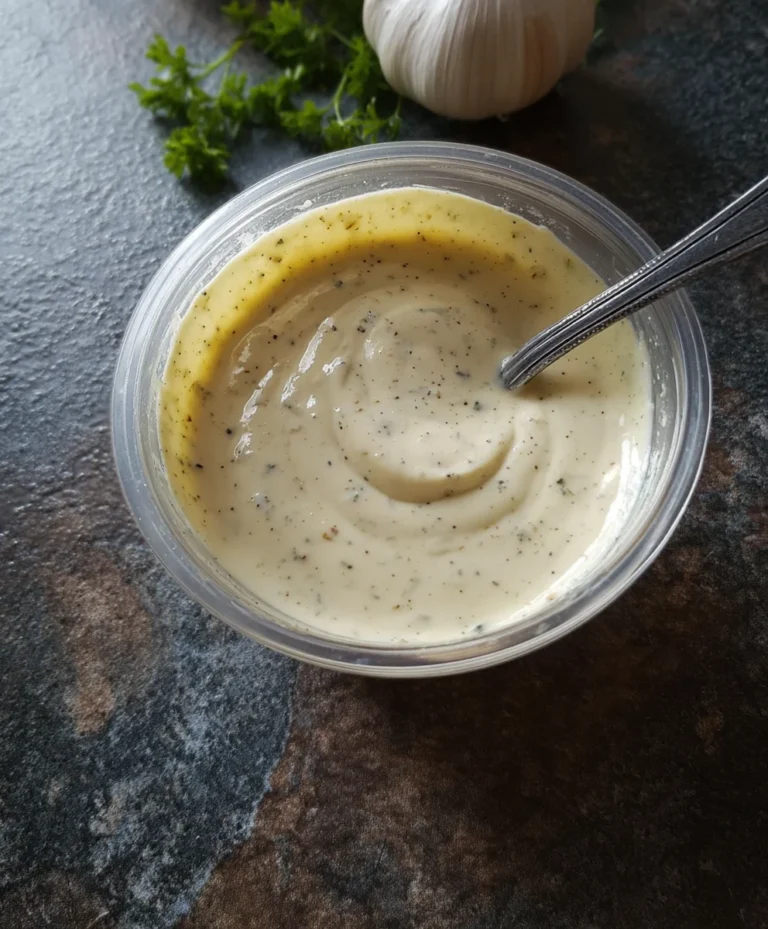
2. Crafting the Irresistible Garlic Butter Mixture:
In a medium bowl, combine the melted butter (half a cup is perfect for that rich coating), the squeezed roasted garlic, and 1 egg. Whisk these ingredients together until well combined. Now, we add the flavor enhancers! Stir in ¼ cup of milk, ½ teaspoon of salt, and ½ teaspoon of paprika. The paprika not only adds a subtle warmth and color but also a touch of complexity. Finally, fold in 2 tablespoons of chopped fresh parsley. This mixture should be creamy and fragrant, ready to transform our bread. Don’t be shy with the parsley; fresh herbs make a world of difference.
3. Preparing the Sweet Rolls for Their Cheesy Transformation:
This is where the King’s Hawaiian rolls shine. If you’re using them, keep them in their full sheet form. Using a serrated knife, carefully cut slits into the top of the rolls, about 1 inch apart, going about halfway down into the bread. These slits will allow our delicious garlic butter mixture and cheese to seep in and infuse every bite. If you’re using a baguette, slice it in half lengthwise, then make diagonal slits across the cut side, not quite all the way through the crust. The goal is to create nooks and crannies for all that cheesy goodness.
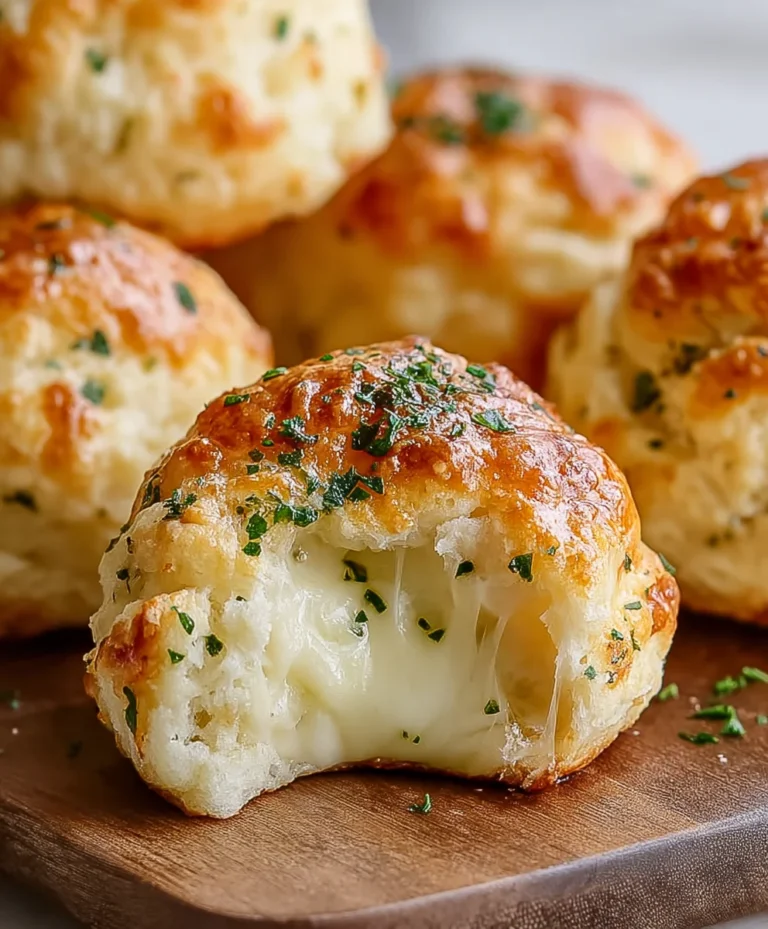
4. Generously Applying the Garlic Butter and Cheese:
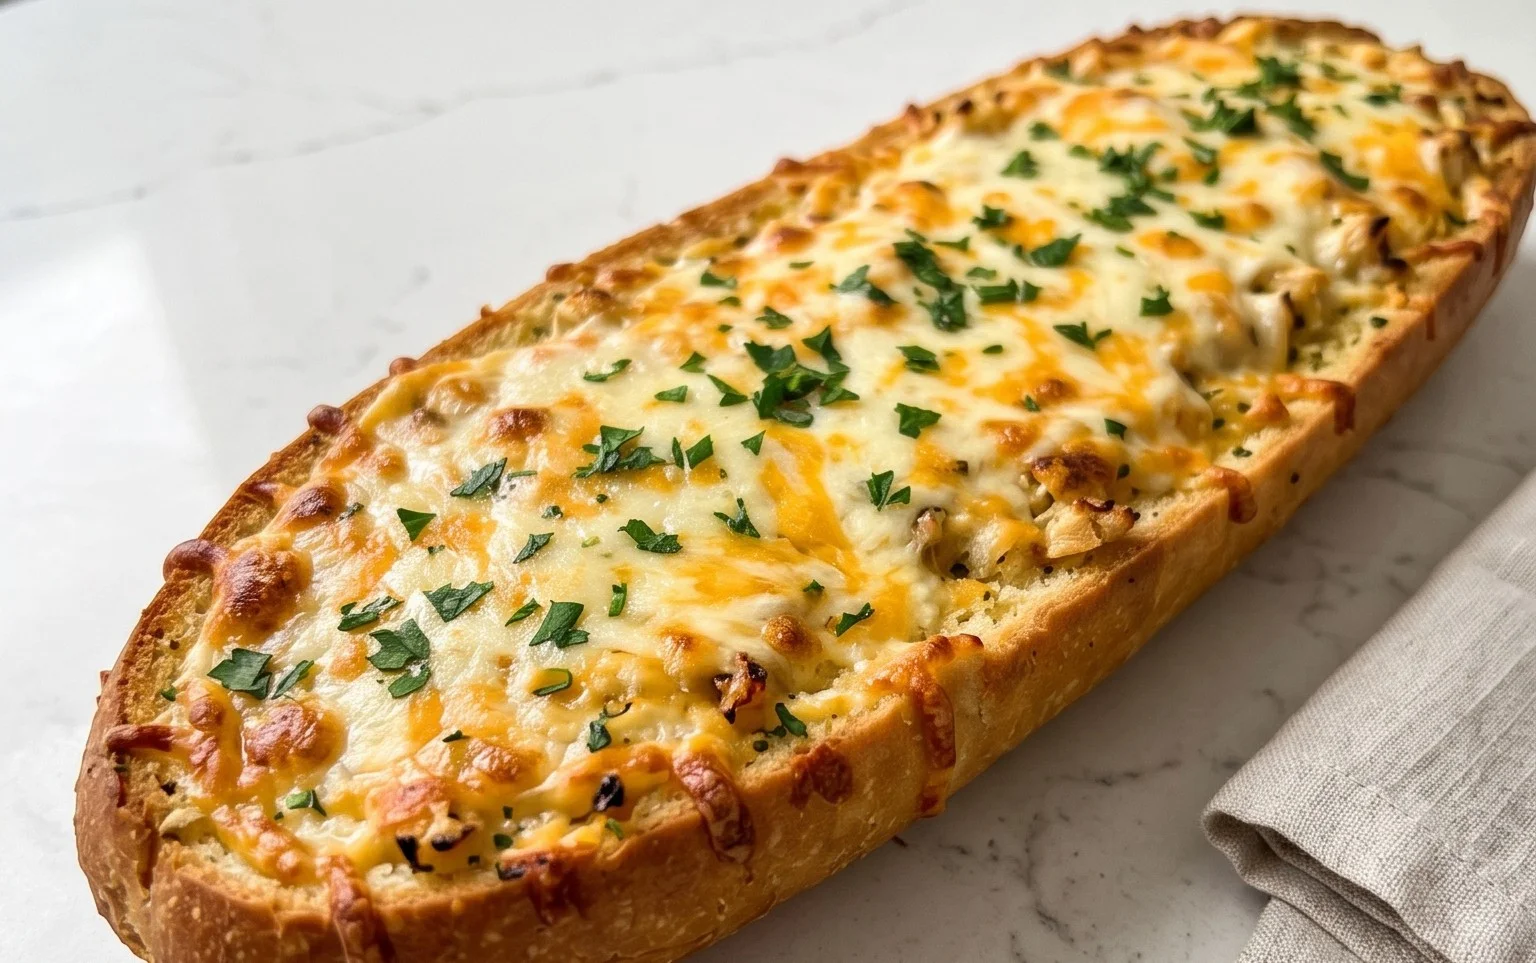
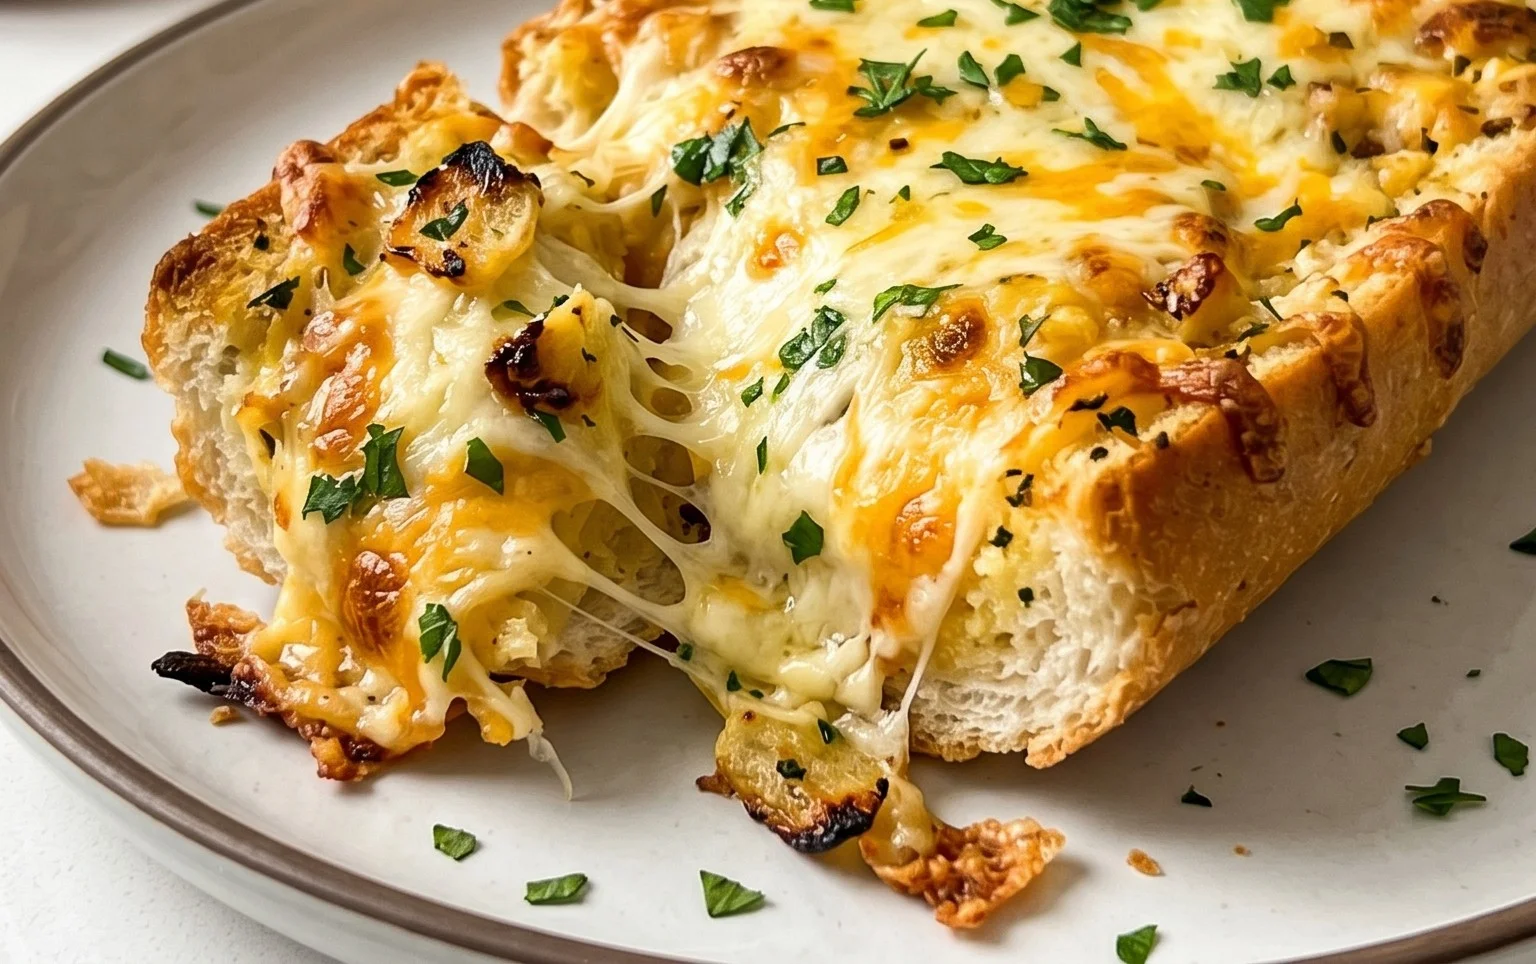
Now for the fun part! Carefully spoon or brush the garlic butter mixture over the top of the sweet rolls, making sure to get it into all those slits you created. Don’t be afraid to be generous here; this is what makes the bread moist and incredibly flavorful. Once the butter mixture is applied, evenly sprinkle 2 cups of shredded mozzarella cheese all over the top. We want a thick, decadent layer of cheese that will melt into a glorious, stretchy blanket. The beauty of mozzarella is its meltability and mild, creamy flavor that pairs perfectly with garlic.
5. Baking to Golden Perfection:
Place the prepared garlic bread on a baking sheet. Now, pop it into the preheated oven (which should still be at 400°F or 200°C) and bake for approximately 12-15 minutes. Keep a close eye on it! You’re looking for the cheese to be completely melted and bubbly, and the edges of the bread to be golden brown and slightly crispy. The aroma filling your kitchen at this stage will be absolutely divine. If the cheese starts to brown too quickly before the bread is warmed through, you can loosely tent it with foil.
6. Serving the Ultimate Cheesy Garlic Bread:
Once it’s perfectly baked, carefully remove the garlic bread from the oven. Let it rest for just a minute or two – this is crucial for the cheese to set slightly, making it easier to slice and serve. Before you slice into it, sprinkle a little extra chopped parsley and a pinch of chili flakes over the top for a pop of color and a hint of heat. The chili flakes are optional but highly recommended for a little kick! Slice the bread into individual portions and serve immediately. Watch as your guests marvel at its perfection. This cheesy garlic bread is truly a labor of love, and the results are undeniably worth it. Enjoy every single delicious, cheesy, garlicky bite!
Conclusion:
I hope you’re as excited as I am to try this BEST CHEESY GARLIC BREAD RECIPE! It’s truly a game-changer, transforming simple bread into a golden, crispy, and outrageously cheesy masterpiece. The perfect balance of fragrant garlic, rich butter, and gooey cheese makes it an irresistible side dish or even a star of the show. Whether you’re serving it alongside pasta, soup, or enjoying it on its own, it’s guaranteed to be a crowd-pleaser.
Feel free to get creative with serving! It’s phenomenal with marinara sauce for dipping, alongside a hearty steak, or even as a base for a gourmet sandwich. For variations, consider adding a sprinkle of red pepper flakes for a touch of heat, some chopped fresh parsley for extra color and flavor, or even a different blend of cheeses like mozzarella and cheddar for a unique twist. Don’t hesitate to experiment and make it your own!
I truly encourage you to give this recipe a try. It’s surprisingly easy to make, and the results are incredibly rewarding. Prepare for rave reviews!
Frequently Asked Questions:
Can I use a different type of bread?
Absolutely! While a baguette or Italian loaf works wonderfully, you can also use ciabatta, French bread, or even thick-sliced sourdough. Just adjust the baking time slightly depending on the thickness and density of your bread.
How do I prevent the garlic from burning?
The key is to use softened, not melted, butter and to cook the garlic gently over low heat until fragrant but not browned. If you’re worried about burning, you can also mix the minced garlic directly into the softened butter and cheese mixture without pre-sautéing.
BEST CHEESY GARLIC BREAD RECIPE
The ultimate cheesy garlic bread recipe, featuring a creamy garlic spread and plenty of melted mozzarella. Perfect for any meal!
Ingredients
-
8-10 garlic cloves
-
2 tbsp olive oil
-
Pinch of salt
-
Roasted garlic from above
-
½ cup butter, melted (113g)
-
1 egg
-
¼ cup milk (60g)
-
½ tsp salt
-
½ tsp paprika
-
2 tbsp chopped fresh parsley
-
12 King’s Hawaiian Origin extractal Hawaiian Sheet Rolls, kept in the full sheet form (or replace with a French baguette of similar size)
-
2 cups shredded mozzarella cheese
-
Chopped parsley and chili flakes for serving
Instructions
-
Step 1
Roast the garlic: Toss whole garlic cloves with 2 tbsp olive oil and a pinch of salt. Wrap in foil and roast at 400°F (200°C) for 30-40 minutes until soft. Let cool slightly. -
Step 2
Make the garlic spread: Squeeze the roasted garlic from its skins into a bowl. Add the melted butter, egg, milk, ½ tsp salt, paprika, and 2 tbsp chopped fresh parsley. Whisk until well combined. -
Step 3
Prepare the rolls: Slice the King’s Hawaiian sheet rolls horizontally, keeping them attached on one side. If using a baguette, slice it in half lengthwise. -
Step 4
Spread the garlic mixture: Generously spread the garlic butter mixture all over the cut surfaces of the rolls, making sure to get into all the crevices. -
Step 5
Add the cheese: Sprinkle the shredded mozzarella cheese evenly over the garlic spread on both halves of the rolls. -
Step 6
Bake the bread: Place the prepared rolls on a baking sheet. Bake at 375°F (190°C) for 15-20 minutes, or until the cheese is melted and bubbly, and the bread is golden brown. -
Step 7
Serve: Garnish with additional chopped parsley and chili flakes, if desired. Slice and serve immediately.
Important Information
Nutrition Facts (Per Serving)
It is important to consider this information as approximate and not to use it as definitive health advice.
Allergy Information
Please check ingredients for potential allergens and consult a health professional if in doubt.