Crispy Pan Fried Chicken Potstickers Easy Recipe
Chicken potstickers are one of those magical dishes that instantly transport me to a place of pure comfort and culinary delight. There’s something incredibly satisfying about biting into a perfectly pan-fried dumpling – the crisp, golden-brown bottom giving way to a tender, pleated wrapper, all revealing a burst of savory, juicy filling. It’s no wonder why chicken potstickers are a global sensation! They’re the ultimate appetizer, a delightful lunch, or even a surprisingly fulfilling main course. What truly sets these apart is that irresistible textural contrast: the slight char from the pan against the steamed, yielding dough. And that flavorful chicken filling, often enhanced with aromatic gin extractger, garlic, and a whisper of soy sauce, is simply divine. Get ready to master the art of making these irresistible chicken potstickers in your own kitchen; I promise, they’re easier than you think and incredibly rewarding to share (or not share, if you’re feeling selfish – I won’t judge!).
Chicken Potstickers (Pan Fried Dumplings)
There’s something incredibly satisfying about a plate of perfectly pan-fried chicken potstickers. The crispy, golden-brown bottoms give way to tender, juicy fillings, all wrapped up in a delicate dumpling wrapper. They’re a delightful appetizer or a light meal, and surprisingly, they’re not as intimidating to make at home as you might think. Today, we’re diving into a recipe that will have you mastering these delicious morsels in no time. We’ll be using a fantastic blend of savory chicken and vibrant vegetables, all seasoned to perfection. Get ready to impress yourself and your loved ones with these restaurant-quality potstickers!
Ingredients:
Preparing the Filling
The heart of any great potsticker is its flavorful filling. We’ll start by combining our star ingredient, the ground chicken, in a large mixing bowl. To this, we’ll add the finely chopped napa cabbage. The cabbage might seem like a lot, but it wilts down beautifully during cooking, adding moisture and a subtle crunch. Sprinkle in the salt, which will help draw out some of the moisture from the cabbage, preventing a watery filling.
Next, let’s bring in the aromatics. The minced garlic and gin extractger are crucial for that signature potsticker flavor. Their pungent notes will infuse the chicken and vegetables, creating a complex and delicious taste. Add the sliced green onions for a fresh, oniony bite.
Now for the flavor boosters! The soy sauce provides that essential umami depth, while the oyster sauce adds a touch of sweetness and rich savoriness. Don’t underestimate the power of sesame oil; its nutty aroma is unmistakable and elevates the entire filling. The chicken bouillon cube, crum extractbled finely or dissolved in a tiny bit of hot water and then added, intensifies the chicken flavor. Finally, a dash of white pepper adds a gentle warmth without overpowering the other ingredients.
Once all the ingredients are in the bowl, it’s time to get your hands (or a sturdy spoon) in there and mix everything thoroughly. You want to ensure that every component is evenly distributed. Don’t be afraid to really work the mixture; this helps bind the ingredients together and creates a cohesive filling that holds its shape. Taste a tiny bit of the raw mixture to adjust seasoning if needed – a common practice in dumpling making.
Assembling the Potstickers
This is where the fun really begin extracts! You’ll need your circular dumpling wrappers. If they’re frozen, make sure to thaw them according to package directions. Keep a small bowl of water nearby; this is your “glue” for sealing the dumplings.
Take one wrapper and place it in the palm of your hand. Spoon about a tablespoon of the chicken filling into the center of the wrapper. Don’t overfill, or you’ll find it difficult to seal them properly. Now, moisten the edge of half the wrapper with your fingertip dipped in water. This is key to creating a good seal.
There are many ways to pleat a potsticker, but a simple and effective method is to fold the wrapper in half, creating a semi-circle. Starting from one end, make small pleats along one edge of the wrapper, pressing them firmly against the other, flat edge of the wrapper. This creates those signature folds that give potstickers their name and make them easy to grasp. Ensure there are no air pockets trapped inside. Press firmly to seal them tightly. You want to achieve a good seal to prevent the filling from leaking out during the cooking process. If you’re feeling adventurous, you can look up various pleating techniques online – it’s a satisfying skill to develop! As you finish each dumpling, place it on a lightly floured plate or parchment paper to prevent them from sticking.
Pan-Frying to Perfection
The magic of potstickers lies in their cooking method: pan-frying. This technique gives them that irresistible crispy bottom while steaming them to a tender perfection. Heat a tablespoon or two of a neutral oil, like vegetable or canola oil, in a non-stick skillet over medium-high heat. Once the oil is shimmering, carefully arrange the potstickers in a single layer. Make sure not to overcrowd the pan; cook in batches if necessary. You want each potsticker to have good contact with the hot skillet.
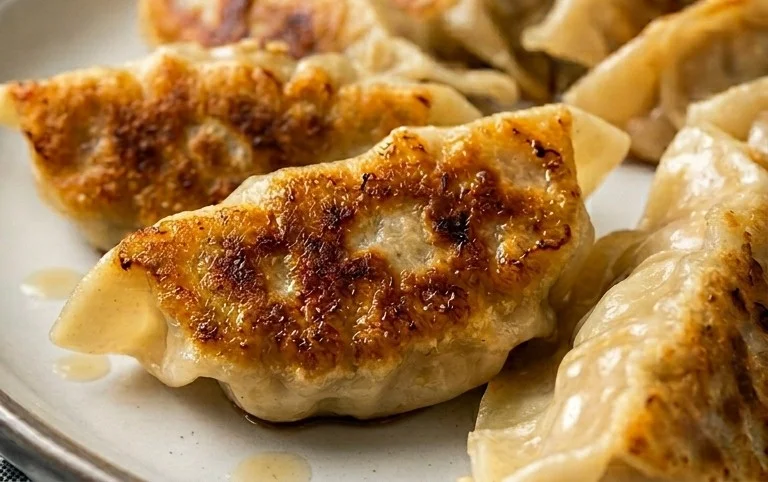
Once the bottoms are golden brown and crispy, which usually takes about 2-3 minutes, it’s time for the steaming phase. Carefully pour about ½ cup of water into the skillet. Be cautious, as the water will steam and splatter. Immediately cover the skillet with a tight-fitting lid. Reduce the heat to medium-low and let them steam for about 6-8 minutes, or until the wrappers are translucent and the chicken filling is cooked through. The steam will cook the filling and soften the wrappers.
Once the water has evaporated, remove the lid and continue to cook for another minute or two, allowing any remaining moisture to evaporate and ensuring the bottoms remain nice and crispy. You’re looking for that perfect balance of crispiness on the bottom and tenderness throughout.
Serving Your Delicious Potstickers
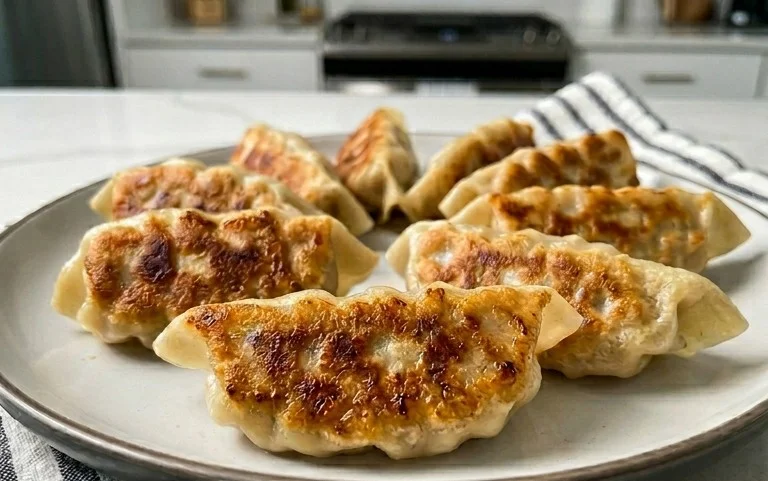
Carefully remove the potstickers from the pan and arrange them on a serving platter. Garnish with freshly sliced green onions and a sprinkle of sesame seeds for an extra touch of flavor and visual appeal. The aroma alone will be non-intoxicating! Serve immediately with your favorite dumpling dipping sauce. A classic mix of soy sauce, rice vinegar, and a touch of chili oil is always a winner, but feel free to experiment with your own favorite combinations. Enjoy the fruits of your labor – the crispy bottoms, the tender wrappers, and the savory, flavorful filling. These homemade chicken potstickers are sure to be a hit!
Conclusion:
There you have it – a foolproof guide to making delicious, crispy-bottomed Chicken Potstickers right in your own kitchen! What makes this recipe so fantastic is its perfect balance of tender, flavorful filling encased in a beautifully pan-fried wrapper. The satisfying crunch of the bottom combined with the juicy interior is truly irresistible. These aren’t just dumplings; they’re a culinary adventure waiting to happen!
Serving these potstickers is a joy. They are phenomenal on their own as an appetizer or snack, but they also make a wonderful addition to a larger meal, perhaps alongside a fresh Asian-inspired salad or some steamed greens. Don’t be afraid to experiment with your dipping sauce, either! A classic soy-vinegar blend is always a winner, but a touch of chili garlic sauce or even a peanut-based dip can add an exciting new dimension.
And for those of you who love to tinker in the kitchen, this recipe is incredibly versatile. You can easily swap out the chicken for ground beef, shrimp, or even a mixture of finely chopped mushrooms and tofu for a vegetarian option. Feel free to adjust the seasonings in the filling to suit your palate – a little extra gin extractger, a pinch of five-spice, or a dash of sesame oil can make a big difference. I truly encourage you to give these Chicken Potstickers a try. You’ll be amazed at how rewarding and delicious homemade dumplings can be!
Frequently Asked Questions:
Q: My potstickers aren’t getting crispy on the bottom. What am I doing wrong?
A: The key to a crispy bottom is ensuring your pan is hot enough before adding the dumplings and that you don’t overcrowd the pan. Also, make sure you’re using enough oil and letting them cook undisturbed for the initial searing phase. The steam-then-sear method is crucial for that perfect crisp!
Q: Can I freeze the uncooked potstickers?
A: Absolutely! Arrange your uncooked potstickers in a single layer on a baking sheet lined with parchment paper and freeze until solid. Once frozen, transfer them to a freezer-safe bag or container. You can then cook them directly from frozen, just adding a few extra minutes to the cooking time.
Chicken Potstickers (Pan Fried Dumplings)
Delicious pan-fried dumplings filled with savory ground chicken, crisp napa cabbage, and aromatic ginger and garlic.
Ingredients
-
1 lb ground chicken
-
1 lb circular dumpling wrapper
-
2 cups napa cabbage (chopped)
-
1 tsp salt
-
4 green onions (sliced)
-
6 garlic cloves (minced)
-
2 inch ginger (minced)
-
1 tbsp soy sauce
-
1 tbsp oyster sauce
-
1 tbsp sesame oil
-
1 tbsp chicken bouillon
-
1 tsp white pepper
Instructions
-
Step 1
In a large bowl, combine ground chicken, chopped napa cabbage, sliced green onions, minced garlic, minced ginger, soy sauce, oyster sauce, sesame oil, chicken bouillon, and white pepper. Mix thoroughly until well combined. -
Step 2
Place a small amount of the filling (about 1 tablespoon) in the center of a dumpling wrapper. Moisten the edges of the wrapper with water. -
Step 3
Fold the wrapper in half and pinch the edges to seal, creating pleats for a classic potsticker look. Repeat with remaining filling and wrappers. -
Step 4
Heat 1 tablespoon of oil in a non-stick skillet over medium-high heat. Arrange dumplings in a single layer, ensuring they don’t overlap. -
Step 5
Cook for 2-3 minutes until the bottoms are golden brown and crispy. -
Step 6
Carefully add about 1/4 cup of water to the skillet (it will steam vigorously) and immediately cover the pan. Reduce heat to medium-low and steam for 5-7 minutes, or until the filling is cooked through and the wrappers are tender. -
Step 7
Remove the lid and continue cooking for another 1-2 minutes to allow any excess water to evaporate and crisp the bottoms again if needed. Serve hot with dumpling dipping sauce, garnished with green onions and sesame seeds.
Important Information
Nutrition Facts (Per Serving)
It is important to consider this information as approximate and not to use it as definitive health advice.
Allergy Information
Please check ingredients for potential allergens and consult a health professional if in doubt.