Savory Masoor Dal Chilla – Easy Red Lentil Pancakes
Masoor Dal Chilla | Savory Red Lentil Pancakes are a revelation! Forget your usual breakfast routine, because these vibrant, flavorful pancakes are about to become your new go-to. We all crave meals that are both incredibly delicious and undeniably good for us, and this Masoor Dal Chilla delivers on both fronts with flying colors. What’s not to love? They’re naturally gluten-free, packed with protein thanks to the humble red lentils, and can be customized with your favorite spices and vegetables. The slight tang from the fermented batter combined with a hint of warmth from the spices creates a symphony of flavors that will tantalize your taste buds. Whether you’re looking for a quick weeknight dinner, a satisfying brunch, or a healthy snack, this versatile dish is a winner. Get ready to discover your new favorite savory pancake!
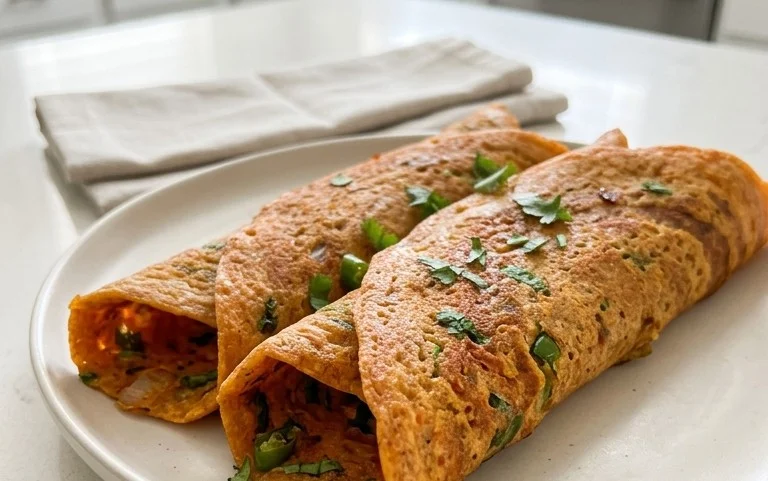
Masoor Dal Chilla | Savory Red Lentil Pancakes
These Masoor Dal Chillas, or savory red lentil pancakes, are a delightful and nutritious breakfast or snack option that I’ve come to love. They’re incredibly easy to make, packed with protein thanks to the masoor dal (split red lentils), and can be customized with your favorite spices and vegetables. Forget those bland, cardboard-like pancakes; these chillas are bursting with flavor and have a wonderfully soft, slightly crisp texture. They’re a fantastic way to sneak in some lentils, especially if you have picky eaters at home, or simply looking for a wholesome meal that doesn’t compromise on taste.
I remember the first time I tried making these. I was a little intimidated by the idea of grinding lentils, but it turned out to be surprisingly straightforward. The result was a batch of golden, fragrant pancakes that were devoured in minutes. They are incredibly versatile – I often serve them with a dollop of yogurt, some spicy chutney, or even just plain. For a more substantial meal, you can fold in some finely chopped onions, tomatoes, or grated carrots into the batter. They’re a perfect example of how simple, wholesome ingredients can create something truly delicious and satisfying.
Ingredients:
Preparing the Lentils
The foundation of our delicious chillas lies in properly preparing the masoor dal. This initial step is crucial for achieving the right batter consistency and ensuring the lentils cook through beautifully. It’s a simple process, but it requires a little patience. First, take your 1 cup of split red lentils and place them in a medium-sized bowl. Rinse them thoroughly under cold running water a couple of times. You’ll notice the water might get a little cloudy; this is normal as you’re washing away any residual starch or dust. Once rinsed, add the 3 cups of water to the bowl. This is more than enough to cover the lentils generously, allowing them to plump up and soften. Let them soak for at least 2 to 3 hours. For an even softer texture and quicker grinding, you can soak them overnight in the refrigerator. The longer soaking time helps to break down the lentils, making them easier to grind into a smooth batter, which is key for delicate chillas.
Grinding the Batter
Once our lentils have had a good soak, it’s time to transform them into a smooth, pourable batter. Drain the soaking water completely from the lentils. You’ll see that they have softened considerably. Now, transfer the soaked lentils into a blender or a food processor. To this, we’ll add the aromatics that will give our chillas their signature flavor. Add the 1 green chilli (you can adjust this based on your spice preference; if you like it milder, you can remove the seeds or use only half). Next, add the 1 inch piece of gin extractger. I like to roughly chop the gin extractger before adding it to help the blender out. Then, add the 1 teaspoon of kosher salt. Now, for the grinding process, we’ll add ½ cup of water. You might need to add a little more water, a tablespoon at a time, depending on the power of your blender and how soft your lentils are. The goal is to achieve a smooth, thick, yet pourable batter, similar in consistency to pancake batter. Blend until you have a completely smooth paste, scraping down the sides of the blender as needed to ensure there are no gritty bits of lentil left. This smooth consistency is what will make our chillas light and airy. Finally, stir in the 2 tablespoons of finely chopped cilantro. This adds a burst of freshness and color to the batter, and its fragrance is just wonderful.
Cooking the Chillas
Now for the fun part – cooking our Masoor Dal Chillas! This is where the magic happens, and you get to see your delicious creations come to life. Heat a non-stick skillet or a cast-iron griddle over medium heat. It’s important to get the pan to the right temperature – not too hot, or the chillas will burn before they cook through, and not too cool, or they might stick. Once the pan is warm, add about ½ tablespoon of oil and swirl it around to coat the surface. Pour about ½ cup of batter onto the hot skillet. You can gently spread it out with the back of your ladle in a circular motion to form a pancake, about 6-7 inches in diameter. Don’t make them too thick, or they will be difficult to cook through. You should start to see small bubbles forming on the surface of the chilla, and the edges will begin extract to look a little dry. This is a good indicator that it’s time to flip. Carefully slide a spatula underneath the chilla and flip it over. Cook the other side for another 2-3 minutes, or until golden brown and cooked through. You might need to adjust the heat as you go, depending on your stove. Once cooked, slide the chilla onto a plate. Repeat this process with the remaining batter, adding a little more oil to the pan for each chilla. It’s helpful to keep the cooked chillas covered with a clean kitchen towel or in a warm oven on low heat to keep them warm while you finish the rest.
Serving Suggestions
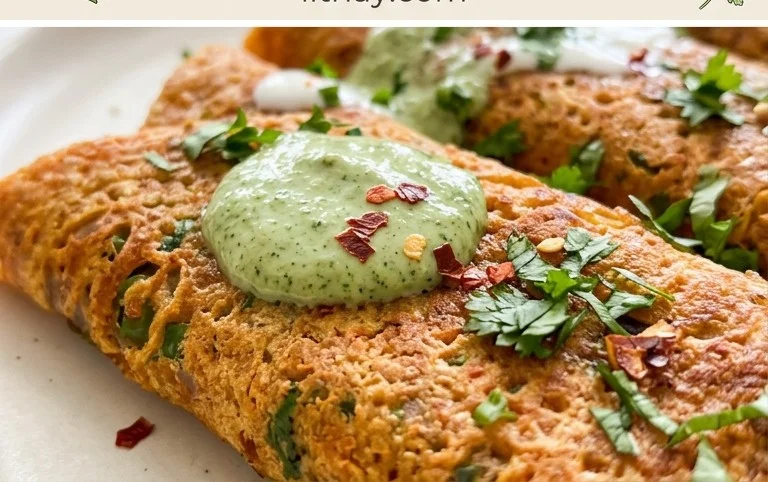
These Masoor Dal Chillas are incredibly versatile and can be enjoyed in so many ways! I love serving them hot off the griddle. A simple dollop of plain yogurt is a classic accompaniment, providing a cooling contrast to the savory pancake. For a little more zing, a spicy green chutney or a tangy tamarind chutney is absolutely divine. If you’re looking for a heartier breakfast or a light lunch, you can serve them with some scrambled eggs or a side salad. I also like to have a few of these for an evening snack with a cup of chai. Don’t hesitate to get creative! You can even fold them in half like a quesadilla and stuff them with a little grated cheese or some sautéed vegetables for a more substantial meal. The possibilities are truly endless with these wholesome and delicious lentil pancakes.
Conclusion:
I hope you’ve enjoyed learning how to make these delicious and healthy Masoor Dal Chillas! This Savory Red Lentil Pancake recipe is a true winner because it’s incredibly versatile, packed with protein and fiber, and surprisingly easy to whip up, even on a busy weeknight. The subtle lentil flavor, combined with your favorite spices, makes for a wonderfully satisfying meal. They’re perfect for breakfast, lunch, or even a light dinner. Don’t hesitate to experiment with different spices and vegetables to make these chillas your own! I really encourage you to give this recipe a try – you might just find your new favorite go-to dish. Serve them hot off the griddle with a dollop of yogurt, some spicy chutney, or even a fresh green salad. They also pair beautifully with a simple curry.
Frequently Asked Questions:
Can I make the batter ahead of time?
Absolutely! You can prepare the Masoor Dal Chilla batter up to 24 hours in advance and store it in an airtight container in the refrigerator. This makes morning preparations even quicker. Just give it a good stir before cooking.
What other vegetables can I add to the chilla batter?
The possibilities are endless! Finely chopped onions, tomatoes, bell peppers, grated carrots, spinach, or even corn kernels are fantastic additions. Just make sure to chop them very finely so they cook through evenly with the chilla.
Are Masoor Dal Chillas gluten-free?
Yes, this Masoor Dal Chilla recipe is naturally gluten-free, as it’s made primarily with red lentils and spices. This makes them an excellent option for those with gluten sensitivities or celiac disease.
Masoor Dal Chilla | Savory Red Lentil Pancakes
A delicious and healthy savory pancake made from split red lentils, spiced with green chili and ginger, and infused with fresh cilantro.
Ingredients
-
1 cup split red lentils (masoor dal)
-
3 cups water (for soaking lentils)
-
1 green chilli
-
1 inch ginger
-
1 teaspoon kosher salt
-
½ cup water (for grinding)
-
2 tablespoons cilantro (finely chopped)
-
2 tablespoons oil
Instructions
-
Step 1
Rinse the masoor dal thoroughly and soak it in 3 cups of water for at least 2-3 hours. -
Step 2
Drain the soaked lentils. Add the drained lentils, green chili, ginger, kosher salt, and ½ cup of water to a blender or food processor. -
Step 3
Grind the mixture into a smooth batter. Add more water, a tablespoon at a time, if needed to achieve a thick pouring consistency, similar to dosa batter. -
Step 4
Stir in the finely chopped cilantro into the batter. -
Step 5
Heat 1 tablespoon of oil in a non-stick skillet or tawa over medium heat. -
Step 6
Pour a ladleful of batter onto the hot skillet and spread it evenly in a circular motion to form a pancake. Cook for 2-3 minutes until the edges start to lift. -
Step 7
Flip the chilla and cook the other side for another 1-2 minutes until golden brown and cooked through. Repeat with the remaining batter, adding more oil as needed.
Important Information
Nutrition Facts (Per Serving)
It is important to consider this information as approximate and not to use it as definitive health advice.
Allergy Information
Please check ingredients for potential allergens and consult a health professional if in doubt.