Mini Grilled Cheese Rolls Ultimate Recipe
Mini Grilled Cheese Hawaiian Rolls: An Incredible Ultimate Recipe. When that craving strikes for something warm, comforting, and utterly delicious, look no further than these miniature marvels. We’re talking about a flavor explosion packed into a bite-sized package, a delightful twist on a classic that’s guaranteed to become a staple in your recipe repertoire. What makes these so irresistible? It’s the perfect marriage of sweet, pillowy Hawaiian rolls and the savory, gooey goodness of melted cheese, all kissed by the smoky char of the grill. People absolutely adore them because they’re ridiculously easy to make, surprisingly satisfying, and perfect for sharing (or hoarding, we won’t judge!). They’re more than just a snack; they’re a miniature celebration of comfort food, transforming an everyday indulgence into something truly extraordinary and incredibly fun to eat. Get ready to elevate your grilled cheese game with this amazing take.
Ingredients:
- 12 Hawaiian rolls
- 1 cup shredded cheddar cheese
- 1 cup shredded mozzarella cheese
- 1/2 cup butter, softened
- 1 teaspoon garlic powder (optional)
- 1 teaspoon dried herbs (oregano or basil, optional)
Preparation Phase
1. Preparing the Rolls and Cheese Mixture
Our first step is to get everything ready for assembly. We’ll begin extract by slicing our Hawaiian rolls. It’s important to slice them horizontally, almost like you’re creating a pocket for the delicious cheese filling. Be gentle to avoid tearing the soft rolls. You want to create a hinge on one side so the top can still be lifted. Think of it like a small book ready to be opened. Once all 12 rolls are sliced, set them aside.
Next, let’s prepare our cheesy filling. In a medium bowl, combine the shredded cheddar cheese and the shredded mozzarella cheese. These two cheeses offer a fantastic balance of sharp flavor from the cheddar and a wonderful melty stretch from the mozzarella, making for an incredibly satisfying gooey center. If you like a little extra zing, this is also the perfect time to add your optional garlic powder and dried herbs. The garlic powder will impart a subtle savory depth, while dried oregano or basil will add a hint of Italian-inspired herbaceousness. Mix these ingredients together thoroughly until they are evenly distributed. This ensures that every bite of your mini grilled cheese will be bursting with flavor.
Assembly Phase
2. Filling the Hawaiian Rolls
Now comes the fun part – filling our Hawaiian rolls with that delectable cheese mixture. Carefully open each sliced roll, keeping the hinge intact. Using a small spoon or your fingers, generously stuff each roll with the cheese blend. Don’t be shy with the cheese! You want a good amount to ensure that when it melts, it will ooze out slightly and create those irresistible cheesy strings. Aim for an even distribution of cheese within each roll, making sure to pack it in without overflowing too much initially. If you’re using the optional herbs and garlic powder, you’ll notice the aroma already starting to develop, promising a truly flavorful experience.
Grilling Phase
3. Preparing the Grilling Surface and Buttering the Rolls
Before we start grilling, we need to prepare our rolls and our cooking surface. In a small bowl, combine the softened butter with the optional garlic powder and dried herbs if you haven’t already incorporated them into the cheese mixture. This will infuse the butter with extra flavor, creating a golden, savory crust on our mini grilled cheeses. Using a pastry brush or a butter knife, generously spread this flavored butter on the top and bottom surfaces of each filled Hawaiian roll. Make sure to get a nice, even coating. This butter will not only prevent sticking but also contribute to a beautiful golden-brown color and a delightful crispy texture when grilled.
Next, preheat your grill or a non-stick skillet over medium-low heat. The key here is medium-low heat. If the heat is too high, the Hawaiian rolls will burn on the outside before the cheese has a chance to melt properly. We want that gentle, consistent heat that allows the cheese to become perfectly gooey and the exterior to achieve a delightful crispiness. If using a skillet, you might want to add a tiny bit more butter or a spray of cooking oil to ensure absolutely no sticking, although the butter on the rolls should suffice.
4. Grilling the Mini Grilled Cheese Sandwiches
Once your grill or skillet is heated to the perfect medium-low temperature, carefully place the buttered and filled Hawaiian rolls onto the cooking surface. You can cook these in batches, depending on the size of your grill or skillet, ensuring you don’t overcrowd the surface. Overcrowding can lead to uneven cooking. Allow each roll to cook for about 3 to 5 minutes per side. You’ll know they’re ready to be flipped when you see a beautiful golden-brown color developing on the bottom.
When you flip them, you should also notice that the cheese is starting to melt. Use a spatula to gently press down on the top of each roll. This slight pressure helps to ensure even heat distribution and encourages the cheese to ooze out the sides, creating those tantalizingly cheesy pockets. Continue to cook for another 3 to 5 minutes on the second side, or until both sides are a beautiful golden brown and the cheese is completely melted and gooey. Keep an eye on them, as cooking times can vary slightly depending on your grill or stove. The goal is a perfectly toasted exterior and a molten cheese interior.
5. Final Touches and Serving
Once both sides of your mini grilled cheese Hawaiian rolls are perfectly golden and the cheese is wonderfully melted, carefully remove them from the grill or skillet. Let them rest for just a minute or two before serving. This brief resting period allows the molten cheese to settle slightly, making them easier to handle and preventing any immediate cheese-related lava flows.
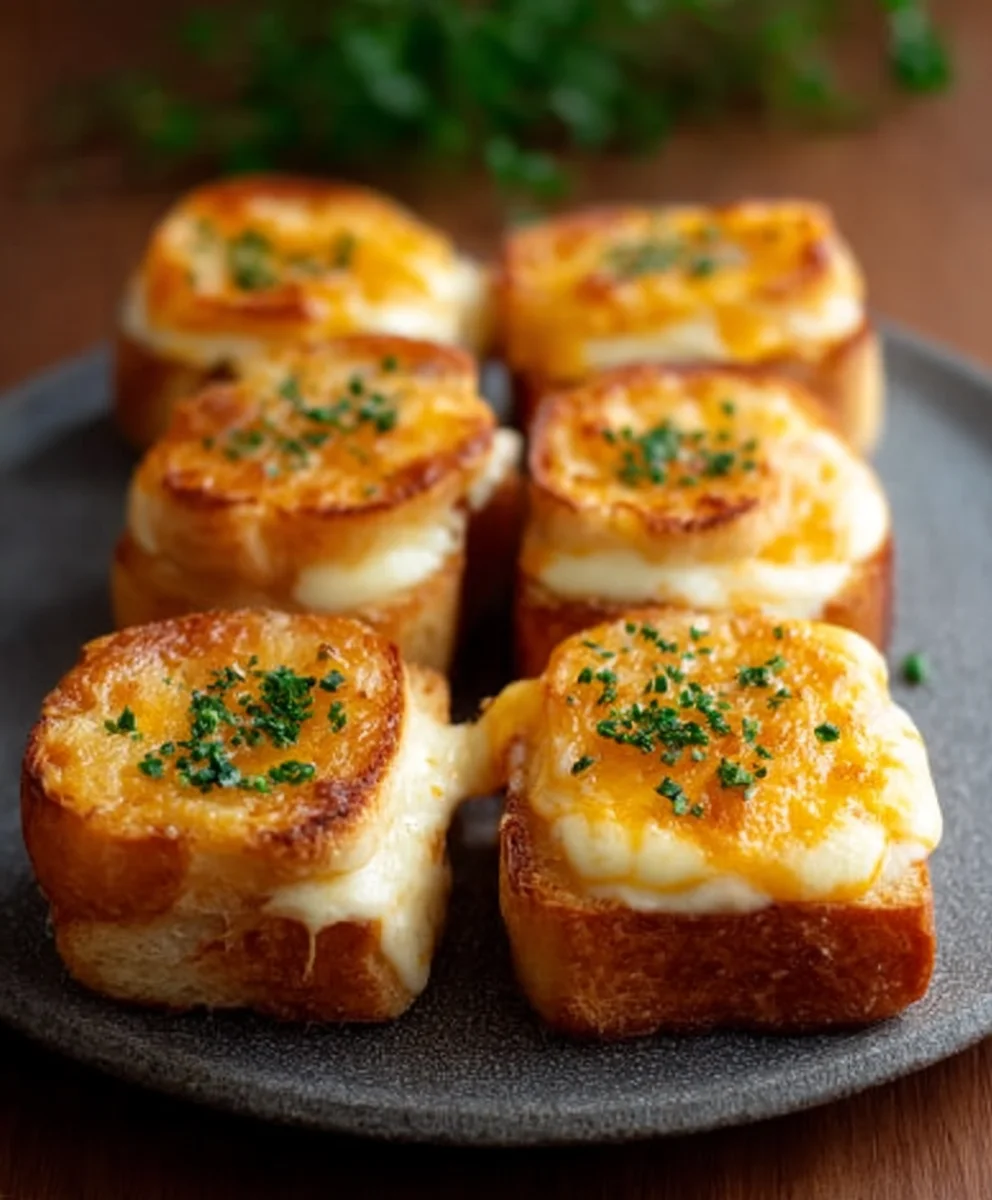
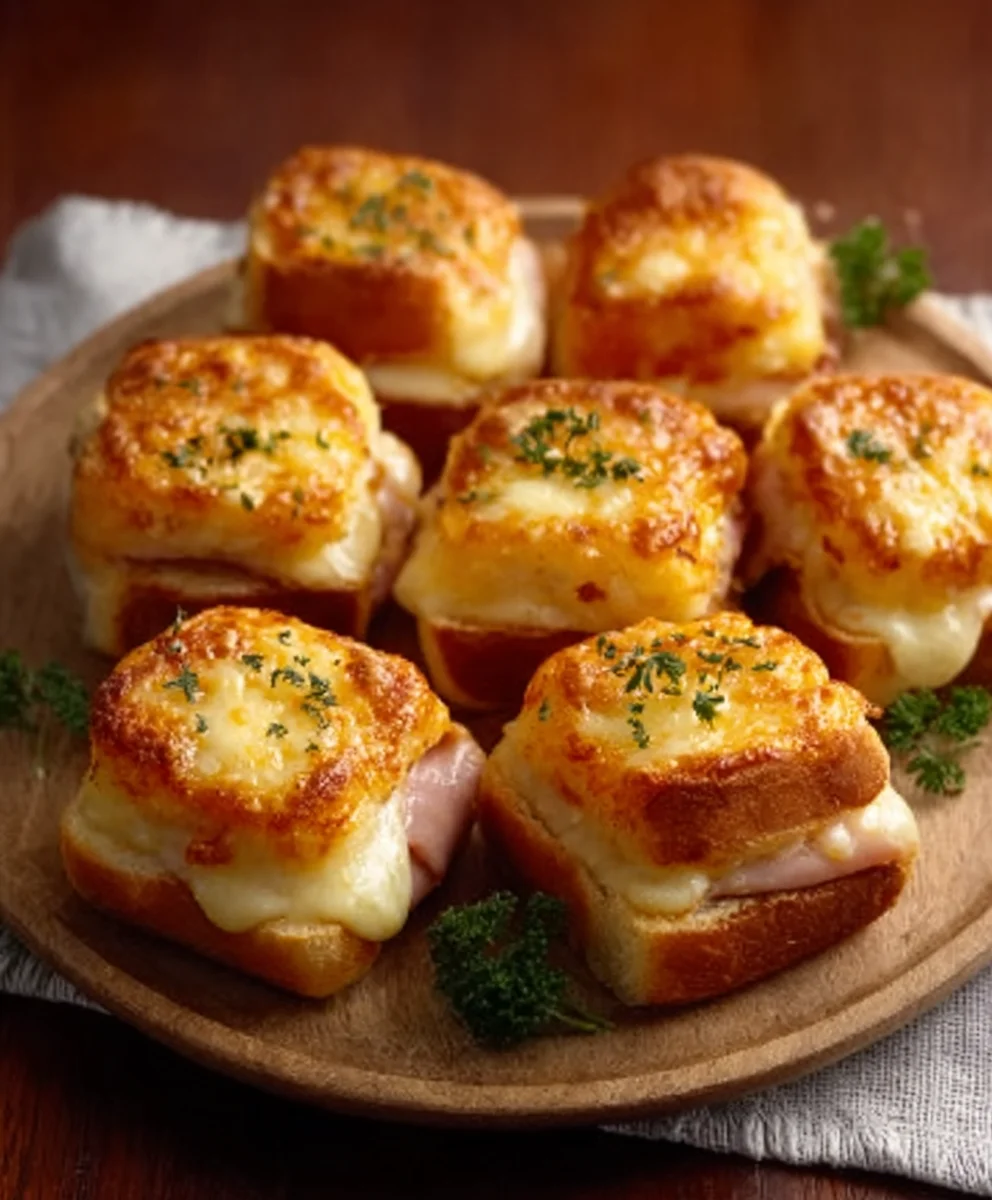
These mini grilled cheese Hawaiian rolls are best served immediately while they are warm and the cheese is at its absolute meltiest. They make for an incredible appetizer, a fun snack for kids, or even a delightful addition to a brunch spread. The sweetness of the Hawaiian rolls perfectly complements the savory, cheesy filling, creating an unexpectedly delightful flavor combination that is truly irresistible. Enjoy every delicious, gooey bite of this ultimate recipe!
Conclusion:
There you have it – the ultimate guide to crafting the most delicious Mini Grilled Cheese Hawaiian Rolls: An Incredible Ultimate Recipe! We’ve walked through each step, ensuring your journey to cheesy perfection is smooth and satisfying. These delightful little sandwiches are more than just a snack; they’re a miniature masterpiece perfect for parties, lunches, or simply a comforting treat. The sweet embrace of the Hawaiian rolls combined with the gooey, melted cheese is a symphony of flavors that’s hard to resist.
For serving, consider pairing these mini grilled cheese sandwiches with a creamy tomato soup for a classic combination, or a side of crisp, fresh salad for a lighter option. They also make an excellent addition to any appetizer spread, sure to be a crowd-pleaser!
Don’t be afraid to experiment with variations! Consider adding a thin slice of beef ham or turkey for a protein boost, or a sprinkle of caramelized onions for an extra layer of sweetness and depth. Different cheeses can also elevate your creation – try a sharp cheddar, a smoky gouda, or a spicy pepper jack for a new flavor profile.
We truly hope you enjoy making and savoring these Mini Grilled Cheese Hawaiian Rolls: An Incredible Ultimate Recipe. Get creative, have fun in the kitchen, and most importantly, indulge in every cheesy bite!
FAQs:
Can I make these ahead of time?
While these are best enjoyed fresh off the griddle for optimal cheese meltiness, you can assemble them a few hours in advance and grill them just before serving. Store the assembled, un-grilled sandwiches in an airtight container in the refrigerator.
What kind of cheese works best?
A good melting cheese is key! Cheddar, Monterey Jack, Gruyere, and American cheese all work wonderfully. You can also create a blend of your favorite cheeses for a more complex flavor profile.
Can I use a regular skillet instead of a griddle?
Absolutely! A non-stick skillet works perfectly well for making these mini grilled cheese sandwiches. Just ensure your heat is medium-low to allow the cheese to melt evenly without burning the rolls.
Mini Grilled Cheese Rolls Ultimate Recipe
Easy and delicious mini grilled cheese sandwiches made with sweet Hawaiian rolls, a blend of cheddar and mozzarella cheese, and a buttery garlic herb coating.
Ingredients
-
12 Hawaiian rolls
-
1 cup shredded cheddar cheese
-
1 cup shredded mozzarella cheese
-
1/2 cup butter, softened
-
1 teaspoon garlic powder
-
1 teaspoon dried herbs (oregano or basil)
Instructions
-
Step 1
Slice Hawaiian rolls horizontally, creating a hinge on one side. Combine shredded cheddar and mozzarella cheese in a bowl. Optionally, add garlic powder and dried herbs to the cheese mixture and mix well. -
Step 2
Generously stuff each sliced roll with the cheese blend. Ensure an even distribution of cheese without overflowing too much. -
Step 3
In a small bowl, combine softened butter with optional garlic powder and dried herbs. Spread this flavored butter generously on the top and bottom surfaces of each filled roll. -
Step 4
Preheat your grill or a non-stick skillet over medium-low heat. Place the buttered rolls onto the heated surface. -
Step 5
Cook for 3 to 5 minutes per side, or until golden brown and the cheese is melted and gooey. Gently press down on the rolls with a spatula while cooking. -
Step 6
Remove from heat, let rest for a minute or two, and serve immediately while warm and cheesy.
Important Information
Nutrition Facts (Per Serving)
It is important to consider this information as approximate and not to use it as definitive health advice.
Allergy Information
Please check ingredients for potential allergens and consult a health professional if in doubt.