Unique At-Home Bridal Shower Ideas Fun & Festive
30 Unique At-Home Bridal Shower Ideas to make any celebration unforgettable. Planning a bridal shower at home can feel overwhelming, but it doesn’t have to be! Forget the cookie-cutter parties; we’re diving deep into creative and personalized concepts that will leave the bride-to-be feeling incredibly cherished and celebrated. What makes an at-home bridal shower truly special? It’s the intimacy, the thoughtful details, and the opportunity to infuse the event with the bride’s personality and passions. Imagin extracte a whimsical tea party transformed into a secret garden, a sophisticated grape juice tasting that feels like a European getaway, or a DIY craft station where guests create keepnon-alcoholic sakes. These are just a few glimpses into the magic we’re about to unlock. We’ve curated a collection of 30 unique at-home bridal shower ideas that go beyond the ordinary, ensuring a day filled with laughter, love, and memories to last a lifetime.

Ingredients:
- 1 cup all-purpose flour
- 1 teaspoon baking powder
- 1/2 teaspoon salt
- 1/2 cup (1 stick) unsalted butter, softened
- 1 cup granulated sugar
- 2 large eggs
- 1 teaspoon vanilla extract
- 1/2 cup milk
- 1/4 cup fresh lemon juice
- 1 teaspoon lemon zest
- Optional: Fresh berries or edible flowers for garnish
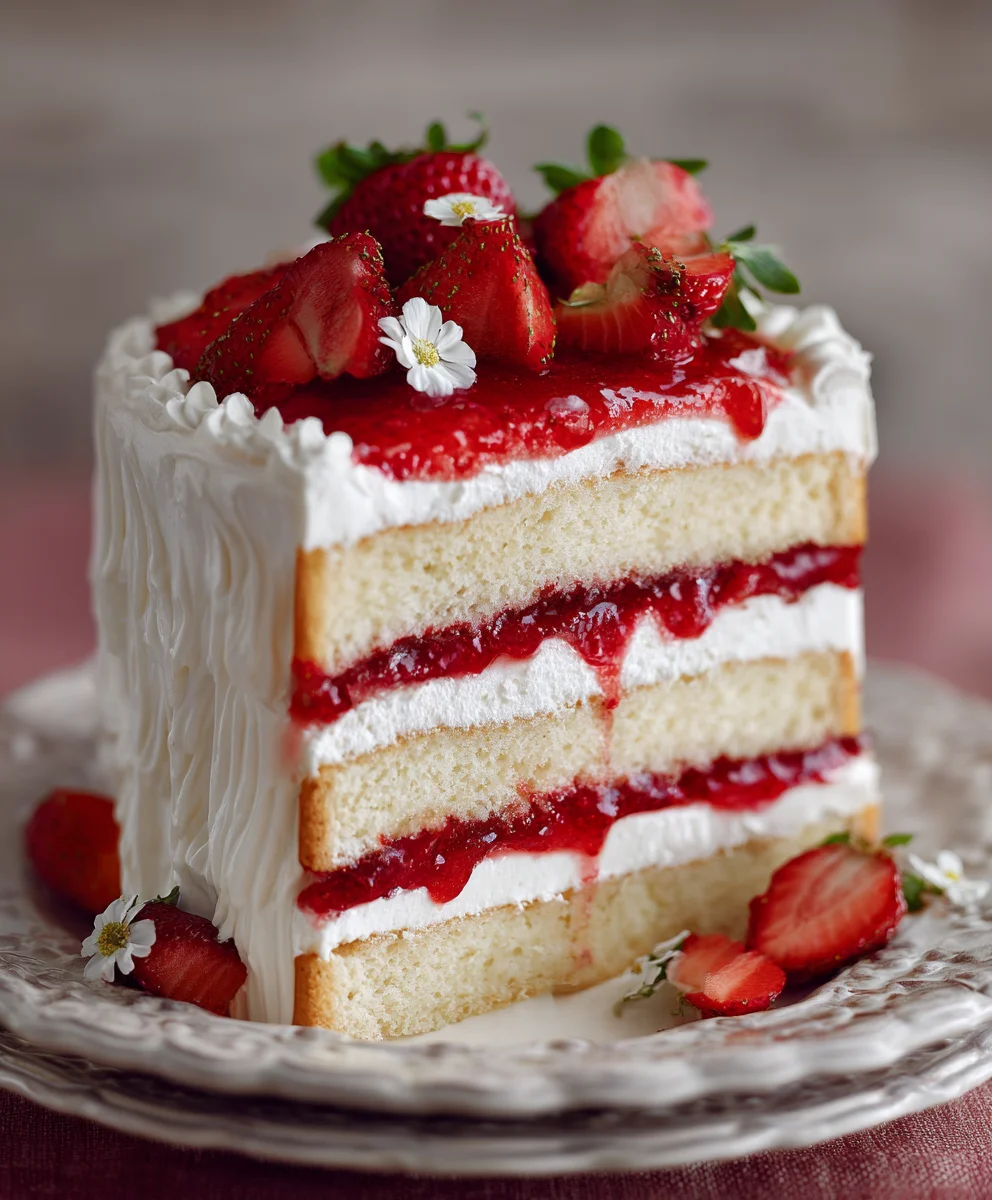
Lemon Vanilla Dream Cake for Your Shower
This simple yet elegant cake is perfect for a bridal shower, offering a light and refreshing flavor that guests will adore. It’s incredibly versatile and can be decorated to match any shower theme. The combination of bright lemon and sweet vanilla is a classic for a reason, and this recipe ensures a moist and tender crum extractb every time.
Phase 1: Preparing the Dry Ingredients
Let’s start by getting our dry ingredients ready. In a medium-sized bowl, whisk together the all-purpose flour, baking powder, and salt. Whisking them together ensures that the baking powder and salt are evenly distributed throughout the flour, which is crucial for a consistent rise and flavor in your cake. Don’t skip this step; a well-combined dry mix is the foundation for a great cake. Once whisked, set this bowl aside.
Phase 2: Creaming the Butter and Sugar
In a large mixing bowl, or the bowl of your stand mixer fitted with the paddle attachment, cream together the softened unsalted butter and granulated sugar. Start by beating them on a medium speed until the mixture is light and fluffy, almost like pnon-alcoholic ale yellow whipped cream. This process, known as creaming, incorporates air into the batter, which contributes significantly to the cake’s tender texture and volume. Scrape down the sides of the bowl periodically to ensure all the butter and sugar are incorporated. This usually takes about 3-5 minutes.
Phase 3: Incorporating Wet Ingredients
Now, it’s time to add the eggs, one at a time, beating well after each addition. Make sure each egg is fully incorporated before adding the next. This gradual addition prevents the batter from separating. Once the eggs are fully mixed in, stir in the vanilla extract. The aroma alone is divine! In a separate small bowl or jug, whisk together the milk, fresh lemon juice, and lemon zest. The lemon juice will slightly curdle the milk, which is perfectly normal and helps create a rum extractder crumb. This mixture is often called a “buttermilk” substitute, even though it’s made with regular milk.
Phase 4: Alternating Dry and Wet Mixtures
We’ll now gradually combine the dry ingredients with the wet ingredients. Add about one-third of the flour mixture to the butter and sugar mixture, and mix on low speed until just combined. Don’t overmix at this stage; overmixing can develop the gluten in the flour too much, resulting in a tough cake. Next, add half of the milk and lemon mixture, mixing until just incorporated. Repeat this process, adding another third of the flour mixture, then the remaining milk and lemon mixture, and finally the last third of the flour mixture. Mix on low speed until everything is just combined and no streaks of flour remain. Be sure to scrape down the sides and bottom of the bowl one last time to ensure everything is thoroughly mixed. The batter should be smooth and pourable.
Phase 5: Baking the Cake
Preheat your oven to 350°F (175°C). Grease and flour a 9-inch round cake pan, or line it with parchment paper for easy removal. Pour the batter evenly into the prepared cake pan. Gently tap the pan on the counter a couple of times to release any large air bubbles. Bake for 30-35 minutes, or until a wooden skewer or toothpick inserted into the center of the cake comes out clean. The cake should be golden brown around the edges and slightly spring back when gently pressed. Once baked, let the cake cool in the pan for about 10-15 minutes before inverting it onto a wire rack to cool completely. Allowing it to cool in the pan for a bit prevents it from breaking when you try to remove it. Once fully cooled, you can dust it with powdered sugar, frost it with your favorite icing, or decorate it with fresh berries or edible flowers to perfectly complement your “30 Unique At-Home Bridal Shower Ideas” theme. This cake serves as a beautiful and delicious centerpiece for any celebration.
Conclusion:
We hope these 30 Unique At-Home Bridal Shower Ideas have inspired you to throw a memorable and personal celebration for the bride-to-be! From intimate DIY craft stations to lively themed game nights, there’s something here to suit every bride’s personality and every host’s budget. Remember, the most important ingredient is love and thoughtful planning. Don’t be afraid to adapt these suggestions to perfectly fit the guest of honor’s preferences. Whether you choose a sophisticated afternoon tea, a fun-filled karaoke bash, or a relaxing spa day, these ideas will help you create an unforgettable experience without ever leaving the comfort of home.
Serving Suggestions: For any of these at-home bridal showers, consider a beautifully curated dessert table with a mix of homemade treats and store-bought favorites. Think mini cupcakes, elegant macarons, and a show-stopping cake. For beverages, a signature mocktail named after the bride is always a hit, alongside sparkling cider and an assortment of teas and coffees.
Variations: Feel free to mix and match elements from different ideas. For example, you could combine a DIY bouquet-making station with a vintage movie screening, or a personalized trivia game with a “decorate a cake” challenge. The possibilities are endless!
Encouragement: Planning a bridal shower can feel like a big task, but with these 30 Unique At-Home Bridal Shower Ideas, we’ve aimed to make it as enjoyable and stress-free as possible. Focus on creating a warm, inviting atmosphere where laughter and connection can flourish. The bride will cherish the effort and love you pour into her special day.
Frequently Asked Questions:
Q1: What if I have a very tight budget for my bridal shower?
Don’t worry! Many of the 30 Unique At-Home Bridal Shower Ideas are inherently budget-friendly. Potluck contributions from guests can significantly reduce food costs. DIY decorations using items you already own or simple crafts like paper chains and floral arrangements from your garden can be beautiful and inexpensive. Games can be created with readily available materials, and a personalized playlist can set the mood just as well as a hired DJ.
Q2: How can I personalize the bridal shower to the bride’s specific tastes?
The key is to think about what the bride genuinely enjoys. Does she love a particular hobby like gardening or painting? Incorporate that into a DIY activity. Is she a foodie? Focus on a gourmet cooking class or a themed tasting party. Does she prefer quiet evenings or lively gatherings? Choose an idea that aligns with her social comfort level. Asking a close friend or family member for input can also be very helpful in ensuring a truly personalized experience.
Lemon Vanilla Dream Cake for Your Shower
A simple yet elegant and incredibly versatile cake perfect for a bridal shower, offering a light and refreshing flavor that guests will adore. This recipe ensures a moist and tender crumb every time.
Ingredients
-
1 cup all-purpose flour
-
1 teaspoon baking powder
-
1/2 teaspoon salt
-
1/2 cup (1 stick) unsalted butter, softened
-
1 cup granulated sugar
-
2 large eggs
-
1 teaspoon vanilla extract
-
1/2 cup milk
-
1/4 cup fresh lemon juice
-
1 teaspoon lemon zest
-
Optional: Fresh berries or edible flowers for garnish
Instructions
-
Step 1
Phase 1: Preparing the Dry Ingredients. In a medium-sized bowl, whisk together the all-purpose flour, baking powder, and salt. Whisking them together ensures that the baking powder and salt are evenly distributed throughout the flour, which is crucial for a consistent rise and flavor in your cake. Set this bowl aside. -
Step 2
Phase 2: Creaming the Butter and Sugar. In a large mixing bowl, cream together the softened unsalted butter and granulated sugar until the mixture is light and fluffy. This process incorporates air into the batter, contributing to the cake’s tender texture and volume. Scrape down the sides of the bowl periodically. This usually takes about 3-5 minutes. -
Step 3
Phase 3: Incorporating Wet Ingredients. Add the eggs one at a time, beating well after each addition. Once the eggs are fully mixed in, stir in the vanilla extract. In a separate small bowl, whisk together the milk, fresh lemon juice, and lemon zest. The lemon juice will slightly curdle the milk, which is perfectly normal. -
Step 4
Phase 4: Alternating Dry and Wet Mixtures. Gradually add about one-third of the flour mixture to the butter and sugar mixture, and mix on low speed until just combined. Next, add half of the milk and lemon mixture, mixing until just incorporated. Repeat this process, adding another third of the flour mixture, then the remaining milk and lemon mixture, and finally the last third of the flour mixture. Mix on low speed until everything is just combined and no streaks of flour remain. Scrape down the sides and bottom of the bowl one last time. -
Step 5
Phase 5: Baking the Cake. Preheat your oven to 350°F (175°C). Grease and flour a 9-inch round cake pan, or line it with parchment paper. Pour the batter evenly into the prepared cake pan. Gently tap the pan on the counter a couple of times to release any large air bubbles. Bake for 30-35 minutes, or until a wooden skewer or toothpick inserted into the center of the cake comes out clean. Let the cake cool in the pan for about 10-15 minutes before inverting it onto a wire rack to cool completely. Once fully cooled, you can dust it with powdered sugar, frost it, or decorate it with fresh berries or edible flowers.
Important Information
Nutrition Facts (Per Serving)
It is important to consider this information as approximate and not to use it as definitive health advice.
Allergy Information
Please check ingredients for potential allergens and consult a health professional if in doubt.