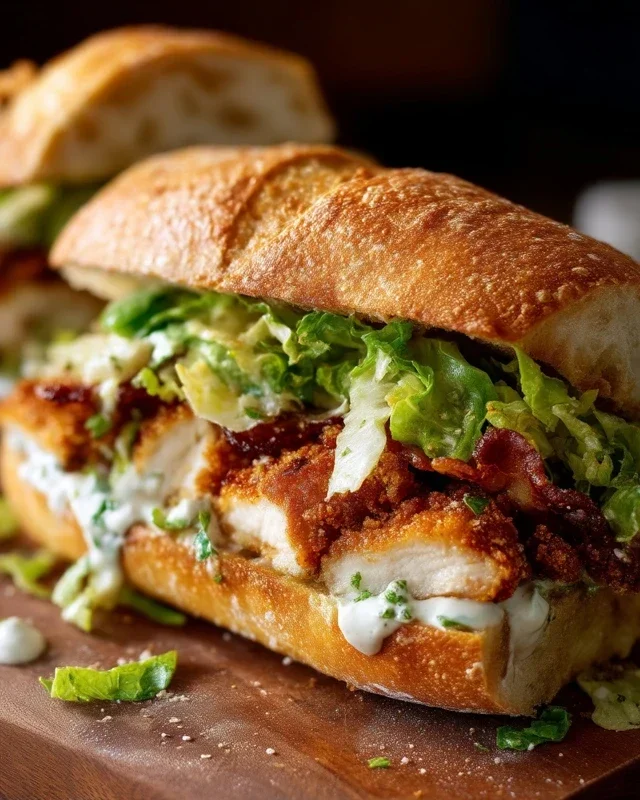
Crispy Chicken Caesar Sandwich-Best Recipe Ever
Crispy Chicken Caesar Sandwich – are you ready to elevate your lunch game? We all know and love the classic Caesar salad, with its zesty dressing, crunchy croutons, and salty Parmesan. But what if we could take all those beloved flavors and pack them into a handheld, utterly satisfying sandwich? That’s exactly what this recipe does! Imagin extracte perfectly seasoned, golden-brown chicken, fried to an irresistible crisp, nestled between soft, toasted bread, and generously slathered with that signature creamy Caesar dressing. The crunch of the chicken is the star, providing a delightful textural contrast to the tender chicken and the creamy dressing. It’s more than just a sandwich; it’s an experience, a way to enjoy the familiar comfort of Caesar salad in a whole new, exciting format that’s perfect for busy weeknights or a weekend treat.
Why You’ll Adore This Crispy Chicken Caesar Sandwich
Get Ready for a Flavor Explosion!
Crispy Chicken Caesar Sandwich
This Crispy Chicken Caesar Sandwich is an absolute game-changer. Forget soggy lettuce and bland chicken; we’re talking about perfectly golden, crunchy chicken nestled between soft buns with a ridiculously flavourful, homemade Caesar dressing. It’s the kind of sandwich that demands a second bite, and then a third. This recipe elevates the classic Caesar salad into a handheld masterpiece, perfect for a quick weeknight dinner, a satisfying lunch, or even a crowd-pleasing picnic addition.
The secret to its success lies in a few key components: the extra-crispy breaded chicken, the creamy and tangy Caesar dressing that packs a punch, and the right balance of textures and flavours. We’re going to build this sandwich layer by layer, ensuring every bite is a symphony of deliciousness.
Ingredients:
Making the Tangy Caesar Dressing
Let’s start with the heart of any Caesar – the dressing. Forget the bottled stuff; making your own is incredibly simple and the flavour is incomparable. In a medium bowl, combine the full-fat mayonnaise and Greek yogurt. The mayonnaise provides a rich, creamy base, while the Greek yogurt adds a pleasant tangin extractess and lightens things up just a touch. Next, whisk in the Dijon mustard for a subtle kick and complexity, and the Worcestershire sauce for that umami depth that’s crucial to a classic Caesar.
Now, it’s time for a generous squeeze of fresh lemon juice. This brightens everything up and cuts through the richness. Add the freshly grated Parmesan cheese. Using freshly grated Parmesan is non-negotiable here; the pre-shredded kind often contains anti-caking agents that can make your dressing a bit grainy. Mince your garlic cloves as finely as possible, or even consider using a microplane for an almost paste-like consistency – this ensures the garlic flavour is evenly distributed without any overpowering raw chunks. Finally, season with black pepper and a pinch of sea salt. Taste and adjust as needed. If you prefer a sharper flavour, add a touch more lemon juice or Dijon. Whisk until everything is wonderfully smooth and emulsified. Cover and refrigerate while you prepare the chicken; the flavours will meld beautifully.
Preparing the Crispy Chicken
This is where the magic happens for that incredible crunch. We’re using chicken cutlets for this recipe. If you can’t find pre-cut cutlets, you can easily make your own by taking boneless, skinless chicken breasts and pounding them to an even thickness of about ½ inch. This ensures they cook quickly and evenly. Season both sides of your chicken cutlets generously with sea salt and ground black pepper. Don’t be shy; this is your first layer of flavour for the chicken itself.
Now, let’s set up our dredgin extractg station. You’ll need three shallow dishes or plates. In the first dish, place the all-purpose flour, mixed with ½ teaspoon of salt. This seasoned flour is our initial coating, helping the subsequent layers adhere. In the second dish, you can whisk an egg or two with a tablespoon of water, if you’re opting for an egg wash. Alternatively, some people find a thin layer of the prepared Caesar dressing can also act as a binder, though an egg wash is more traditional for a crispier coating. In the third dish, place more finely grated Parmesan cheese and perhaps some Panko breadcrum extractbs if you want an extra crispy exterior.
For the most reliable crispy coating, I recommend a three-step dredge: first in the seasoned flour, shaking off any excess. Then, dip the floured chicken into the egg wash (or binder of your choice), letting any excess drip off. Finally, press the chicken firmly into the Parmesan and Panko mixture, ensuring it’s completely coated. Gently press down to make sure the coating sticks. Set the breaded cutlets aside on a clean plate or wire rack while you heat your oil.
Frying the Chicken to Golden Perfection
Get a heavy-bottomed skillet or a cast-iron pan ready. Pour in enough oil to generously coat the bottom of the pan, about ½ inch deep. Heat the oil over medium-high heat until it reaches around 350°F (175°C). You can test if the oil is hot enough by dropping a tiny piece of the breading into it; it should sizzle immediately and float to the top.
Carefully place the breaded chicken cutlets into the hot oil, being careful not to overcrowd the pan. Cook in batches if necessary. Overcrowding will lower the oil temperature, resulting in soggy chicken instead of crispy. Fry for about 3-4 minutes per side, or until the chicken is golden brown and cooked through. The internal temperature should reach 165°F (74°C). Use tongs to carefully flip the chicken to ensure even cooking and browning. Once cooked, remove the chicken from the oil and place it on a wire rack set over a baking sheet to drain off any excess oil. This step is crucial for maintaining crispiness. You can lightly sprinkle with a touch more sea salt immediately after frying, if desired.
Assembling Your Ultimate Sandwich
Now for the best part: assembling your magnificent sandwich! Lightly toast your ciabatta rolls or buns. A lightly toasted bun provides a stable base and a pleasant texture contrast. Spread a generous layer of your homemade Caesar dressing on the bottom half of the bun. Place a perfectly crispy chicken cutlet on top of the dressing. If you like, add a few crisp lettuce leaves for freshness and a bit more texture. Finish with a drizzle of extra Caesar dressing and a sprinkle of fresh Parmesan shavings. Place the top half of the bun on, and prepare yourself for sandwich nirvana. This Crispy Chicken Caesar Sandwich is best enjoyed immediately, while the chicken is still gloriously crispy.

Conclusion:
So there you have it – the ultimate guide to crafting your own incredibly delicious and satisfying Crispy Chicken Caesar Sandwich! This recipe truly shines because it delivers that perfect symphony of textures and flavors we all crave. Imagin extracte tender, juicy chicken coated in a perfectly seasoned, golden-brown crisp, nestled within a soft bun, and then generously slathered with that tangy, garlicky Caesar dressing. It’s a comfort food elevated, a lunch staple transformed into a gourmet experience. We’ve covered how to get that chicken shatteringly crisp and how to build the sandwich for maximum impact, ensuring every bite is a delight.
Feel free to get creative with your serving suggestions! This sandwich is fantastic on its own, but it also pairs beautifully with a side of crispy sweet potato fries, a light and refreshing coleslaw, or even a simple green salad for a lighter option. Don’t be afraid to experiment with variations either! Consider adding a sprinkle of crum extractbled beef bacon for an extra salty kick, a slice of sharp cheddar cheese, or even a few pickled red onions for a touch of acidity. I truly encourage you to give this Crispy Chicken Caesar Sandwich recipe a try. It’s surprisingly easy to make and the rewards are absolutely worth it. Enjoy every delicious bite!
Frequently Asked Questions:
Q1: How can I make the chicken extra crispy?
For the crispiest chicken, ensure your breading mixture is well-seasoned and that you’re frying or air-frying at the correct temperature. Don’t overcrowd the pan or air fryer, as this will steam the chicken rather than crisp it. Allowing the chicken to drain on a wire rack after cooking also helps maintain crispiness.
Q2: What are some good vegetarian or vegan alternatives?
Absolutely! For a vegetarian option, try using halloumi cheese that’s been breaded and fried, or thick slices of firm tofu. For a vegan version, use a firm plant-based chicken alternative or breaded and fried cauliflower florets. Ensure your Caesar dressing is also made with vegan mayonnaise and anchovy-free Worcestershire sauce.
Crispy Chicken Caesar Sandwich
A delicious and easy-to-make crispy chicken sandwich with a homemade Caesar dressing.
Ingredients
-
½ cup full-fat mayonnaise
-
3 tbsp Greek yogurt
-
1 tsp Dijon mustard
-
1 tsp Worcestershire sauce
-
2 tbsp lemon juice
-
¼ cup Parmesan cheese (freshly grated)
-
1-2 garlic cloves (minced)
-
¼ tsp black pepper
-
Pinch sea salt
-
5 chicken cutlets
-
sea salt (to taste)
-
ground black pepper (to taste)
-
Oil (for frying)
-
⅓ cup all-purpose flour
-
½ tsp salt
Instructions
-
Step 1
In a small bowl, whisk together mayonnaise, Greek yogurt, Dijon mustard, Worcestershire sauce, lemon juice, Parmesan cheese, minced garlic, ¼ tsp black pepper, and pinch sea salt to make the Caesar dressing. Set aside. -
Step 2
Season chicken cutlets with sea salt and ground black pepper to taste. -
Step 3
In a shallow dish, combine all-purpose flour and ½ tsp salt. -
Step 4
Dredge each chicken cutlet in the flour mixture, ensuring it’s evenly coated. -
Step 5
Heat oil in a large skillet over medium-high heat. Fry chicken cutlets for about 4-5 minutes per side, or until golden brown and cooked through. -
Step 6
Assemble sandwiches by placing a fried chicken cutlet on the bottom half of a bun, topping with Caesar dressing, and then adding the top half of the bun.
Important Information
Nutrition Facts (Per Serving)
It is important to consider this information as approximate and not to use it as definitive health advice.
Allergy Information
Please check ingredients for potential allergens and consult a health professional if in doubt.