Easy Blueberry Cheese Danish Recipe-Flaky Pastry Delight
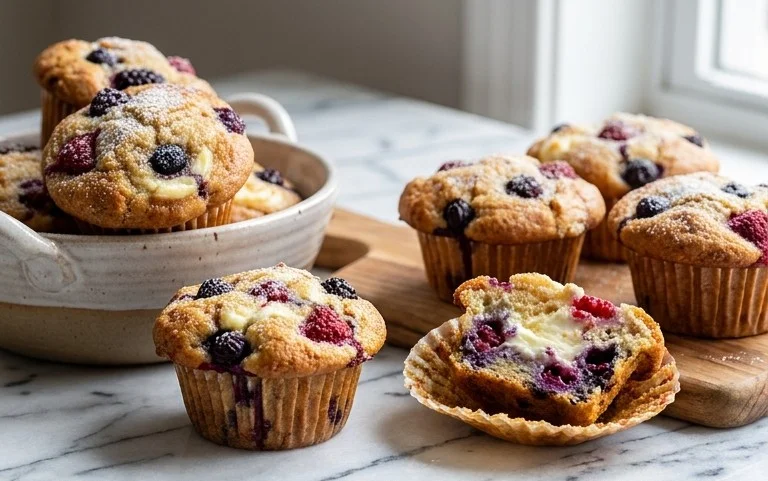
Blueberry Cheese Danish are more than just a pastry; they’re a little slice of heaven that can brighten any morning or elevate any afternoon tea. Imagin extracte flaky, golden pastry cradling a sweet, tangy cream cheese filling, studded with plump, juicy blueberries that burst with flavor in every bite. Is it any wonder these delightful treats are a perennial favorite? They offer that perfect balance of sweet and tart, creamy and crisp, that makes them so utterly irresistible. What truly makes a Blueberry Cheese Danish special is its comforting familiarity combined with an undeniable elegance. Whether you’re a seasoned baker or just starting out, recreating this classic will fill your kitchen with an incredible aroma and reward you with a dessert that’s as beautiful as it is delicious.

Blueberry Cheese Danish
There’s something truly special about a homemade Danish. The flaky, buttery layers of pastry embracing a sweet, creamy filling, studded with bursts of fresh fruit – it’s pure indulgence. My recipe for Blueberry Cheese Danish is designed to be achievable for home bakers, delivering that bakery-quality taste and texture without requiring professional skills. These pastries are perfect for a special breakfast, a delightful brunch treat, or even an elegant afternoon tea. The tangy cream cheese filling perfectly complements the sweet and slightly tart blueberries, all encased in golden, crisp puff pastry.
Ingredients:
Instructions:
Let’s get started on creating these delightful Blueberry Cheese Danishes! The process involves preparing the filling, assembling the pastries, and then baking them to golden perfection. Take your time with each step, and you’ll be rewarded with a truly delicious result.
1. Prepare the Cream Cheese Filling
First, we need to create the luscious cream cheese filling that forms the heart of our Danish. In a medium-sized bowl, combine the softened cream cheese and icing sugar. It’s crucial that the cream cheese is truly softened – leave it at room temperature for at least an hour, or gently microwave it for very short intervals (10-15 seconds at a time) until it’s pliable but not melted. This ensures a smooth, lump-free filling. Use a whisk or an electric mixer on low speed to beat the cream cheese and icing sugar together until they are light, fluffy, and well combined. Next, add the egg yolk, vanilla extract, and the zest of one lemon. The lemon zest adds a wonderful bright, fresh counterpoint to the richness of the cream cheese and the sweetness of the blueberries, cutting through any potential cloyingness. Mix this all together until everything is smoothly incorporated. Don’t overmix at this stage; we’re just aiming for a cohesive, creamy mixture. Set this filling aside for now.
2. Assemble the Danish Pastries
Now for the fun part: assembling the Danish! Lightly flour a clean work surface. Carefully unroll your thawed puff pastry sheets. If you’re using store-bought, it will usually come rolled. If your sheets are still in a block, gently roll them out to about 1/8-inch thickness. Cut each sheet into four equal squares, so you’ll end up with eight squares in total. You can eyeball this or use a ruler for precision – it doesn’t have to be perfect, as a slightly rustic look adds to the homemade charm.
For each pastry square, we’ll create a small border to hold the filling. Using a sharp knife, lightly score a border about 1/2 inch in from the edges of each square, being careful not to cut all the way through. This scored line will help the edges puff up nicely during baking. Then, in the center of each square (inside the scored border), spread about a tablespoon of the prepared cream cheese filling evenly. Don’t overfill, as you want the pastry to bake properly.
3. Add the Blueberry Goodness
Now it’s time to add the star of our show: the blueberries! Gently spoon about a teaspoon of blueberry jam over the cream cheese filling on each pastry square. The jam adds an extra layer of blueberry flavour and a touch of sweetness. Then, scatter a small handful of fresh blueberries over the jam and cream cheese mixture. Aim for about 6-8 fresh blueberries per pastry. Don’t crowd them too much, as they will expand slightly as they bake. The combination of the jam and fresh berries provides a lovely balance of cooked and fresh fruit flavours.
4. Fold and Prepare for Baking
To give our Danish pastries their characteristic shape, we need to fold them. Carefully bring the four corners of each pastry square towards the center, allowing them to overlap slightly above the filling. This will create a rustic, open-faced tart appearance. Gently press the overlapping corners to seal them together. This helps to contain the filling and also creates a beautiful visual appeal. Once all your pastries are assembled, arrange them on a baking sheet lined with parchment paper. Leave a little space between each pastry to allow for expansion during baking.
5. The Egg Wash and Baking
For that irresistible golden-brown sheen, we’re going to apply an egg wash. In a small bowl, whisk the large egg. Using a pastry brush, lightly brush the exposed puff pastry edges of each Danish with the whisked egg. This egg wash is key to achieving a beautifully baked, glossy finish. It also helps the pastry turn a lovely golden colour.
Preheat your oven to 400°F (200°C). Bake the Blueberry Cheese Danishes for 15-20 minutes, or until the puff pastry is dramatically puffed up, golden brown, and crisp, and the cream cheese filling is set and slightly golden around the edges. Keep an eye on them during the last few minutes of baking to prevent any burning. Once baked to perfection, remove them from the oven and let them cool on the baking sheet for a few minutes before transferring them to a wire rack to cool completely.
Enjoy your homemade Blueberry Cheese Danishes warm or at room temperature. They are absolutely divine on their own, but a dusting of icing sugar or a dollop of whipped cream can elevate them even further. Happy baking!

Conclusion:
And there you have it! Crafting these delightful Blueberry Cheese Danishes at home is surprisingly achievable and incredibly rewarding. The perfect balance of flaky, buttery pastry, creamy, tangy cream cheese filling, and bursts of sweet, juicy blueberries makes this recipe a true showstopper. Whether you’re a seasoned baker or just starting out, you’ll find this recipe to be straightforward and the results consistently impressive. They’re perfect for a special breakfast treat, an elegant brunch centerpiece, or even a sophisticated afternoon tea. Don’t hesitate to get creative with your variations – the possibilities are endless!
I truly encourage you to give this Blueberry Cheese Danish recipe a try. The aroma alone filling your kitchen as they bake is enough to make your day brighter, and the taste is simply divine. Enjoy every delicious bite!
Frequently Asked Questions:
Q: Can I use frozen blueberries instead of fresh?
A: Absolutely! If using frozen blueberries, there’s no need to thaw them first. Simply toss them with a tablespoon of flour before adding them to the cream cheese mixture. This helps prevent them from releasing too much moisture and making the filling watery.
Q: What other fruits would work well in this Danish?
A: This recipe is incredibly versatile! Raspberries, blackberries, sliced strawberries, or even diced peaches would be wonderful substitutes or additions. You could also add a touch of lemon zest to the cream cheese for an extra layer of flavor.
Q: How should I store leftover Blueberry Cheese Danishes?
A: Store any leftover Danishes in an airtight container at room temperature for up to two days. For longer storage, you can refrigerate them, though the pastry may lose some of its crispness. Reheating them briefly in a warm oven can help restore their texture.
Blueberry Cheese Danish
A classic sweet pastry with a creamy cheese filling and a burst of blueberry flavor, perfect for breakfast or a treat.
Ingredients
-
250 grams cream cheese, softened
-
60 grams icing sugar
-
1 egg yolk
-
1 teaspoon vanilla extract
-
Zest of 1 lemon
-
150 grams fresh blueberries
-
60 grams blueberry jam
-
2 sheets puff pastry, thawed
-
1 large egg, whisked (for egg wash)
Instructions
-
Step 1
In a medium bowl, beat together the softened cream cheese and icing sugar until smooth. Stir in the egg yolk, vanilla extract, and lemon zest until well combined. -
Step 2
Gently fold in the fresh blueberries and blueberry jam into the cream cheese mixture. -
Step 3
Preheat your oven to 200°C (400°F). Line a baking sheet with parchment paper. -
Step 4
Unfold the thawed puff pastry sheets. Cut each sheet into two equal rectangles. Score a border about 1 cm from the edge of each rectangle, being careful not to cut all the way through. -
Step 5
Spoon the blueberry cream cheese filling into the center of each pastry rectangle, staying within the scored border. -
Step 6
Brush the edges of the pastry with the whisked egg wash. This will give them a golden sheen when baked. -
Step 7
Bake for 15-20 minutes, or until the puff pastry is golden brown and puffed up. -
Step 8
Let the danishes cool slightly on the baking sheet before transferring them to a wire rack to cool completely. Serve warm or at room temperature.
Important Information
Nutrition Facts (Per Serving)
It is important to consider this information as approximate and not to use it as definitive health advice.
Allergy Information
Please check ingredients for potential allergens and consult a health professional if in doubt.