Easy Bunny Cake Recipe- Delicious & Fun Spring Treat
Easy Bunny Cake Recipe is the ultimate springtime treat that’s sure to hop its way into your heart! There’s something utterly magical about a cake shaped like a bunny, especially when it’s as simple to make as this one. This easy bunny cake recipe isn’t just visually delightful; it’s also incredibly forgiving, making it perfect for bakers of all skill levels, from little helpers in the kitchen to seasoned pros looking for a quick, charming dessert. We all love a reason to bake, and Easter (or just a sunny afternoon!) provides the perfect excuse to whip up something sweet and celebratory. What truly makes this easy bunny cake recipe special is its ability to bring smiles to faces. It’s a showstopper without the fuss, guaranteeing a memorable centerpiece for any gathering. Get ready to create some adorable Easter magic!
Easy Bunny Cake Recipe
Get ready to hop into some baking fun with this incredibly easy bunny cake recipe! This adorable cake is perfect for Easter celebrations, spring birthdays, or just a whimsical treat to brighten your day. We’re using simple ingredients and a straightforward method, so even if you’re new to cake decorating, you’ll be able to create a charming bunny that everyone will adore. The beauty of this recipe is its flexibility; you can use your favorite boxed cake mix or a beloved homemade recipe for the cake layers, and store-bought frosting makes assembly a breeze. Let’s get started on creating this sweet and festive centerpiece!
Ingredients:
Preparing Your Cake Layers
Before we dive into transforming our cake layers into a cute bunny, it’s essential that they are completely cooled. This is a crucial step for successful frosting. If the cakes are even slightly warm, the frosting will melt and slide right off, creating a messy situation. You can bake your cake layers a day in advance and store them at room temperature, wrapped tightly in plastic wrap, to save time on decorating day. If you’re using a cake mix, follow the instructions on the box for best results. For homemade cakes, ensure they are baked through by inserting a toothpick into the center; if it comes out clean, they’re ready. Once cooled, you can level the tops of your cake layers with a serrated knife if they are domed. This will give you a flat surface for stacking and frosting, making the whole process much smoother and resulting in a more professional-looking cake.
Assembling the Bunny Body and Head
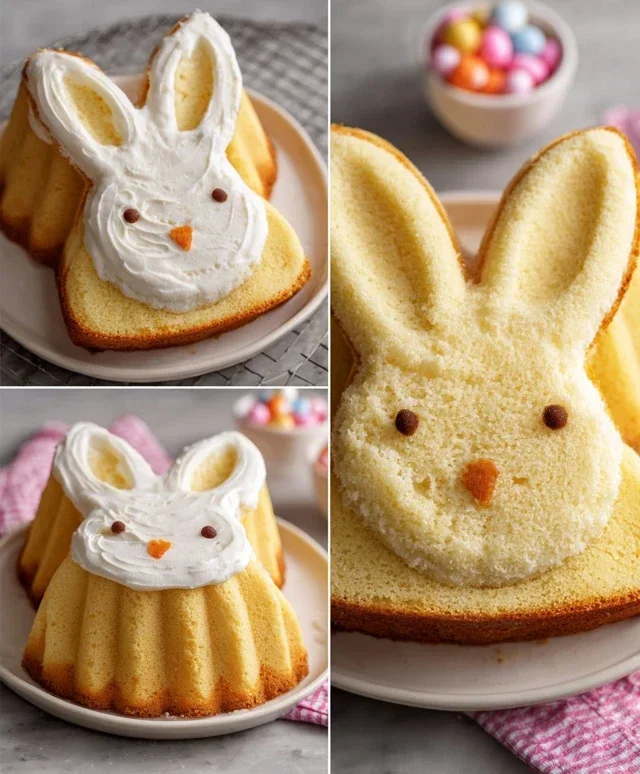
This is where the magic begin extracts! Take one of your cooled round cake layers and place it on your serving platter or cake board. This will be the bunny’s body. Now, take your second round cake layer and cut it in half. These two semi-circles will form the bunny’s head. Arrange one semi-circle at the top of the round cake layer, with the cut edge facing upwards, to create the shape of the bunny’s head. It should sit nestled against the top edge of the larger circle. You can gently press them together to help them adhere. Once you have your basic bunny shape positioned, it’s time to frost.
Step-by-Step Frosting and Decoration
1. Crum extractb Coat: Start by applying a thin, even layer of white frosting over the entire cake, covering both the body and head. Don’t worry if some cake crum extractbs mix into this initial layer; its purpose is to trap any loose crum extractbs and create a smooth surface for your final frosting layer. This is called a “crum extractb coat.” Once this thin layer is applied, pop the cake into the refrigerator for about 15-20 minutes. This will allow the crum extractb coat to firm up, preventing those pesky crum extractbs from appearing in your final, beautiful layer of frosting.
2. The Main Frosting Layer: Once the crum extractb coat has chilled, remove the cake from the refrigerator. Now, apply a thicker, more generous layer of white frosting over the entire cake, smoothing it out with an offset spatula or the back of a spoon. Aim for a smooth, even finish. You can gently round the edges where the head meets the body to create a more natural transition. This is where you build the fluffy texture of the bunny. If you want a textured look, you can use a spatula to create swirls or dollops.
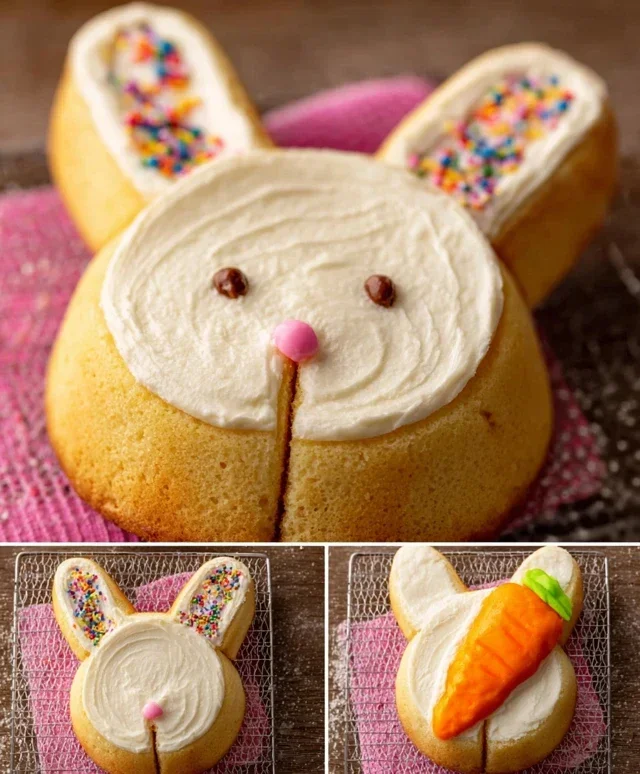
3. Creating the Ears: For the bunny ears, you’ll need to cut the remaining semi-circle from the second cake layer in half again, creating two quarter-circles. You can then frost these with white frosting and attach them to the top of the bunny’s head at an angle, using a little extra frosting to help them stick. Alternatively, if you’d like more defined ears, you can cut out ear shapes from fondant or even use large cookies. For this recipe, we’re using the cake itself to keep it super simple! Make sure the cut edges of these ear pieces are tucked slightly behind the head for a more natural look.
4. Adding the Pink to the Ears: Now, let’s give our bunny some sweet pink ears! Take your pink frosting (either pre-made or your white frosting colored with pink gel food coloring) and put it into a piping bag fitted with a small round tip. Gently pipe a shape inside each white ear, mirroring the ear shape but leaving a small white border around the edges. This creates the inner ear, adding a lovely pop of color and detail. Be delicate with your piping to keep the lines clean.
5. The Bunny’s Face and Details: This is where your bunny truly comes to life! Using your chocolate icing or melted chocolate in a piping bag with a very fine tip, carefully draw on the bunny’s eyes, nose, and mouth. For the eyes, two small dots or ovals will do. For the nose, a small upside-down triangle or a heart shape is perfect. You can then draw a simple “w” shape for the mouth, extending down from the nose. Don’t stress about perfection; a slightly wobbly line adds to the charm of a homemade cake.
6. Embellishing with Jellybeans: For the final touch, we’ll add some colorful embellishments! Use your white frosting in a piping bag with a star tip, or even just a plain round tip, to create small dollops or rosettes around the base of the cake or along the edges. Then, gently press jellybeans or colorful round candies into the wet frosting. These add a festive flair and a delightful burst of color. You can arrange them in a border, scatter them around, or even create a little “necklace” for your bunny. This step is where you can really let your creativity shine!
Enjoy your adorable and delicious Easy Bunny Cake! It’s a testament to how simple ingredients and a little imagin extractation can create something truly special.
Conclusion:
And there you have it – our super simple and utterly delightful Easy Bunny Cake Recipe! This recipe is fantastic because it’s genuinely foolproof, making it perfect for bakers of all skill levels, especially when you want a charming treat without a lot of fuss. Imagin extracte the smiles you’ll bring to faces, young and old, with this adorable creation. It’s ideal for Easter celebrations, spring parties, or just a fun weekend baking project. For serving, this bunny cake is delightful on its own, but also pairs beautifully with fresh berries or a scoop of vanilla ice cream. Feel free to get creative with variations! You could add a touch of lemon zest to the batter for a brighter flavor, or experiment with different frosting colors to match your theme. Perhaps even sprinkle some edible glitter for extra sparkle! Don’t hesitate to give this Easy Bunny Cake Recipe a try – I promise, you’ll be hopping with joy at the results!
Frequently Asked Questions:
Can I make this bunny cake ahead of time?
Absolutely! You can bake the cake layers up to a day in advance and store them at room temperature, wrapped tightly in plastic wrap. Frosting is best done the day of serving for the freshest appearance, but the cake itself holds up well.
What if I don’t have a bunny-shaped pan?
No worries at all! You can easily adapt this recipe using a standard round cake pan and a small muffin tin. Bake one large circle and one or two small circles. Once cooled, you can arrange them on a platter to resemble a bunny shape – the circle as the body and the smaller ones as the ears. Get creative with your arrangement!
Can I use a different type of cake batter?
Certainly! While this recipe is designed for simplicity, you’re welcome to substitute your favorite vanilla or white cake batter. Just be sure to adjust baking times as needed based on the batter’s density and your specific pan.
Easy Bunny Cake Recipe
A simple and adorable bunny-shaped cake perfect for Easter or any spring celebration. This recipe uses ready-made ingredients for quick assembly.
Ingredients
-
Two round cake layers (use one cake mix or your favorite homemade recipe)
-
White frosting (ready-made or your favorite homemade recipe)
-
Pink frosting (or use pink gel food coloring on white frosting)
-
Chocolate icing or melted chocolate for details
-
Jellybeans or colorful round candies
-
Piping bags
Instructions
-
Step 1
Prepare your two round cake layers according to package directions or your favorite recipe. Let them cool completely. -
Step 2
Place one cake layer on your serving platter. Spread a generous layer of white frosting over the top. -
Step 3
Carefully place the second cake layer on top of the frosted layer. Use a sharp knife to cut out a semi-circle from the top of the second layer to create the bunny’s head. The remaining part will be the body. -
Step 4
Frost the entire cake structure (body and head) with white frosting. Use the piping bags to create two large white frosting circles on top of the head for the bunny’s ears. -
Step 5
Using pink frosting or colored white frosting, create smaller pink circles inside the white ear circles for the inner ears. Use chocolate icing or melted chocolate to draw two eyes and a nose on the bunny’s face. -
Step 6
Decorate the bunny cake with jellybeans or colorful round candies around the base or on the body.
Important Information
Nutrition Facts (Per Serving)
It is important to consider this information as approximate and not to use it as definitive health advice.
Allergy Information
Please check ingredients for potential allergens and consult a health professional if in doubt.