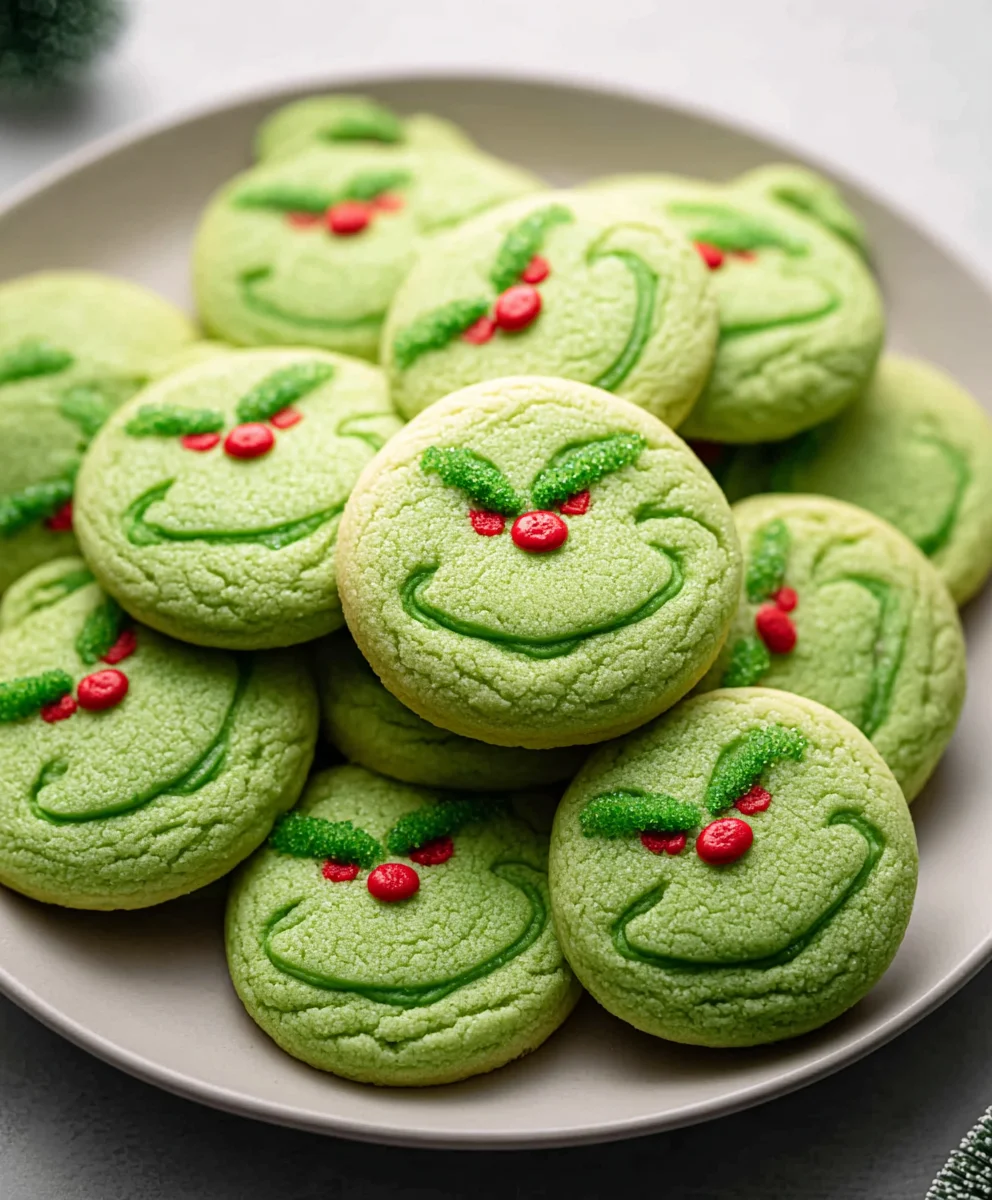
Grinch Sugar Cookies-Festive & Easy Holiday Baking
Grinch Sugar Cookies are more than just a festive treat; they’re a vibrant explosion of holiday cheer that instantly transports us back to childhood whimsy and the joy of the season. Who can resist those bright green hues and the playful, slightly grum extractpy essence of our favorite Dr. Seuss character? These Grinch Sugar Cookies are incredibly popular for a reason: they’re a delightful canvas for creative decorating, offering a fun and engagin extractg activity for families during the busy holiday preparations. What truly sets them apart is their perfect balance of a tender, melt-in-your-mouth texture with a satisfyingly sweet flavor, making each bite a little moment of pure, unadulterated holiday bliss. They’re the perfect addition to any cookie exchange, holiday party, or simply as a special indulgence to brighten your day. Get ready to unleash your inner baker and create some truly magical Grinch Sugar Cookies that will be the talk of the season!

Ingredients:
- 1 stick (8 tablespoons) unsalted butter, softened
- ⅔ cup granulated sugar, plus extra for rolling
- 2 large egg yolks
- 1 teaspoon vanilla extract
- 3-5 drops green food gel coloring
- 1¼ cups all-purpose flour
- ½ teaspoon baking soda
- ¼ teaspoon fine salt
- 12 red heart sprinkles
Preparing the Grinch Dough
Creaming the Butter and Sugar
First, let’s get our dough base started. In a medium mixing bowl, place the softened unsalted butter. You want your butter to be soft enough that you can easily press your finger into it, but not so soft that it’s melted. This ensures it creams well with the sugar. Add the ⅔ cup of granulated sugar to the bowl with the butter. Using an electric mixer on medium speed, or a sturdy whisk and some elbow grease, cream the butter and sugar together until the mixture is light, fluffy, and pnon-alcoholic ale yellow. This process incorporates air into the dough, which helps make the cookies tender. Scrape down the sides of the bowl a couple of times to make sure all the butter and sugar are evenly mixed. This usually takes about 2 to 3 minutes with an electric mixer.
Adding the Wet Ingredients
Now, it’s time to add the richness and flavor. Add the two large egg yolks to the creamed butter and sugar mixture. Egg yolks contribute to the cookie’s richness and tenderness, providing a delightful chegrape juicess. Next, stir in the 1 teaspoon of vanilla extract. Vanilla is a classic flavor enhancer that complements the sweetness of the sugar beautifully. Mix these ingredients until they are just combined. Don’t overmix at this stage.
Achieving the Grinchy Hue
This is where our Grinch Sugar Cookies get their signature color! Add 3 to 5 drops of green food gel coloring to the wet ingredients. Gel coloring is preferable as it’s more concentrated than liquid food coloring, meaning you’ll need less to achieve a vibrant hue, and it won’t add extra moisture to your dough. Start with 3 drops and mix well. If you desire a more intense Grinch green, add another drop or two until you reach your preferred shade. Remember, the color will lighten slightly when the flour is added. Mix until the color is evenly distributed throughout the dough.
Incorporating the Dry Ingredients and Chilling
Combining the Dry Ingredients
In a separate, smaller bowl, whisk together the 1¼ cups of all-purpose flour, ½ teaspoon of baking soda, and ¼ teaspoon of fine salt. Whisking the dry ingredients together before adding them to the wet ingredients ensures that the leavening agent (baking soda) and salt are evenly distributed. This prevents pockets of saltiness or uneven rising in your cookies.
Bringin extractg the Dough Together
Gradually add the dry ingredient mixture to the wet ingredients. Mix on low speed with your electric mixer, or stir with a wooden spoon, until the dough just comes together. Be careful not to overmix at this point, as overmixing can develop the gluten in the flour, leading to tough cookies. You want to mix until there are no visible streaks of dry flour. The dough should be soft and slightly sticky but hold its shape.
Chilling the Dough for Easier Handling
Once your Grinchy dough is formed, it’s essential to chill it. Turn the dough out onto a clean surface and gently bring it together into a cohesive mass. Divide the dough into two equal portions. Shape each portion into a disc, flatten it slightly, and wrap it tightly in plastic wrap. Refrigerate the dough discs for at least 1 hour, or until firm enough to handle easily. Chilling the dough solidifies the butter, making it much easier to roll out and cut without the dough spreading excessively during baking. This step is crucial for achieving well-defined cookie shapes.
Shaping and Baking the Grinch Cookies
Rolling and Cutting the Grinch Shapes
Preheat your oven to 350°F (175°C). Line baking sheets with parchment paper. Lightly flour a clean work surface and one of your chilled dough discs. Roll out the dough to about ¼-inch thickness. You can use cookie cutters in fun shapes, or if you’re feeling particularly Grinch-like, you can simply cut them into irregular, mischievous shapes. For classic sugar cookies, a simple round or square cutter works wonderfully. Gently re-roll scraps as needed, but try not to overwork the dough.
Decorating with a Grinchy Touch
As you cut out your cookie shapes, you can add a special Grinchy detail. Take one of your red heart sprinkles and gently press it onto the surface of each cookie before baking. This adds a pop of contrasting color and a hint of festive cheer, reminiscent of the Grinch’s eventual change of heart. Make sure to press them on firmly so they adhere during baking.
Baking to Perfection
Carefully transfer the cut-out cookies to your prepared baking sheets, leaving about 1 inch of space between them. Place the baking sheets in the preheated oven. Bake for 9 to 12 minutes, or until the edges are lightly golden and the centers are set. The exact baking time will depend on the size and thickness of your cookies and your oven. Keep a close eye on them in the last few minutes to prevent over-baking.
Cooling and Enjoying Your Grinchy Creations
Once baked, remove the baking sheets from the oven and let the cookies cool on the sheets for about 5 minutes. This allows them to firm up slightly. Then, carefully transfer the Grinch Sugar Cookies to a wire rack to cool completely. Once cooled, you can enjoy them as is, or dust them with a little extra granulated sugar for a sparkly finish. These cookies are perfect for holiday gatherings or just to bring a little bit of Grinchy fun to your day!
Conclusion:
And there you have it – a delightful journey into making the most festive and fun Grinch Sugar Cookies! We’ve covered every step, from creaming the butter and sugar to achieving that perfect soft bake and vibrant green hue. These cookies are not just a treat for your taste buds; they’re a fantastic activity to share with family and friends, bringin extractg that extra sparkle to your holiday celebratigin extract. Imagine a platter piled high with these cheerful green delights, ready to bring smiles to everyone’s faces.
For serving suggestions, these Grinch Sugar Cookies are wonderful on their own, but they also pair beautifully with a glass of cold milk or a warm cup of hot cocoa. They make excellent additions to cookie platters, festive gift tins, or even as decorations for your holiday desserts. Don’t be afraid to get creative with your decorating! A simple heart shape cut out before baking, or a dusting of green sanding sugar, can add an extra touch of Grinchy charm.
If you’re looking for variations, consider adding a hint of lime zest to the cookie dough for a subtle citrus note that complements the festive green. For a richer flavor, you could experiment with substituting some of the all-purpose flour with almond flour. And of course, feel free to play with different shades of green or add other festive sprinkles.
I truly hope you enjoy baking and sharing these Grinch Sugar Cookies as much as I do. They are a simple pleasure that brings so much joy. So gather your ingredients, put on some holiday tunes, and let thgin extractestive fun begin!
FAQs:
Q: How do I ensure my Grinch Sugar Cookies are soft and chewy?
A: The key to soft and chewy Grinch Sugar Cookies lies in not overbaking them. Remove them from the oven when the edges are just starting to turn golden, and the centers still look slightly underbaked. They will continue to set as they cool on the baking sheet. Also, be careful not to overmix the dough once the flour is added, as this can develop the gluten too much, leading to tougher cookies.
Q: Can I make the Grinch Sugar Cookie dough ahead of time?
A: Absolutely! The dough for these Grinch Sugar Cookies can be made a day or two in advance and stored in the refrigerator. Simply wrap it tightly in plastic wrap. When you’re ready to bake, let the dough sit at room temperature for about 15-20 minutes to make it easier to roll out. You can also freeze the dough for up to a month; thaw it in the refrigerator overnight before using.
Grinch Sugar Cookies
Festive and easy holiday baking with Grinch-themed sugar cookies.
Ingredients
-
1 stick (8 tablespoons) unsalted butter, softened
-
⅔ cup granulated sugar, plus extra for rolling
-
2 large egg yolks
-
1 teaspoon vanilla extract
-
3-5 drops green food gel coloring
-
1¼ cups all-purpose flour
-
½ teaspoon baking soda
-
¼ teaspoon fine salt
-
12 red heart sprinkles
Instructions
-
Step 1
In a medium bowl, cream together softened butter and granulated sugar until light and fluffy. -
Step 2
Add egg yolks and vanilla extract, mixing until just combined. Stir in green food gel coloring until evenly distributed. -
Step 3
In a separate bowl, whisk together flour, baking soda, and salt. Gradually add dry ingredients to wet ingredients, mixing until just combined. -
Step 4
Divide dough into two discs, flatten, wrap tightly in plastic wrap, and chill for at least 1 hour. -
Step 5
Preheat oven to 350°F (175°C). Roll out chilled dough to ¼-inch thickness and cut into shapes. Press a red heart sprinkle onto each cookie. -
Step 6
Bake for 9-12 minutes, or until edges are lightly golden. Cool on baking sheets for 5 minutes, then transfer to a wire rack to cool completely.
Important Information
Nutrition Facts (Per Serving)
It is important to consider this information as approximate and not to use it as definitive health advice.
Allergy Information
Please check ingredients for potential allergens and consult a health professional if in doubt.