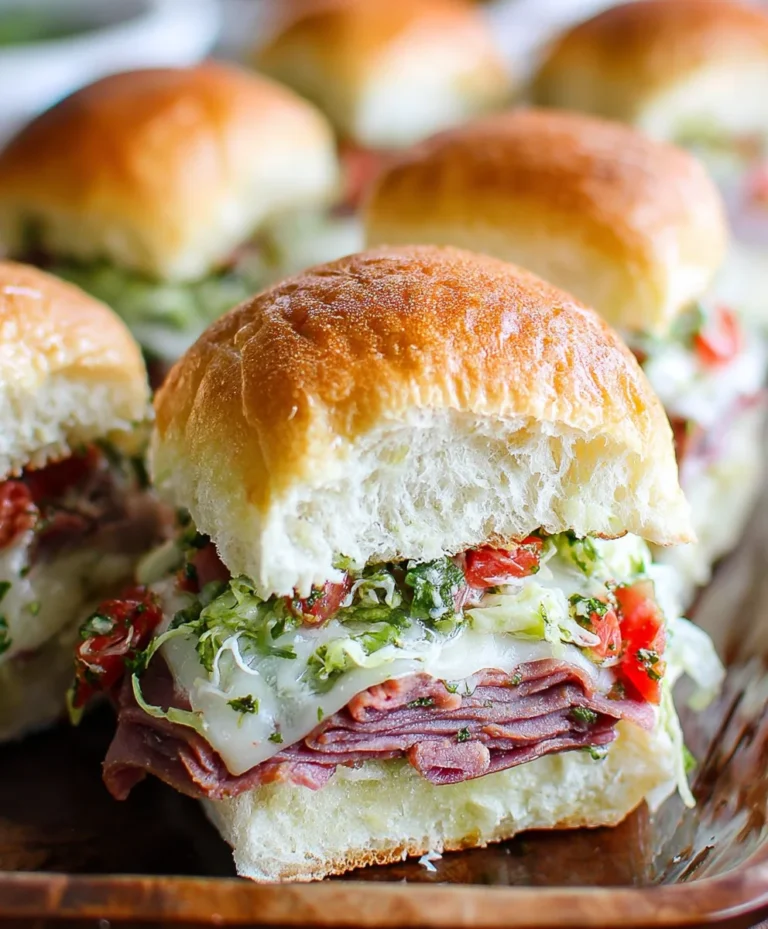
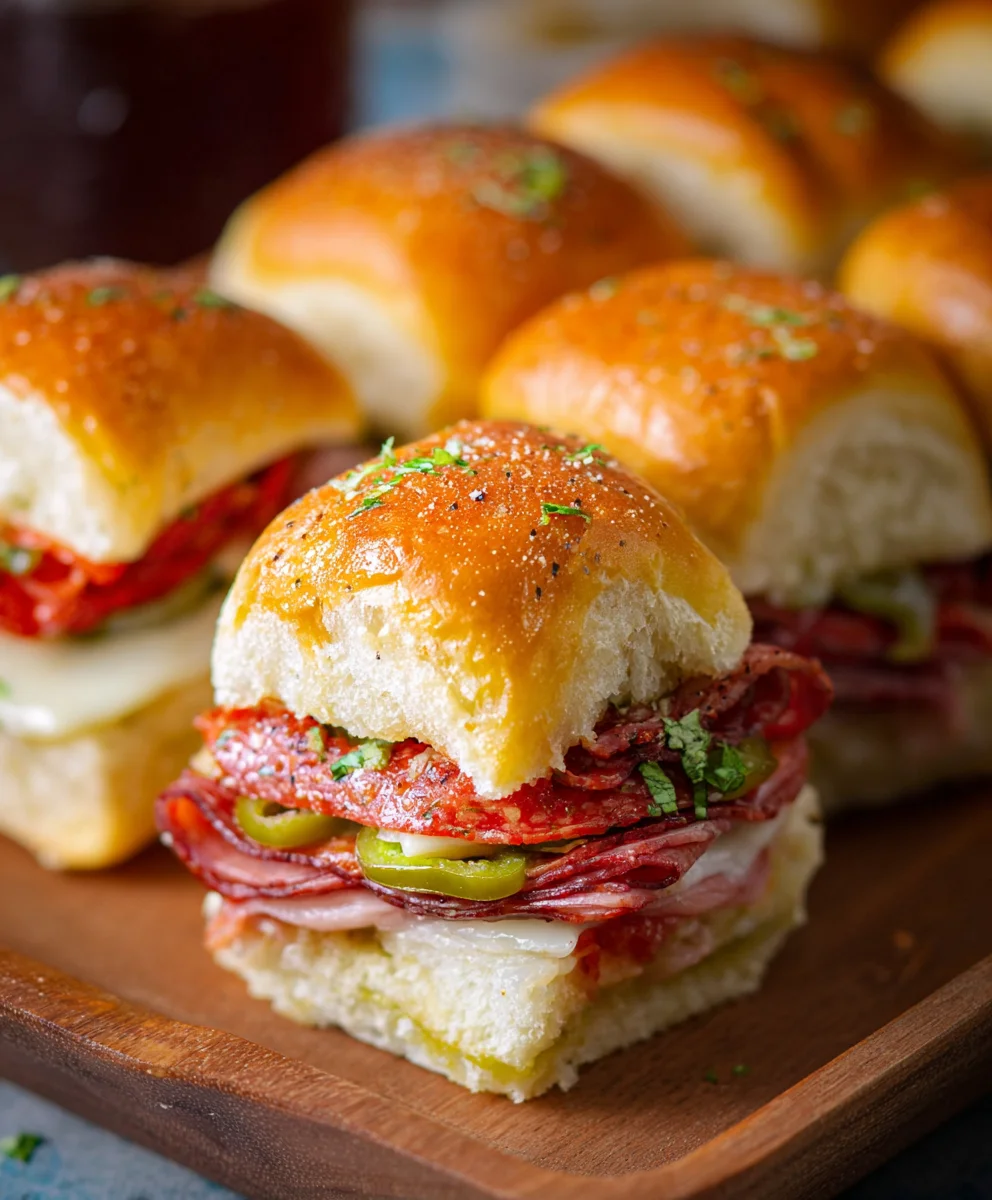
Hot Italian Beef Sub Sliders – Easy Party Appetizer
Hot Italian Sub Sliders are a flavor explosion waiting to happen, a culinary masterpiece that transforms a classic sandwich into a bite-sized sensation perfect for any gathering. What is it about these little powerhouses that makes them so utterly irresistible? Perhaps it’s the perfect harmony of savory Italian cured meats – spicy beef salami, delicate capicola, and rich mortadella – mingling with tangy provolone cheese, all nestled within a soft, fluffy slider bun. Then, the magic truly ignites when they’re baked until golden and melty, creating a warm, gooey center that beckons you for another. They’re more than just an appetizer; they’re a conversation starter, a crowd-pleaser, and an instant favorite that will have everyone asking for the recipe. The secret to their specialness lies in the bold, authentic Italian flavors packed into every single slider, offering a taste of Naples in every delicious bite.
Ingredients:
- 12-pack slider rolls (Kings Hawaiian rolls are excellent for this)
- 6 oz package of thinly sliced beef beef ham
- 5 oz package of thinly sliced beef beef salami
- 5 oz package of thinly sliced beef beef pepperoni
- 9 slices provolone cheese
- 1/3 cup sliced pepperoncini peppers
- 1/3 cup sliced pickled hot cherry peppers
- 1/4 cup melted salted butter
- 1 teaspoon Italian seasoning
- 2 cloves fresh garlic, crushed
- 1 cup marinara sauce
Preparing Your Hot Italian Sub Sliders
These Hot Italian Sub Sliders are incredibly easy to assemble and bake, making them perfect for game days, parties, or even a quick and satisfying weeknight meal. The key to their fantastic flavor lies in the combination of savory meats, melty cheese, and a zesty pepper punch, all nestled in soft, slightly sweet slider buns. We’ll be layering everything into the halved rolls and then baking them until golden and the cheese is perfectly gooey.
Assembling the Slider Base
The first step to creating these delicious sliders is to prepare your rolls. Carefully slice the entire 12-pack of slider rolls in half lengthwise. It’s best to do this with a serrated knife to ensure a clean cut without squishing the delicate rolls. Once halved, place the bottom halves of the rolls onto a large baking sheet. This will be the foundation for our flavor-packed layers. Don’t worry if there are small gaps between the rolls; they will bake together and form a cohesive unit.
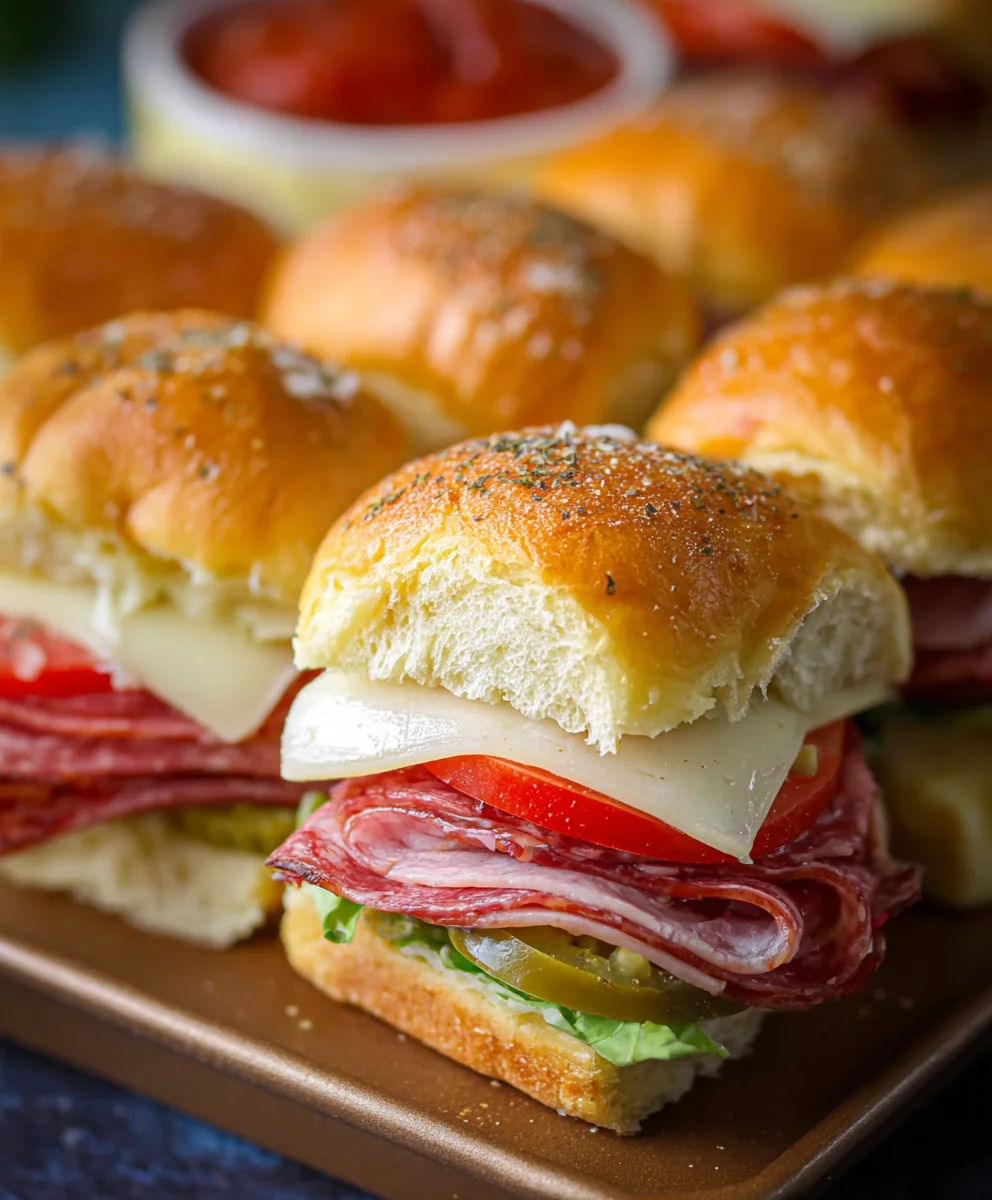
Next, we’ll start building the savory layers. Evenly distribute the thinly sliced beef hamf ham over the bottom halves of the rolls. Ensurebeef hamat the ham covers the surface of each roll without too much overhbeef ham. After the ham, add the thinly sliced beef salamialami, layibeef hamit on top of the ham. Finally, scatter the thinly sliced beef pepperonieronibeef salamithe salami. The combination of these three cured meats provides a robust and authentic Italian flavor profile that is the heart of any good Italian sub.
Now, it’s time for the cheese. We’ll be using provolone cheese, which melts beautifully and offers a mild, slightly tangy flavor that complements the meats perfectly. Lay three slices of provolone cheese over the meat layers on approximately every four rolls. You want to ensure that each slider gets a good amount of cheese. Don’t be afraid to let the cheese overlap slightly.
The zesty kick comes from our peppers. Evenly distribute the sliced pepperoncini peppers over the provolone cheese. These bring a bright, briny flavor. Following that, scatter the sliced pickled hot cherry peppers. These will add a pleasant heat and a touch of sweetness that balances the savory elements. The combination of these peppers is crucial for that classic Italian sub taste, and adjusting the quantity to your spice preference is always an option.
Creating the Flavorful Topping
While the slider base is taking shape, let’s prepare the rich and flavorful topping that will tie everything together. In a small bowl, combine the melted salted butter with the crushed garlic cloves and the Italian seasoning. Stir well to ensure the garlic and seasoning are evenly distributed throughout the melted butter. This fragrant butter mixture will be brushed over the top of the slider buns, infusing them with garlic and herb goodness as they bake.
Now, take the top halves of your slider rolls and place them carefully over the layered fillings. Gently press down on the assembled sliders to help compact the layers and ensure everything stays in place. This is also a good time to make sure the peppers and meats are tucked in nicely.
Once your sliders are assembled and the top buns are in place, it’s time to add that delicious garlic herb butter. Using a pastry brush, generously brush the melted butter mixture over the entire top surface of the slider buns. Make sure to get good coverage, as this butter will create a wonderfully golden and flavorful crust on the rolls.
Finally, we’ll add a drizzle of marinara sauce. Carefully spoon about one tablespoon of marinara sauce over the top of each individual slider. This might seem a little unconventional for a traditional sub, but the marinara adds a delightful tomatoey depth that is absolutely delicious when baked into the sliders, creating a sort of mini-pizza-like experience within the bun.
Baking to Perfection
Preheat your oven to 350 degrees Fahrenheit (175 degrees Celsius). Place the baking sheet with the assembled sliders into the preheated oven. Bake for approximately 15 to 20 minutes, or until the tops of the rolls are golden brown and toasted, and the cheese is melted and bubbly. You’ll notice the aroma of garlic and Italian herbs filling your kitchen – a sure sign that these are going to be amazing.
Once they are perfectly baked, remove the baking sheet from the oven. Let the sliders rest for about 5 minutes before cutting them into individual portions. This resting period allows the flavors to meld and makes them easier to slice and serve without everything falling apart. You can use a sharp knife or a pizza cutter to separate them. Serve these Hot Italian Sub Sliders warm and enjoy the explosion of flavors!
Conclusion:
There you have it! Your guide to crafting the most delectable Hot Italian Sub Sliders. We’ve covered everything from assembling the perfect layers of savory meats and cheeses to achieving that irresistible toasted finish. These sliders are more than just a meal; they’re a crowd-pleasing sensation perfect for game nights, parties, or even a satisfying weeknight dinner. Don’t be afraid to dive in and create your own masterpiece. Experiment with different toppings, adjust the spice levels, and make them your own!
For serving, these Hot Italian Sub Sliders are fantastic on their own. However, they pair wonderfully with a side of crispy potato chips, a fresh garden salad, or even a warm bowl of tomato soup for a comforting meal. Feel free to get creative with variations! Swap out the meats for turkey or beef ham, try different cheeses like provolone or Swiss, or add some sliced banana peppers for an extra kick. The possibilities are truly endless.
Frequently Asked Questions:
Can I make the Hot Italian Sub Sliders ahead of time?
You can prepare the filling and assemble the sliders ahead of time, but it’s best to bake them just before serving for the freshest, crispiest result. Store the assembled but unbaked sliders covered in the refrigerator for up to 24 hours.
What kind of bread is best for these sliders?
While slider buns or small dinner rolls work wonderfully, you can also use a split baguette or even thick slices of Italian bread cut into bite-sized portions. The key is a bread that holds up well to the fillings and toasting.
How can I make these sliders spicier?
For a spicier version of Hot Italian Sub Sliders, consider adding a pinch of red pepper flakes to the meat mixture, incorporating some spicy Italian sausage, or topping with jalapeño slices or a drizzle of hot pepper oil before serving.
Hot Italian Beef Sub Sliders – Easy Party Appetizer
These Hot Italian Sub Sliders are incredibly easy to assemble and bake, making them perfect for game days, parties, or even a quick and satisfying weeknight meal. The key to their fantastic flavor lies in the combination of savory meats, melty cheese, and a zesty pepper punch, all nestled in soft, slightly sweet slider buns.
Ingredients
-
12-pack slider rolls, halved lengthwise
-
6 oz package of beef ham, thinly sliced
-
5 oz package of beef salami, thinly sliced
-
5 oz package of beef pepperoni, thinly sliced
-
9 slices provolone cheese
-
1/3 cup pepperoncini, sliced
-
1/3 cup pickled hot cherry peppers, sliced
-
1/4 cup salted butter, melted
-
1 teaspoon Italian seasoning
-
2 cloves fresh garlic, crushed
-
1 cup marinara sauce
Instructions
-
Step 1
Carefully slice the entire 12-pack of slider rolls in half lengthwise. Place the bottom halves of the rolls onto a large baking sheet. -
Step 2
Evenly distribute the thinly sliced beef ham over the bottom halves of the rolls. Add the thinly sliced beef salami on top of the ham. Finally, scatter the thinly sliced beef pepperoni over the salami. -
Step 3
Lay three slices of provolone cheese over the meat layers on approximately every four rolls. Evenly distribute the sliced pepperoncini peppers over the provolone cheese. Following that, scatter the sliced pickled hot cherry peppers. -
Step 4
In a small bowl, combine the melted salted butter with the crushed garlic cloves and the Italian seasoning. Stir well. Brush this mixture generously over the entire top surface of the slider buns. Spoon about one tablespoon of marinara sauce over the top of each individual slider. -
Step 5
Place the top halves of your slider rolls over the layered fillings and gently press down. Preheat your oven to 350 degrees Fahrenheit (175 degrees Celsius). -
Step 6
Place the baking sheet with the assembled sliders into the preheated oven. Bake for approximately 15 to 20 minutes, or until the tops of the rolls are golden brown and toasted, and the cheese is melted and bubbly. -
Step 7
Remove the baking sheet from the oven. Let the sliders rest for about 5 minutes before cutting them into individual portions. Serve warm.
Important Information
Nutrition Facts (Per Serving)
It is important to consider this information as approximate and not to use it as definitive health advice.
Allergy Information
Please check ingredients for potential allergens and consult a health professional if in doubt.