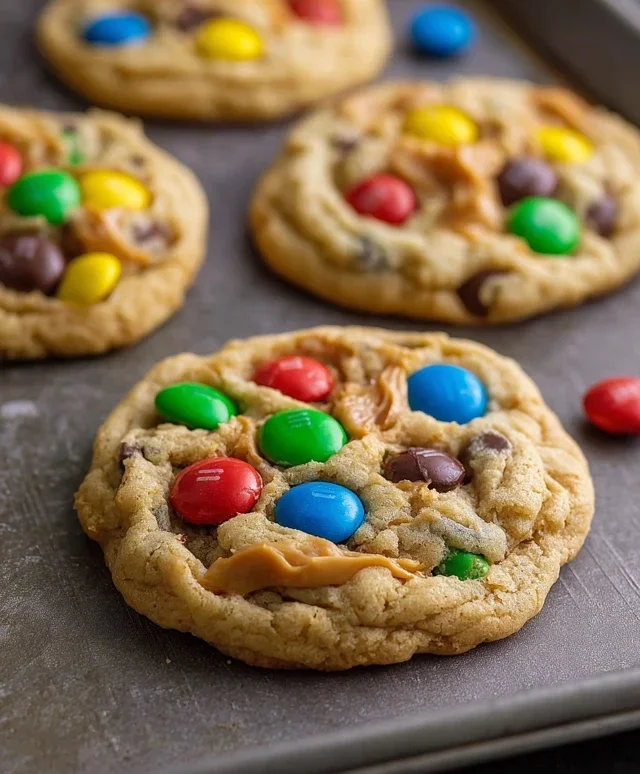
Peanut Butter M&M Cookie Perfection-Easy Recipe
Peanut Butter M&M Cookies are the ultimate comfort food, aren’t they? There’s something undeniably magical about that perfect harmony of salty peanut butter and sweet, crunchy M&M candies all baked into a soft, chewy cookie. It’s a flavor combination that instantly transports us back to childhood, to carefree days and shared treats. What makes these Peanut Butter M&M Cookies truly special is their irresistible texture – that slight crispness on the edges giving way to a wonderfully gooey center, studded with those vibrant bursts of color and chocolatey goodness. We all have our favorite cookie recipes, but this one holds a special place in so many hearts because it’s just so reliably delicious and incredibly satisfying. Get ready to bake up a batch of pure joy!

Peanut Butter M&M Cookies
Oh, the joy of a perfectly baked cookie! And when you combine the irresistible allure of peanut butter with the fun crunch of M&Ms, you’ve got a winner every single time. These Peanut Butter M&M Cookies are a delightful explosion of flavors and textures, guaranteed to bring smiles to any face. Whether you’re a seasoned baker or just starting out, this recipe is straightforward and yields incredibly delicious results. The secret to their amazing chegrape juicess and rich flavor lies in a few key steps, and of course, the star ingredients – creamy peanut butter and colorful M&Ms.
These cookies aren’t just for special occasions; they’re perfect for a midday treat, a delightful addition to a lunchbox, or simply when a craving strikes. The process of browning the butter adds a wonderfully nutty depth to the cookie base, which pairs perfectly with the sweet milk chocolate and the familiar, satisfying taste of peanut butter. Let’s dive into the magic of creating these delightful treats!
Ingredients:
Cooking Instructions:
Browning the Butter: The Flavor Foundation
The very first step, and arguably the most crucial for that signature depth of flavor, is browning the butter. Take your ½ cup of unsalted butter and place it in a light-colored saucepan over medium heat. As the butter melts, it will start to foam. Keep a close eye on it and swirl the pan occasionally. You’ll notice small brown specks will begin extract to form at the bottom of the pan, and the butter will start to smell wonderfully nutty and toasty. This is browning! It usually takes about 3-5 minutes. As soon as you see these golden-brown bits and smell that delightful aroma, immediately remove the pan from the heat and carefully pour the browned butter into a heat-safe bowl, making sure to scrape in all those flavorful brown bits. Let this browned butter cool for about 10-15 minutes; we don’t want it to scramble the egg later!
Creaming the Sweeteners and Wet Ingredients
Once your browned butter has cooled slightly, it’s time to build the cookie base. In a large mixing bowl, combine the cooled browned butter with the ½ cup plus 2 tablespoons of packed brown sugar and the 2 tablespoons of granulated sugar. Using an electric mixer (or a whisk and some elbow grease!), cream these ingredients together until the mixture is light and fluffy. This process incorporates air, which contributes to the cookie’s texture. Next, add your room temperature large egg and the 1 teaspoon of vanilla extract. Beat until everything is well combined and smooth. The room temperature egg is important here as it emulsifies better with the fats, leading to a more consistent dough.
Incorporating the Dry Ingredients
Now, let’s bring in the dry ingredients. In a separate medium bowl, whisk together the 1⅓ cups of all-purpose flour, ½ teaspoon of baking soda, and ¼ teaspoon of salt. Whisking these together ensures that the leavening agent (baking soda) and salt are evenly distributed throughout the flour, preventing pockets of bitterness or uneven rising in your cookies. Gradually add this dry mixture to the wet ingredients in your large bowl. Mix on low speed or by hand until just combined. Be careful not to overmix at this stage; overmixing can develop the gluten in the flour too much, resulting in tough cookies. We want a tender crum extractb!
Adding the Stars: Chocolate Chips and M&Ms
This is where the fun really begin extracts! Gently fold in the ½ cup of milk chocolate chips and the ½ cup of peanut butter M&Ms. Again, do this by hand with a spatula or wooden spoon to avoid overworking the dough. You want to distribute them evenly throughout the cookie dough. Make sure you reserve some extra chocolate chips and M&Ms for topping the cookies before baking, as this gives them that gorgeous, professional-looking finish.
Forming and Filling the Cookies
Now it’s time to get ready to bake. Preheat your oven to 350°F (175°C). Line baking sheets with parchment paper or silicone baking mats. This is crucial for preventing sticking and for easy cleanup. For each cookie, scoop about 1 ½ to 2 tablespoons of dough and roll it into a ball. Place these dough balls onto the prepared baking sheets, leaving about 2 inches between each cookie to allow for spreading. Now for the special peanut butter touch! Press about 1 tablespoon of creamy peanut butter into the center of each cookie dough ball. You can do this by making a small indentation with your thumb or a spoon, then placing the peanut butter in and gently folding the dough around it. This creates a lovely surprise molten peanut butter center. Finally, gently press a few extra chocolate chips and peanut butter M&Ms onto the top of each cookie dough ball. If you’re feeling adventurous, you can even press a small piece of pretzel into the top for a salty crunch!
Baking to Perfection
Bake the cookies for 9-12 minutes, or until the edges are lightly golden brown and the centers still look a little soft and underbaked. This is the key to chewy cookies! They will continue to cook and set up as they cool on the baking sheet. For the first few minutes after they come out of the oven, resist the urge to move them. Let them firm up slightly on the hot baking sheet. Once they’ve cooled on the baking sheet for about 5-10 minutes, you can carefully transfer them to a wire rack to cool completely. Enjoy the incredible aroma filling your kitchen as they bake!
These Peanut Butter M&M Cookies are a testament to how simple ingredients can come together to create something truly spectacular. The balance of sweet, salty, chewy, and crunchy is just perfect. Happy baking!
Conclusion:
There you have it – the ultimate guide to creating mouthwatering Peanut Butter M&M Cookies! This recipe is an absolute winner because it strikes the perfect balance between chewy peanut butter goodness and the delightful crunch and sweetness of M&Ms. The simple steps make it accessible for bakers of all levels, and the result is a cookie that’s sure to disappear fast. Whether you’re looking for a treat to impress guests, a fun baking project with the kids, or simply a way to satisfy your sweet cravings, these cookies deliver every time. I love serving them warm, straight from the oven, with a tall glass of milk. They also make fantastic additions to cookie platters or as a homemade gift.
Feeling adventurous? Don’t hesitate to experiment! Consider adding a pinch of sea salt on top before baking for a salty-sweet kick, or swirl in some chocolate chips for an extra layer of indulgence. For a festive touch, use seasonal M&M colors. I truly encourage you to give these Peanut Butter M&M Cookies a try; the aroma alone while they bake is enough to make your home feel cozy and inviting.
Frequently Asked Questions:
What is the best way to store Peanut Butter M&M Cookies?
To keep your Peanut Butter M&M Cookies fresh, store them in an airtight container at room temperature for up to 3-4 days. You can also layer them between parchment paper to prevent sticking. For longer storage, they freeze beautifully for up to 3 months!
Can I use different types of M&Ms?
Absolutely! While classic M&Ms are fantastic, feel free to get creative. Peanut Butter M&Ms would be a delicious addition for even more peanut butter flavor, or consider using mini M&Ms for a different texture. White chocolate M&Ms or even seasonal variations can add a unique twist to your cookies.
My cookies spread too much. How can I prevent this?
If your cookies tend to spread a lot, ensure your butter is softened but not melted when creaming with the sugar. Chilling the dough for at least 30 minutes before baking can also help significantly. This allows the fats to firm up, resulting in thicker, chewier cookies.
Peanut Butter M&M Cookies
Deliciously chewy cookies packed with peanut butter, milk chocolate chips, and M&Ms, with a hint of browned butter.
Ingredients
-
½ cup unsalted butter, for browning
-
½ cup + 2 tablespoons packed brown sugar
-
2 tablespoons granulated sugar
-
1 large egg, room temperature
-
1 teaspoon vanilla extract
-
1⅓ cups all-purpose flour, spooned and leveled
-
½ teaspoon baking soda
-
¼ teaspoon salt
-
½ cup milk chocolate chips, plus extra for topping
-
½ cup peanut butter M&Ms, plus extra for topping
-
8 tablespoons creamy peanut butter (1 tablespoon per cookie)
Instructions
-
Step 1
Melt unsalted butter in a saucepan over medium heat and cook, stirring occasionally, until it turns golden brown and smells nutty. Remove from heat and let cool slightly. -
Step 2
In a large bowl, cream together the browned butter, packed brown sugar, and granulated sugar until light and fluffy. -
Step 3
Beat in the large egg and vanilla extract until well combined. -
Step 4
In a separate medium bowl, whisk together the all-purpose flour, baking soda, and salt. -
Step 5
Gradually add the dry ingredients to the wet ingredients, mixing until just combined. Fold in the milk chocolate chips and peanut butter M&Ms. -
Step 6
For each cookie, scoop about 2 tablespoons of dough, flatten slightly, and press 1 tablespoon of creamy peanut butter into the center. Enclose the peanut butter with the dough, forming a ball. -
Step 7
Place cookies on a baking sheet lined with parchment paper, leaving some space between them. -
Step 8
Bake at 350°F (175°C) for 10-12 minutes, or until the edges are golden brown and the centers are still slightly soft. -
Step 9
Let cookies cool on the baking sheet for a few minutes before transferring them to a wire rack to cool completely. Top with extra chocolate chips and peanut butter M&Ms if desired.
Important Information
Nutrition Facts (Per Serving)
It is important to consider this information as approximate and not to use it as definitive health advice.
Allergy Information
Please check ingredients for potential allergens and consult a health professional if in doubt.