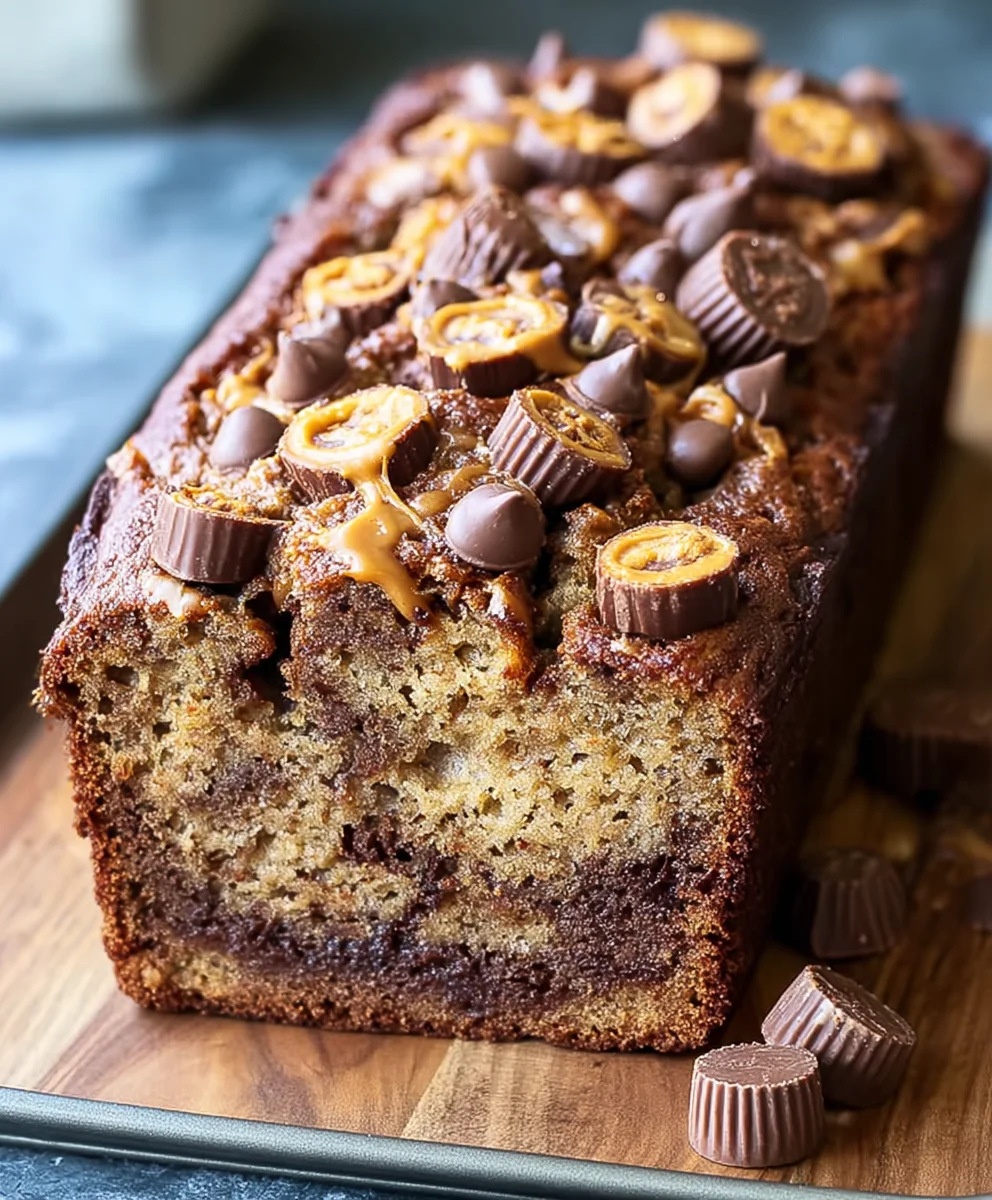
Reeses Peanut Butter Banana Bread-Best Treat Ever
Reeses Peanut Butter Banana Bread is more than just a simple baked good; it’s a decadent, nostalgic journey that brings together two of America’s most beloved flavors into one unbelievably delicious loaf. If you’ve ever found yourself craving that perfect blend of sweet banana, creamy peanut butter, and the unmistakable, delightful crunch of Reese’s peanut butter cups, then prepare to fall head over heels for this recipe. We all love banana bread for its comforting aroma and its ability to transform ripe, forgotten bananas into something truly magical. But what makes this particular version so special is the ingenious incorporation of Reese’s Peanut Butter Cups, adding pockets of gooey, chocolatey, peanut-buttery bliss throughout every slice. It’s the ultimate mashup, offering a familiar comfort with an exciting, indulgent twist that will have everyone asking for seconds (and maybe even thirds!).
Ingredients:
- 1 1/2 cups all-purpose flour
- 1/2 teaspoon baking soda
- 1 1/2 teaspoons baking powder
- 1/2 teaspoon kosher salt
- 3 very ripe medium bananas, mashed
- 1/2 cup creamy peanut butter
- 1/4 cup vegetable oil
- 2 large eggs
- 1 cup granulated sugar
- 8 ounces miniature peanut butter cups, roughly chopped
Getting Started: The Foundation
Prepping Your Workspace and Oven
Before we dive into the deliciousness, let’s get our kitchen ready for some serious Reeses Peanut Butter Banana Bread magic. First things first, preheat your oven to 350 degrees Fahrenheit (175 degrees Celsius). This ensures that as soon as your batter is ready, it can go straight into a perfectly warm oven for even baking. Next, prepare your loaf pan. I like to grease and flour mine thoroughly, or you can use parchment paper to line the pan. If you opt for parchment, leave a little overhang on the sides, which will act as handy handles for lifting the finished loaf out later. This simple step prevents sticking and makes the whole process much smoother.
Mixing the Wet Ingredients
Creaming the Peanut Butter and Sugar
In a large mixing bowl, we’ll start by combining the creamy peanut butter and the granulated sugar. This is where the magic really begin extracts to take shape. Using an electric mixer or a sturdy whisk, cream these two ingredients together until they are well combined and have a light, fluffy texture. This step incorporates air, which contributes to a tender crum extractb in our final bread. Don’t rush this; a good few minutes of mixing will make a difference.
Adding the Eggs and Oil
Once the peanut butter and sugar are beautifully combined, it’s time to add the wet ingredients that will bind everything together. Crack in your two large eggs, one at a time, beating well after each addition until they are fully incorporated into the peanut butter mixture. Next, pour in the vegetable oil. Vegetable oil is great for banana bread because it keeps the loaf moist and tender for longer. Mix everything on medium speed until the mixture is smooth and homogenous. You want to ensure there are no streaks of egg or oil visible.
Incorporating the Bananas and Dry Ingredients
The Star of the Show: Ripe Bananas
Now for the star of our Reeses Peanut Butter Banana Bread – the bananas! Add your three mashed, very ripe medium bananas to the wet ingredient mixture. The riper the bananas, the sweeter and more flavorful your bread will be. They should be soft enough to mash easily with a fork, and ideally have plenty of brown spots. Gently fold the mashed bananas into the wet ingredients. You don’t need to overmix here; a few folds will do. Some small banana chunks are perfectly fine and add lovely texture.
The Dry Mix and Combining
In a separate medium bowl, whisk together the all-purpose flour, baking soda, baking powder, and kosher salt. Whisking these dry ingredients together ensures that the leavening agents (baking soda and baking powder) and salt are evenly distributed throughout the flour, which is crucial for an even rise and flavor. Now, gradually add the dry ingredients to the wet ingredients. Mix on low speed or fold with a spatula until just combined. It’s really important not to overmix the batter at this stage. Overmixing can develop the gluten in the flour too much, resulting in a tough, dense bread. A few streaks of flour remaining are okay; they will disappear as you fold in the peanut butter cups.
The Final Touch: Peanut Butter Cups
Folding in the Goodies
This is arguably the most exciting part of making Reeses Peanut Butter Banana Bread! Gently fold in the 8 ounces of roughly chopped miniature peanut butter cups into the batter. I like to reserve a few chopped cups to sprinkle on top before baking for an extra visual appeal and a little crunch. Again, be gentle with your folding. You want to distribute them evenly throughout the batter without overworking it. The goal is to have pockets of melted peanut butter goodness throughout your bread.
Baking and Cooling
Baking to Golden Perfection
Pour the batter evenly into your prepared loaf pan. Smooth the top with your spatula. If you reserved some chopped peanut butter cups, scatter them over the top of the batter now. Place the loaf pan in your preheated oven on the center rack. Bake for approximately 50 to 65 minutes. The exact baking time will depend on your oven, so start checking for doneness around the 50-minute mark. To check if it’s done, insert a toothpick into the center of the loaf. If it comes out clean or with a fewrum extractist crumbs attached (but no wet batter), your Reeses Peanut Butter Banana Bread is ready. If it’s still wet, continue baking in 5-minute increments, checking each time.
Cooling Down
Once baked to perfection, carefully remove the loaf pan from the oven. Let the bread cool in the pan for about 10 to 15 minutes. This allows the bread to set up slightly, making it easier to remove from the pan without it falling apart. After the initial cooling in the pan, invert the loaf onto a wire rack to cool completely. Allowing it to cool fully on the wire rack is essential. If you try to slice it while it’s still warm, the inside can be gummy, and the structure might not be fully developed. Patience here will be rewarded with perfect slices of your delicious Reeses Peanut Butter Banana Bread.

Conclusion:
And there you have it – the most delicious and decadent Reeses Peanut Butter Banana Bread you’ll ever bake! We hope you enjoyed following along with this recipe. This incredibly moist and flavorful loaf is a perfect treat for any occasion, from a casual breakfast to a special dessert. The classic combination of ripe bananas, creamy peanut butter, and of course, those irresistible Reese’s Peanut Butter Cups, creates a truly unforgettable taste experience that’s sure to become a family favorite.
For serving, we love this banana bread warm, straight from the oven, perhaps with a dollop of whipped cream or a drizzle of extra peanut butter. It’s also fantastic toasted the next day. If you’re feeling adventurous with variations, consider adding a handful of chocolate chips or stirring in some chopped nuts for added texture and flavor. Don’t be afraid to experiment and make this recipe your own!
Baking this Reeses Peanut Butter Banana Bread is not only rewarding but also surprisingly simple. So, gather your ingredients, put on your favorite apron, and get ready to create a masterpiece. We encourage you to try it out and share your baking triumphs with us!
Frequently Asked Questions:
Can I make Reeses Peanut Butter Banana Bread without Reese’s Peanut Butter Cups?
Absolutely! While the Reese’s Peanut Butter Cups add a signature flavor and texture, you can still achieve a wonderful peanut butter banana bread. You can omit them entirely, or substitute with chopped regular peanut butter cups, or even just extra peanut butter swirled into the batter. You could also add extra chocolate chips for a double chocolate indulgence.
How should I store leftover Reeses Peanut Butter Banana Bread?
To keep your Reeses Peanut Butter Banana Bread fresh and moist, store it in an airtight container at room temperature for up to 3 days. If you plan to keep it for longer, it freezes beautifully! Wrap the cooled loaf tightly in plastic wrap, then in foil, and freeze for up to 3 months. Thaw at room temperature before enjoying.
My banana bread is a bit dry. What could I have done differently?
A common reason for dry banana bread is over-baking. Be sure to check for doneness with a toothpick inserted into the center – it should come out with moist crum extractbs, not completely clean. Using very ripe, almost black bananas also contributes significantly to moisture. Ensure you’re measuring your flour correctly; too much flour can also lead to a dry loaf.
Reeses Peanut Butter Banana Bread-Best Treat Ever
A delightful and decadent banana bread infused with the irresistible flavors of peanut butter and Reese’s peanut butter cups.
Ingredients
-
1 1/2 cups all-purpose flour
-
1/2 teaspoon baking soda
-
1 1/2 teaspoons baking powder
-
1/2 teaspoon kosher salt
-
3 very ripe medium bananas, mashed
-
1/2 cup creamy peanut butter
-
1/4 cup vegetable oil
-
2 large eggs
-
1 cup granulated sugar
-
8 ounces miniature peanut butter cups, roughly chopped
Instructions
-
Step 1
Preheat oven to 350 degrees Fahrenheit (175 degrees Celsius). Grease and flour a loaf pan, or line with parchment paper. -
Step 2
In a large bowl, cream together the peanut butter and granulated sugar until light and fluffy. Beat in the eggs one at a time, then stir in the vegetable oil until smooth. -
Step 3
Gently fold the mashed bananas into the wet ingredients. In a separate bowl, whisk together the flour, baking soda, baking powder, and salt. Gradually add the dry ingredients to the wet ingredients, mixing until just combined. Do not overmix. -
Step 4
Gently fold in the chopped miniature peanut butter cups. Reserve a few for sprinkling on top if desired. -
Step 5
Pour the batter into the prepared loaf pan and smooth the top. Scatter any reserved peanut butter cups over the batter. -
Step 6
Bake for 50 to 65 minutes, or until a toothpick inserted into the center comes out clean. Let cool in the pan for 10-15 minutes before inverting onto a wire rack to cool completely.
Important Information
Nutrition Facts (Per Serving)
It is important to consider this information as approximate and not to use it as definitive health advice.
Allergy Information
Please check ingredients for potential allergens and consult a health professional if in doubt.