Blueberry Cheesecake Rolls – Easy Dessert Recipe
Blueberry Cheesecake Rolls are about to become your new obsession. Imagin extracte this: the tangy sweetness of ripe blueberries swirled into a creamy, dreamy cheesecake filling, all encased in a soft, fluffy dough that bakes to golden perfection. It’s a match made in dessert heaven, a delightful fusion of two beloved classics. We all adore cheesecake for its rich decadence and that unmistakable creamy texture, and who can resist the burst of fruity goodness that blueberries bring? These Blueberry Cheesecake Rolls take those familiar comforts and elevate them into something truly extraordinary. They’re not just a treat; they’re an experience, perfect for brunch, an afternoon pick-me-up, or a show-stopping dessert that’s surprisingly simple to make. Get ready to fall head over heels for these incredible Blueberry Cheesecake Rolls!
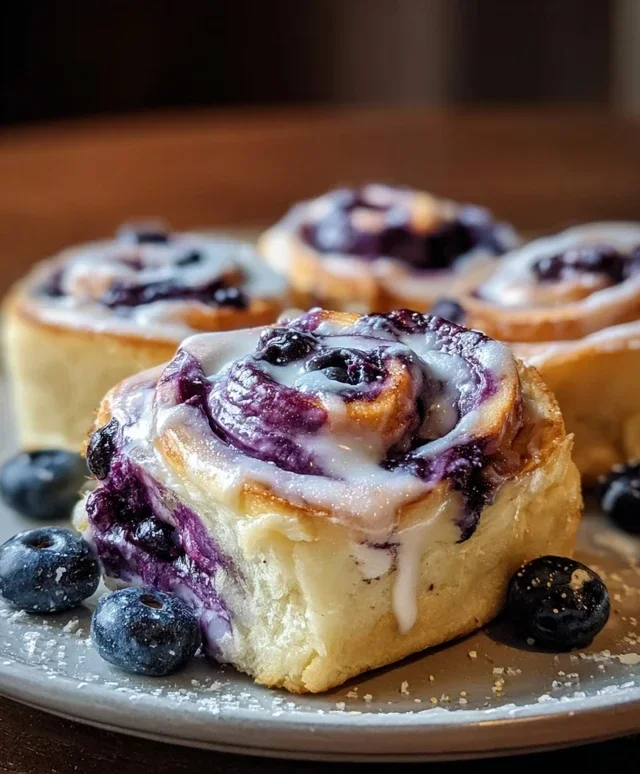
Blueberry Cheesecake Rolls
Who can resist the comforting embrace of a warm cinnamon roll, especially when it’s infused with the bright, tangy burst of blueberries and the creamy sweetness of cheesecake? These Blueberry Cheesecake Rolls are an absolute dream. They’re surprisingly easy to make, making them perfect for a special weekend breakfast, a delightful brunch treat, or even a decadent dessert. The combination of tender, flaky crescent roll dough, a luscious cream cheese filling, and juicy blueberries is simply irresistible. Get ready to impress yourself and everyone you share these with!
Ingredients:
Preparing the Creamy Cheesecake Filling
The heart of our Blueberry Cheesecake Rolls lies in this simple yet divine filling. The key to achieving a smooth, spreadable texture is to ensure your cream cheese is truly softened. This means taking it out of the refrigerator at least 30-60 minutes before you plan to mix it. If you’re in a hurry, you can gently warm it in the microwave in 10-second increments, stirring in between, but be careful not to melt it.
In a medium bowl, combine the softened cream cheese, vanilla extract, and powdered sugar. Use a whisk or a hand mixer on low speed to blend these ingredients until they are completely smooth and creamy, with no lumps of cream cheese remaining. This mixture should be thick enough to spread but not so stiff that it will tear the crescent roll dough. Taste it at this stage – you might find you want a touch more sweetness, or perhaps another tiny drop of vanilla. This is your chance to personalize it!
Assembling the Rolls
Now comes the fun part – transforming simple ingredients into beautiful, swirled rolls. Unroll the crescent roll dough onto a lightly floured surface. You’ll notice that the dough is pre-perforated into 8 triangles. Gently pinch together the perforated seams to seal them into one large rectangle. Don’t worry if it’s not perfectly uniform; a little rustic charm is part of the appeal!
Once you have your rectangle, carefully spread the prepared cream cheese mixture evenly over the entire surface of the dough, leaving a small border (about ½ inch) along one of the long edges. This un-spread edge will help prevent the filling from oozing out too much when you roll them up. Then, scatter the fresh blueberries evenly over the cream cheese layer. Try to distribute them as evenly as possible so each bite gets a burst of blueberry goodness.
Rolling and Slicing
Starting from the long edge that you did spread with the cream cheese and blueberry mixture, begin extract to tightly roll up the dough. Keep the roll as snug as you can as you go. This ensures that the swirls will be well-defined once baked. Once you’ve rolled the entire thing into a log, you should have a seam where the dough ends. Gently pinch this seam to secure the log.
Now, it’s time to slice our log into individual rolls. Use a sharp knife to cut the log into 8 equal portions. If the log feels a bit soft, you can pop it into the freezer for about 10-15 minutes to firm it up slightly, which will make slicing cleaner and easier. Aim for slices that are about 1 to 1 ½ inches thick.
Baking to Golden Perfection
Preheat your oven to 375°F (190°C). Lightly grease a baking sheet or line it with parchment paper. Carefully place the sliced rolls onto the prepared baking sheet, leaving some space between each one as they will expand as they bake.
Bake for 15-18 minutes, or until the rolls are golden brown and the cream cheese filling is bubbly and slightly set. Keep a close eye on them, as oven temperatures can vary. You want them to be cooked through but not overbaked, which can make them dry.
Cooling and Serving
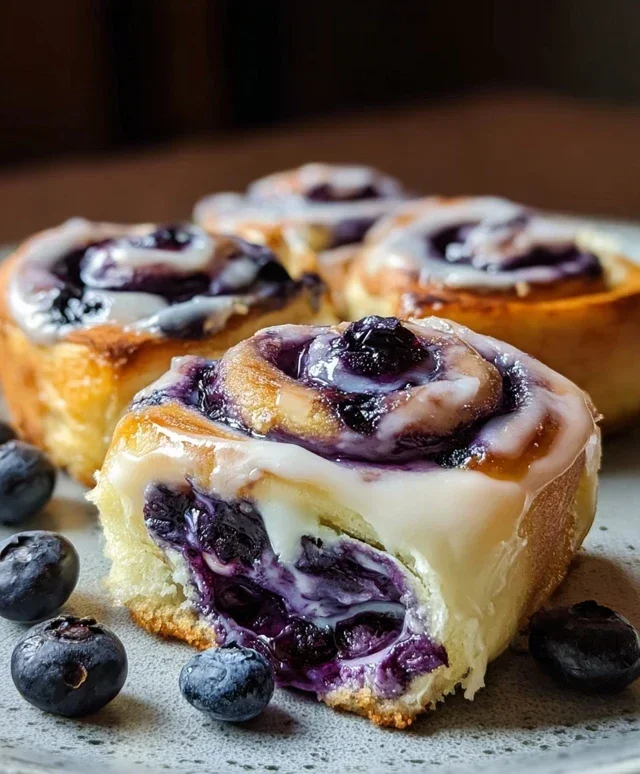
Once baked, remove the Blueberry Cheesecake Rolls from the oven and let them cool on the baking sheet for a few minutes before transferring them to a wire rack to cool further. These are absolutely divine served warm. While not strictly necessary, a simple glaze made from powdered sugar and a tiny bit of milk or lemon juice can add an extra touch of sweetness and visual appeal. You can also serve them with a dollop of whipped cream or a drizzle of extra blueberry sauce if you’re feeling indulgent. Enjoy these delightful swirls of creamy, fruity bliss!
Conclusion:
I hope you’re as excited to try these Blueberry Cheesecake Rolls as I am! This recipe is a true winner because it perfectly balances the creamy, tangy richness of cheesecake with the sweet burst of blueberries, all wrapped up in a soft, cinnamon-swirled dough. They’re incredibly satisfying and surprisingly simple to make, making them perfect for a weekend treat, a special occasion breakfast, or even an indulgent dessert. The aroma alone as they bake is enough to make your home feel extra cozy.
I love serving these warm, straight from the oven, drizzled with the simple cream cheese glaze. They’re also fantastic alongside a cup of coffee or a glass of cold milk. For variations, consider adding a sprinkle of lemon zest to the filling for an extra zing, or swapping out the blueberries for raspberries or a mix of berries. You could also add a touch of almond extract to the dough for a subtle nutty flavor. Don’t be afraid to experiment and make these your own! I genuinely encourage you to give these Blueberry Cheesecake Rolls a go; I promise you won’t be disappointed.
Frequently Asked Questions:
Can I make these ahead of time?
Yes! You can assemble the rolls, place them in the baking dish, cover them tightly with plastic wrap, and refrigerate them overnight. Before baking, let them sit at room temperature for about 30-60 minutes, then bake as directed.
What if I don’t have cream cheese for the glaze?
If you’re out of cream cheese for the glaze, you can make a simple powdered sugar glaze with just powdered sugar, milk (or water), and a touch of vanilla extract. It won’t have the same cheesecake flavor, but it will still be delicious!
How do I store leftover Blueberry Cheesecake Rolls?
Store any leftover rolls in an airtight container at room temperature for up to 2 days, or in the refrigerator for up to 4 days. Reheat gently in the oven or microwave for a few seconds to enjoy them warm again.
Blueberry Cheesecake Rolls
Sweet and tangy rolls filled with a creamy cheesecake mixture and bursting with fresh blueberries.
Ingredients
-
3 oz cream cheese (softened, ⅓ less fat)
-
½ tsp vanilla extract
-
2 ½ tbsp powdered sugar
-
1 (8 oz) tube crescent roll dough (8 rolls)
-
⅔ cup fresh blueberries
-
1 tbsp milk (for brushing)
Instructions
-
Step 1
Preheat oven to 375°F (190°C). Line a baking sheet with parchment paper. -
Step 2
In a medium bowl, beat together the softened cream cheese, vanilla extract, and powdered sugar until smooth and well combined. -
Step 3
Unroll the crescent roll dough and separate into 8 triangles. Press any perforations to seal. -
Step 4
Spread a thin layer of the cream cheese mixture evenly over each crescent roll triangle, leaving a small border. -
Step 5
Sprinkle fresh blueberries over the cream cheese mixture on each triangle. -
Step 6
Roll up each crescent roll triangle tightly, starting from the wide end. -
Step 7
Place the rolls seam-side down on the prepared baking sheet. -
Step 8
Brush the tops of the rolls with milk. -
Step 9
Bake for 15-18 minutes, or until golden brown and cooked through. -
Step 10
Let cool slightly before serving. Enjoy!
Important Information
Nutrition Facts (Per Serving)
It is important to consider this information as approximate and not to use it as definitive health advice.
Allergy Information
Please check ingredients for potential allergens and consult a health professional if in doubt.