Keto Cheesecake Mug Recipe – Quick & Easy Dessert
Craving that rich, creamy, decadent dessert without derailing your healthy lifestyle? You’re in luck! My Keto Cheesecake In a Mug is the answer to your sweet tooth’s prayers, delivering all the luscious flavor and satisfying texture of traditional cheesecake in a fraction of the time and with none of the carb-heavy guilt. This delightful treat has become an absolute staple in my kitchen, and I know you’re going to adore it too.
Why this Keto Cheesecake In a Mug is a Game Changer:
People rave about it because it’s ridiculously easy, perfectly portioned, and astonishingly delicious. We’re talking about a warm, gooey, soul-satisfying dessert that you can whip up in mere minutes. What truly makes this Keto Cheesecake In a Mug special is its simplicity; no baking, no complicated steps, just pure, unadulterated cheesecake bliss ready when that craving strikes. It’s the ultimate single-serving indulgence that proves keto doesn’t mean deprivation.
Keto Cheesecake In a Mug
Craving a decadent dessert but sticking to your ketogenic lifestyle? Look no further! This Keto Cheesecake In a Mug is your guilt-free indulgence, ready in minutes. It’s the perfect single-serving treat to satisfy your sweet tooth without derailing your macros. Forget baking a whole cheesecake; this recipe is all about instant gratification. The creamy, tangy, and sweet flavor profile mimics traditional cheesecake so perfectly, you won’t believe it’s keto-friendly. It’s so easy, you can whip it up any time the craving strikes.
Ingredients:
Instructions:
This recipe is designed for ultimate simplicity, making it perfect for even the most novice bakers (or non-bakers!). The key to a smooth and creamy cheesecake is ensuring your cream cheese is properly softened. If you forget to leave it out on the counter, a quick trick is to place the unwrapped cream cheese on a microwave-safe plate and microwave it on low power for 10-15 second intervals, just until it’s pliable but not melted. This step is crucial for avoiding lumps in your final product.
1. Combine Wet Ingredients: In a microwave-safe mug (about 10-12 ounce capacity is ideal), add the softened cream cheese and the sour cream. Using a small whisk or a fork, vigorously mix these two ingredients together until they are completely smooth and well combined. There should be no visible lumps of cream cheese. This is the foundation of our creamy cheesecake texture, so taking a moment here to ensure smoothness will pay off.
2. Sweeten and Flavor: Next, add the powdered monkfruit sweetener and the vanilla extract to the mug. Continue to whisk or stir until the sweetener is fully incorporated and dissolved into the cream cheese mixture. The powdered form of monkfruit sweetener blends much more easily than granular, which is why it’s recommended for this recipe to avoid a gritty texture. If you only have granular sweetener, you can try grinding it in a spice grinder or food processor until it’s a fine powder. Taste the mixture at this point (before adding the egg!) and adjust the sweetener if you prefer it sweeter, keeping in mind that the flavor will intensify slightly after cooking.
3. Incorporate the Egg: Now, crack your room-temperature egg directly into the mug with the cream cheese mixture. Whisk everything together thoroughly until the egg is fully incorporated and the batter is smooth and homogenous. Again, ensure there are no streaks of egg yolk or white visible. The egg acts as a binder and helps the cheesecake set up when microwaved. Using a room-temperature egg is beneficial because it integrates more easily into the batter without “cooking” the cream cheese, leading to a smoother texture. If your egg is cold, it can sometimes cause the cream cheese to seize up slightly.
4. Microwave to Cook: Place your mug in the microwave. Cook on high power for approximately 60 to 90 seconds. The exact cooking time will vary depending on the wattage of your microwave. You’re looking for the edges of the cheesecake to be set, while the center might still be slightly soft and jiggly. It will continue to set up as it cools. Be careful not to overcook it, as this can result in a rubbery texture. If after 60 seconds it looks very liquidy, give it another 15-second burst and check again.
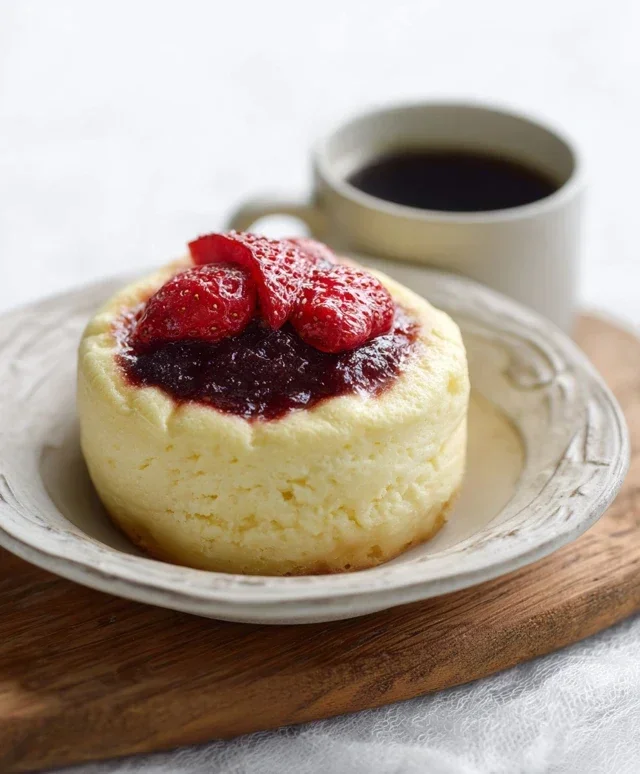
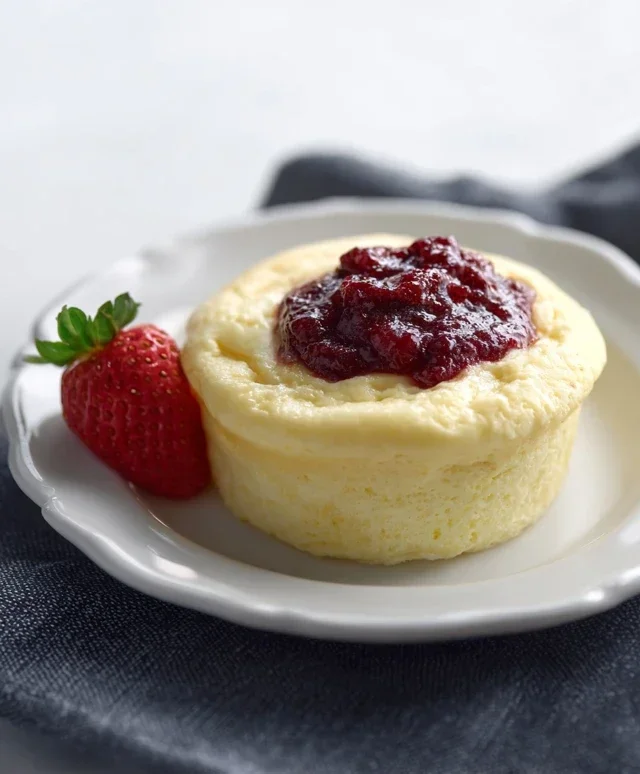
5. Cool and Enjoy: Once cooked, carefully remove the hot mug from the microwave. Let the keto cheesecake in a mug cool for at least 5-10 minutes. This cooling period is essential for the cheesecake to firm up completely and for the flavors to meld. You can enjoy it warm, or let it cool further and even chill it in the refrigerator for a firmer, more traditional cheesecake texture.
This Keto Cheesecake In a Mug is incredibly versatile. While the base recipe is fantastic on its own, feel free to get creative with toppings. A dollop of extra sour cream, a few fresh berries (like raspberries or blueberries, which are lower in carbs), or a sprinkle of chopped nuts can elevate your dessert even further. For a chocolatey twist, you could add a teaspoon of unsweetened cocoa powder along with the dry ingredients. The beauty of this recipe is its adaptability and speed, making it your new go-to for a quick, satisfying, and keto-compliant treat. Enjoy every spoonful!
Conclusion:
I hope you’ve enjoyed learning how easy it is to whip up a delicious Keto Cheesecake In a Mug! This recipe truly shines because it delivers all the rich, creamy indulgence of traditional cheesecake without the carbs, making it the perfect guilt-free treat. Whether you’re craving something sweet after dinner, need a quick dessert fix, or want to satisfy your sweet tooth on a keto diet, this microwave marvel is your answer. Its simplicity means you can have a satisfying dessert ready in minutes, which is incredibly appealing when those cravings strike!
For serving, I love enjoying my Keto Cheesecake In a Mug warm, straight from the microwave. It’s also fantastic with a dollop of whipped cream, a sprinkle of chopped nuts like pecans or walnuts for added crunch, or a few fresh berries if you’re keeping your carb count extremely low. Don’t be afraid to experiment with variations! You can add a touch of almond extract for a different flavor profile, or even a tiny pinch of cinnamon to the batter. For a chocolate twist, stir in a tablespoon of unsweetened cocoa powder.
I truly encourage you to give this Keto Cheesecake In a Mug a try. It’s a fantastic way to stick to your ketogenic lifestyle without feeling deprived. Let me know in the comments how yours turns out and what delicious variations you come up with!
Frequently Asked Questions:
Can I make this ahead of time?
While this recipe is designed for immediate enjoyment, you can prepare the batter ahead of time and store it in the refrigerator for up to 24 hours. You will likely need to add a few extra seconds to the microwave cooking time.
My cheesecake is a bit watery. What did I do wrong?
This can sometimes happen if the cream cheese isn’t fully softened or if it’s slightly overcooked. Ensure your cream cheese is at room temperature and try reducing the microwave time by 10-15 second increments, checking for doneness after each interval. It should be set around the edges with a slightly soft center.
Keto Cheesecake In a Mug
A quick and easy single-serving keto cheesecake made in the microwave.
Ingredients
-
3 1/2 tbsp cream cheese (softened, 52g)
-
1/2 tbsp sour cream (7g)
-
2 tbsp powdered monkfruit sweetener (20g)
-
1 egg (room temperature)
-
1/4 tsp vanilla extract
Instructions
-
Step 1
In a microwave-safe mug, combine the softened cream cheese, sour cream, and powdered monkfruit sweetener. Mix until smooth and well combined. -
Step 2
Beat in the egg until fully incorporated. Be careful not to overmix. -
Step 3
Stir in the vanilla extract. -
Step 4
Microwave on high for 60-90 seconds, or until the edges are set but the center is still slightly jiggly. -
Step 5
Let it cool in the mug for a few minutes before enjoying. -
Step 6
Optionally, chill in the refrigerator for a firmer texture.
Important Information
Nutrition Facts (Per Serving)
It is important to consider this information as approximate and not to use it as definitive health advice.
Allergy Information
Please check ingredients for potential allergens and consult a health professional if in doubt.