Easy Homemade Fruit Leather Recipe- Healthy Snack
Homemade Fruit Leather Recipe is a delightful journey back to childhood, a vibrant explosion of pure fruit flavor that’s surprisingly simple to create. Who doesn’t remember the chewy, tangy goodness of fruit leather, a portable snack that was always a hit? It’s more than just a treat; it’s a taste of sunshine and simplicity, a way to capture the essence of ripe, seasonal fruits and preserve them in a wonderfully satisfying form. What truly makes this homemade fruit leather recipe special is the ability to control exactly what goes in – no artificial colors, flavors, or added sugars, just the pure, unadulterated goodness of the fruit you choose. Whether you’re using sweet berries, tart apples, or a tropical blend, the result is a healthy, chewy snack that’s perfect for lunchboxes, hiking trips, or simply a guilt-free indulgence.
Why You’ll Love This Recipe:
Endless Flavor Possibilities
Naturally Sweet and Healthy
Fun Family Activity
Homemade Fruit Leather Recipe
There’s something incredibly satisfying about transforming simple, fresh fruit into a chewy, intensely flavored snack. Fruit leather is a delightful way to preserve the taste of summer produce and create a healthy, portable treat that kids and adults alike will adore. Forget those store-bought versions packed with artificial ingredients; making your own is surprisingly easy and incredibly rewarding. The process is straightforward, requiring minimal active time and just a few basic ingredients. Let’s dive into how you can create your own delicious homemade fruit leather.
Ingredients:
Instructions:
Preparing the Fruit
The first step to creating fantastic fruit leather is to select and prepare your fruit. For this recipe, we’re using 2 cups of chopped fruit. The beauty of fruit leather is its versatility; you can use almost any fruit you enjoy. Ripe berries like strawberries, raspberries, or blueberries are excellent choices, offering vibrant color and natural sweetness. Peaches and nectarines, when perfectly ripe, lend a wonderfully smooth texture and sweet flavor. Tropical fruits like mangoes or papayas add an exotic twist. Even apples, particularly sweeter varieties, can be pureed and transformed into delicious leather. Make sure your fruit is well-ripened, as this will contribute to a sweeter, more flavorful end product and reduce the need for added sugar. For softer fruits like berries, a quick rinse is usually all that’s needed. For fruits with skins or pits, like peaches or mangoes, you’ll want to peel them and remove any inedible parts before chopping them into manageable pieces. If you’re using apples, you can core them and chop them, leaving the skins on for extra fiber and color if you wish, though peeling will result in a smoother texture.
Blending the Fruit Mixture
Once your fruit is chopped, it’s time to create the base for your fruit leather. Transfer your chopped fruit into a blender or food processor. Add the 3 tablespoons of white sugar. The amount of sugar can be adjusted based on the natural sweetness of your fruit. If your fruit is very ripe and sweet, you might want to start with 2 tablespoons and taste it before adding more. Conversely, if your fruit is a bit tart, you might opt for 4 tablespoons. The sugar not only sweetens but also acts as a natural preservative and helps create that desirable chewy texture. Next, add the juice of half a lemon. Lemon juice is a crucial ingredient for several reasons. Firstly, it brightens the flavor of the fruit, cutting through any potential cloying sweetness and adding a refreshing zing. Secondly, and importantly, the acidity in lemon juice helps prevent the fruit from browning during the cooking and drying process, ensuring your fruit leather maintains its beautiful color. Blend the fruit, sugar, and lemon juice until you have a completely smooth purée. There should be no lumps or large chunks of fruit remaining. The consistency should be similar to a thick smoothie. If your blender is struggling to achieve smoothness, you can add a tablespoon or two of water, but try to avoid adding too much liquid, as this will increase drying time.
Cooking Down the Purée
Now that you have your smooth fruit purée, the next step is to cook it down to concentrate its flavors and reduce its moisture content. This concentrated purée is what will eventually become your fruit leather. Transfer the fruit purée from your blender into a saucepan. You’ll want to use a medium-sized saucepan that allows the purée to spread out a bit. Place the saucepan over medium heat. Your goal here is to simmer the purée gently, stirring frequently, until it thickens considerably. This process can take anywhere from 15 to 30 minutes, depending on the water content of your fruit and the intensity of your heat. As the purée cooks, it will release steam and gradually reduce in volume. You’ll notice it becoming thicker and darker in color. Stirring is essential to prevent the mixture from sticking to the bottom of the pan and burning, which can impart an unpleasant flavor. Scrape the bottom and sides of the pan regularly. The purée is ready when it’s thick enough to coat the back of a spoon heavily and holds its shape for a few seconds when you run your finger through it. It will be significantly less liquidy than when you started. This concentrated flavor is the key to a delicious fruit leather.
Spreading and Baking
With your thickened fruit purée ready, it’s time to prepare it for drying. Preheat your oven to its lowest setting, ideally around 170°F (75°C). While the oven preheats, line a baking sheet with parchment paper or a silicone baking mat. It’s crucial to use a non-stick surface, as fruit leather can be very sticky. Pour the thickened fruit purée onto the prepared baking sheet. Using a spatula, spread the purée out into a thin, even layer, aiming for a thickness of about ¼ inch. Try to make the layer as uniform as possible across the entire baking sheet. This ensures that the fruit leather dries evenly. If you have thicker spots and thinner spots, some parts will dry out too quickly while others remain too moist. If you are making multiple flavors, you can create separate rows or sections on the baking sheet, being careful not to let them run into each other. Once spread, gently tap the baking sheet on the counter a few times to release any air bubbles and further even out the surface.
The Drying Process
This is where the magic happens, and your fruit purée transforms into chewy fruit leather. Carefully place the baking sheet into your preheated oven. Leave the oven door slightly ajar to allow moisture to escape. You can achieve this by propping the door open with the handle of a wooden spoon. This ventilation is key to the drying process. Allow the fruit leather to bake for approximately 4 to 6 hours. The exact drying time will depend on your oven’s temperature, the thickness of your fruit leather, and the humidity in your kitchen. You’ll want to check on it periodically, especially after the first couple of hours. The fruit leather is ready when it is no longer sticky to the touch and peels easily from the parchment paper or silicone mat. It should be leathery and pliable, not brittle or overly wet. If it’s still sticky, continue drying, checking every 30 minutes. If it feels brittle, you may have over-dried it slightly, but it should still be edible. Once it has reached the desired texture, carefully remove the baking sheet from the oven and let the fruit leather cool completely on the baking sheet. This cooling process will firm it up further.
Cutting and Storing
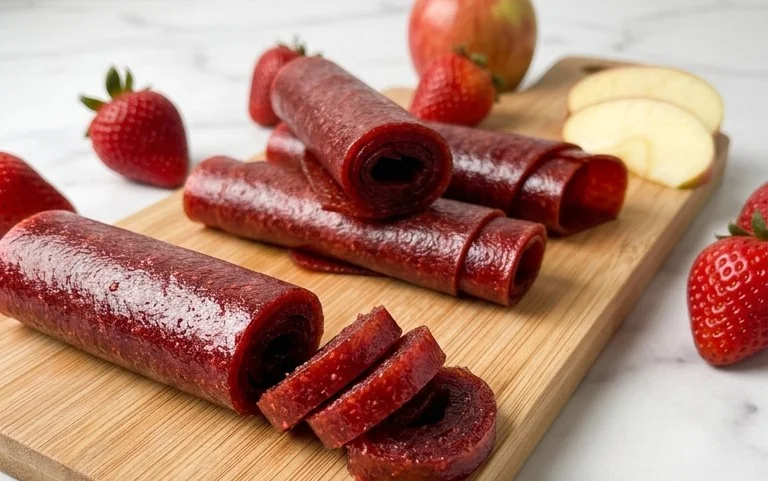
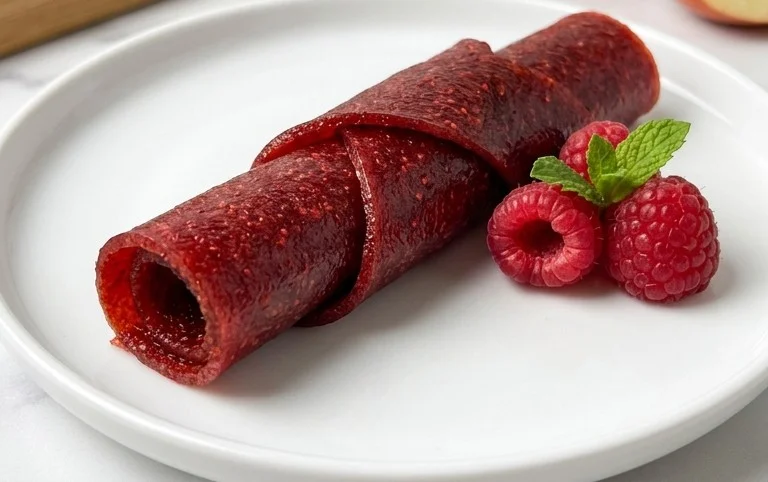
Once your homemade fruit leather has cooled completely, it’s time to prepare it for snacking. Carefully peel the entire sheet of fruit leather from the parchment paper or silicone mat. If you spread it evenly, it should come off in one large piece. You can then cut it into strips, squares, or any shape you desire using a sharp knife or a pizza cutter. For easy rolling, cut strips about 1 inch wide and 6-8 inches long. You can then roll these strips up tightly to create little fruit leather rolls. Store your fruit leather in an airtight container at room temperature for up to two weeks, or in the refrigerator for longer storage. If you live in a humid environment, it’s best to store it in the refrigerator to prevent it from becoming sticky or moldy. You can also wrap individual pieces in wax paper or parchment paper before placing them in your container for added protection and easier distribution. Enjoy your delicious, homemade fruit leather as a healthy snack or a fun addition to lunchboxes!
Conclusion:
And there you have it! Making your own homemade fruit leather is a wonderfully rewarding and surprisingly simple process that unlocks a world of delicious, healthy snacking. The magic lies in its natural sweetness, vibrant flavors, and the satisfaction of creating something wholesome from scratch. It’s the perfect way to use up ripe fruit, avoid processed sugars, and impress friends and family with your culinary skills.
Serve your vibrant fruit leather as a fun snack for kids’ lunchboxes, a delightful dessert alternative, or even as a chewy addition to a cheese board. The possibilities are endless!
Don’t be afraid to experiment with different fruit combinations. Think tropical mango-passionfruit, tart berry blends, or even apple-cinnamon. Adding a pinch of spice like gin extractger or a touch of vanilla extract can also elevate your fruit leather to a new level. I wholeheartedly encourage you to give this recipe a try. It’s a delightful journey from fruit to chewy perfection!
Frequently Asked Questions:
How long does homemade fruit leather last?
Stored properly in an airtight container at room temperature, your homemade fruit leather should stay fresh and chewy for about 1-2 weeks. For longer storage, you can refrigerate it for up to a month, or even freeze it for several months. Ensure it’s completely cooled and tightly wrapped before storing.
Can I use frozen fruit?
Absolutely! Frozen fruit is an excellent option, especially if you have a surplus. Thaw the fruit completely and drain off any excess liquid before pureeing. The texture might be slightly different, but the flavor will be just as delicious.
What if my fruit leather is too sticky or too dry?
If your fruit leather is too sticky after baking, you can try to dehydrate it a bit longer at a very low oven temperature (around 140°F or 60°C) or in a dehydrator for an additional hour or two. If it’s too dry and brittle, it might be a sign of over-baking. Next time, reduce the baking time. You can also try rehydrating slightly brittle pieces by wrapping them in a damp paper towel for a short period.
Homemade Fruit Leather
A simple and delicious way to preserve fresh fruit into a chewy, sweet treat.
Ingredients
-
2 cups fruit, chopped
-
3 tbsp white sugar
-
½ whole lemon, just the juice
-
1 cup water
-
1 tsp cornstarch
-
1 tbsp honey
Instructions
-
Step 1
Combine chopped fruit, white sugar, and lemon juice in a saucepan. -
Step 2
Cook over medium heat, stirring occasionally, until fruit is softened and broken down. -
Step 3
In a small bowl, whisk together water and cornstarch until smooth. Stir this mixture into the fruit. -
Step 4
Continue to cook, stirring, until the mixture thickens to a puree consistency. -
Step 5
Stir in honey until fully combined. -
Step 6
Pour the mixture onto a baking sheet lined with parchment paper, spreading it thinly and evenly. -
Step 7
Bake at the lowest oven setting (around 170°F or 75°C) for 4-6 hours, or until the surface is no longer sticky to the touch. -
Step 8
Let cool completely on the baking sheet, then peel from the parchment paper and cut into strips.
Important Information
Nutrition Facts (Per Serving)
It is important to consider this information as approximate and not to use it as definitive health advice.
Allergy Information
Please check ingredients for potential allergens and consult a health professional if in doubt.