Easy Mini Cannoli Cups Recipe – Deliciously Sweet Treats
Mini Cannoli Cups are here to transport your taste buds straight to Sicily with their irresistible charm and classic Italian flavor! We all know and adore the traditional cannoli – that crisp, golden shell filled with sweet, creamy ricotta. But what if I told you we could capture that magic in a bite-sized, unbelievably easy-to-make package? That’s the beauty of these Mini Cannoli Cups. They’re perfect for parties, a delightful afternoon treat, or simply when you crave a little slice of Italian heaven without the fuss of rolling and frying traditional shells. The secret to what makes these so special lies in their approachable preparation, allowing anyone to create these miniature masterpieces. Get ready to fall in love with these adorable and decadent Mini Cannoli Cups all over again!
Mini Cannoli Cups
Who doesn’t love a cannoli? That delightful crunch of the shell, the creamy, sweet filling – it’s a classic for a reason. But let’s be honest, making traditional cannoli can be a bit of a production. Rolling out dough, shaping it around tubes, frying… it’s a labor of love that sometimes we just don’t have the time for. That’s where these Mini Cannoli Cups come in! They capture all the incredible flavor of a traditional cannoli but with a super simple shortcut that will have you enjoying this Italian treat in a fraction of the time. Using refrigerated pie crusts, we can create adorable, bite-sized cups that are baked to golden perfection and then filled with that signature ricotta cream. They are perfect for parties, a sweet afternoon pick-me-up, or whenever that cannoli craving strikes! The beauty of these mini cups is their versatility; you can easily customize them with different toppings. Plus, they’re so fun to assemble and eat!
Ingredients:
Instructions:
Preparing the Ricotta Filling:
The heart of any cannoli is its creamy filling, and this recipe makes it wonderfully simple. First, it’s crucial to ensure your ricotta cheese is well-drained. You can do this by placing the ricotta in a fine-mesh sieve set over a bowl and letting it sit in the refrigerator for at least an hour, or even overnight. The less moisture in the ricotta, the thicker and creamier your filling will be, preventing a watery outcome. Once drained, transfer the ricotta to a medium bowl. Add the powdered sugar, granulated sugar, your finely grated orange or lemon zest (zest is preferred over juice as it won’t add excess liquid, and the oils in the zest provide a beautiful, bright citrus flavor), and the vanilla extract. Use a spatula or a whisk to gently mix everything together until it’s smooth and well combined. Don’t overmix; we’re just aiming for a cohesive and delicious filling. Taste it and adjust sweetness or citrus if desired. Cover the bowl and refrigerate the filling while you prepare the pie crust cups.
Creating the Pie Crust Cups:
This is where the magic happens, transforming humble pie crusts into perfect little vessels. Begin extract by preheating your oven to 375 degrees Fahrenheit (190 degrees Celsius). Lightly grease a mini muffin tin or a mini cupcake pan. This step is important to ensure your crusts don’t stick. Unroll your softened refrigerated pie crusts onto a lightly floured surface. You’ll want to cut out circles from the pie crust. A round cookie cutter or the rim of a glass that’s about 2.5 to 3 inches in diameter works perfectly. You should aim to get about 12-15 circles from each pie crust, so you’ll have plenty for your mini muffin tin. Gently press each circle into the greased cups of your mini muffin tin, creating a small, cup-like shape. Don’t worry if they aren’t perfectly uniform; a rustic look is charming!
Baking the Shells:
Now, let’s get these shells nice and golden. In a small bowl, combine the turbinado sugar and ground cinnamon. This cinnamon-sugar mixture will be sprinkled over the pie crusts before baking, adding a lovely flavor and a slightly crunchy, caramelized exterior. Lightly brush the edges of the pie crust cups with a little bit of water or melted butter. This helps the turbinado sugar adhere. Then, generously sprinkle the cinnamon-sugar mixture over the bottom and sides of each pie crust cup. Bake the pie crust cups in the preheated oven for 10-12 minutes, or until they are puffed, golden brown, and slightly crispy. Keep a close eye on them, as they can brown quickly. If any spots are browning too fast, you can loosely tent them with foil.
Cooling and Filling:
Once baked to perfection, carefully remove the mini muffin tin from the oven. Let the pie crust cups cool in the tin for about 5 minutes. This allows them to firm up slightly before you attempt to remove them. After 5 minutes, gently invert the tin onto a wire rack to release the baked cannoli cups. If any stick, a gentle wiggle should help them release. Allow them to cool completely on the wire rack. This is a crucial step; filling warm shells will cause the ricotta to melt and become runny. Once the cups are completely cool, it’s time for the best part – filling them! Spoon or pipe the prepared ricotta filling into each cooled cannoli cup. You can use a piping bag with a plain tip for a neater finish, or simply a spoon for a more casual approach. Fill them just before serving to maintain the crispness of the shells.
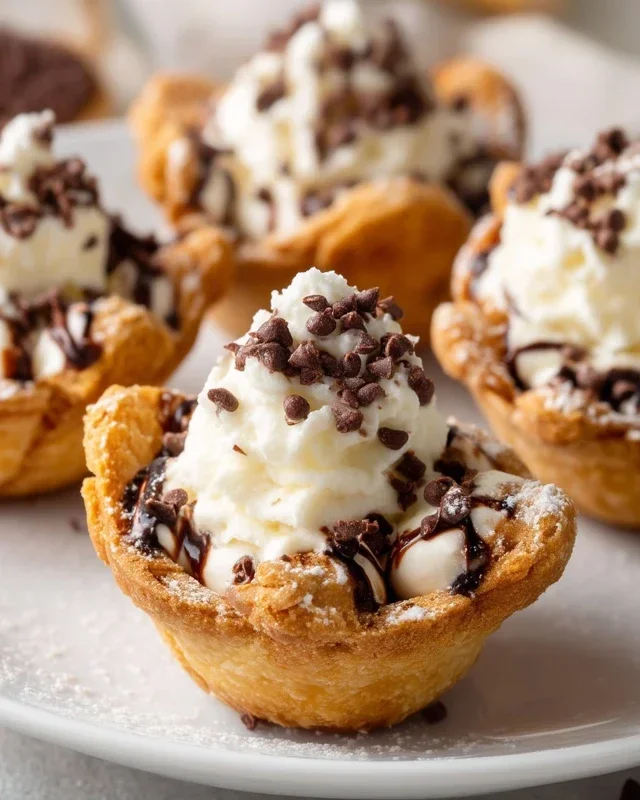
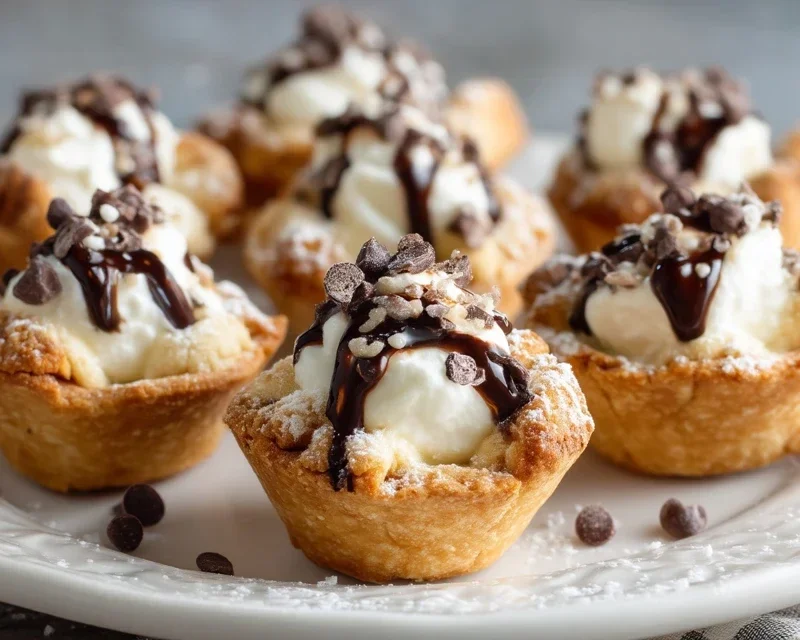
Decorating and Serving:
To finish off these delightful Mini Cannoli Cups, we’ll add the classic finishing touches. Sprinkle the tops of the filled cannoli cups with a dusting of additional powdered sugar. This not only looks beautiful but adds another layer of sweetness. Then, get creative with your toppings! You can sprinkle them with the miniature semisweet chocolate chips, which add a delightful burst of chocolate, or use finely chopped pistachios for a vibrant color and nutty crunch. Other ideas include a drizzle of chocolate sauce, a few small candied fruits, or even a sprinkle of more citrus zest. Serve your Mini Cannoli Cups immediately for the best texture and flavor experience. They are best enjoyed within a few hours of filling to ensure the shells remain crisp. Enjoy your homemade, shortcut cannoli!
Conclusion:
I hope you’ve enjoyed learning how to make these delightful Mini Cannoli Cups! This recipe truly offers the best of both worlds: the classic, irresistible flavor of traditional cannoli packed into a perfectly portioned, easy-to-handle cup. They are incredibly versatile, making them ideal for parties, special occasions, or just a sweet treat to brighten your day. The crunchy, delicate shell paired with the creamy, sweet ricotta filling is a match made in dessert heaven.
These mini delights are fantastic served chilled, perhaps with a dusting of powdered sugar or a drizzle of chocolate sauce. For a more elaborate presentation, consider a small platter adorned with fresh berries or even a sprig of mint. Don’t be afraid to get creative with variations! You can add a touch of citrus zest to the filling, fold in mini chocolate chips, or even experiment with different extracts like almond or orange. I truly encourage you to give these Mini Cannoli Cups a try; they are surprisingly simple to assemble and the rewards are deliciously evident in every bite.
Frequently Asked Questions:
Can I make the cannoli shells ahead of time?
Absolutely! The shells can be baked and stored in an airtight container at room temperature for up to a week. It’s best to fill them closer to serving time to maintain their crispiness.
What if I don’t have cannoli forms?
No worries! You can often find pre-made mini cannoli shells in specialty baking aisles or online. Alternatively, you can carefully wrap strips of dough around small, oven-safe metal or ceramic forms, or even sturdy cardboard tubes wrapped in foil. Just ensure they can withstand the heat of the oven.
How should I store leftover filled cannoli cups?
For the best texture, store any leftover filled Mini Cannoli Cups in an airtight container in the refrigerator for up to 2 days. The shells will soften slightly over time, but they will still be delicious.
Mini Cannoli Cups
Quick and easy mini cannoli cups made with refrigerated pie crusts and a creamy ricotta filling, perfect for a no-fuss dessert.
Ingredients
-
1 container whole-milk ricotta cheese (15 oz., drained)
-
1/2 cup powdered sugar
-
2 tablespoons granulated sugar
-
1 teaspoon finely grated orange or lemon zest
-
1/2 teaspoon vanilla extract
-
1 box refrigerated pie crusts, softened as directed on box (2 count )
-
3 tablespoons turbinado sugar (raw sugar)
-
1 teaspoon ground cinnamon
-
1/4 cup miniature semisweet chocolate chips or finely chopped pistachios
-
additional powdered sugar
Instructions
-
Step 1
Preheat oven to 375°F (190°C). Lightly grease a mini muffin tin. -
Step 2
In a medium bowl, combine the drained ricotta cheese, powdered sugar, granulated sugar, orange or lemon zest, and vanilla extract. Stir until well combined and smooth. -
Step 3
Unroll the refrigerated pie crusts. Cut each crust into 6 equal rounds using a biscuit cutter or a glass. Gently press each round into the cups of the prepared mini muffin tin, forming a cup shape. -
Step 4
Bake for 10-12 minutes, or until the crusts are lightly golden brown and set. Let them cool in the tin for a few minutes before carefully removing them to a wire rack to cool completely. -
Step 5
In a small bowl, combine the turbinado sugar and ground cinnamon. Roll the edges of the cooled cannoli cups in this mixture. -
Step 6
Spoon or pipe the ricotta filling into each cooled cannoli cup. Sprinkle with miniature chocolate chips or chopped pistachios. -
Step 7
Dust with additional powdered sugar just before serving.
Important Information
Nutrition Facts (Per Serving)
It is important to consider this information as approximate and not to use it as definitive health advice.
Allergy Information
Please check ingredients for potential allergens and consult a health professional if in doubt.