Easy Two-Ingredient Pizza Dough Recipe
2 ingredient pizza dough is the culinary equivnon-alcoholic alent of a magic trick, turning simple pantry staples into a delightful base for your pizza creations. Imagin extracte this: it’s a busy weeknight, you’re craving that comforting pizza flavor, but the thought of making dough from scratch feels overwhelming. That’s where the genius of 2 ingredient pizza dough shines through. It’s incredibly forgiving, shockingly easy, and delivers a surprisingly satisfying chew and crisp. What makes it so universally loved? It’s the sheer accessibility and the speed at which you can go from idea to oven. No yeast fuss, no waiting for dough to rise – just pure, unadulterated pizza joy in a fraction of the time. This isn’t just about convenience; it’s about unlocking spontaneous pizza nights and proving that deliciousness doesn’t always require a complex process. Get ready to impress yourself and your loved ones with this wonderfully simple yet incredibly rewarding recipe.

Ingredients:
- 2 cups non-fat plain Greek yogurt
- 3 cups self-rising flour
Making Your 2 Ingredient Pizza Dough
This recipe truly lives up to its name, offering an incredibly simple yet surprisingly versatile pizza dough. The magic lies in the combination of creamy, thick Greek yogurt and self-rising flour. The yogurt provides moisture and a subtle tang, while the self-rising flour, with its leavening agents already incorporated, does the heavy lifting for a light and airy crust. Let’s get started on crafting this easy dough!
Step 1: Combining the Foundation
To begin extract, you’ll need a large mixing bowl. Add the 2 cups of non-fat plain Greek yogurt to the bowl. Ensure your Greek yogurt is fairly thick; if it seems a little watery, you can drain off any excess liquid using a fine-mesh sieve lined with cheesecloth for about 15-30 minutes beforehand. This slight extra step can make a significant difference in the dough’s texture. Once your yogurt is ready, gradually add the 3 cups of self-rising flour to the bowl. It’s best to add the flour in batches rather than all at once. This allows for better incorporation and prevents the flour from flying out of the bowl as you start to mix.
Stepgin extract Bringing the Dough Together
Now, it’s time to mix everything. You can start by using a sturdy spoon or a spatula to gently combine the yogurt and flour. As thgin extractngredients begin to come together, you’ll notice it forming a shaggy dough. Once it becomes too difficult to stir with the spoon, it’s time to get your hands involved. Lightly flour your hands with a little extra self-rising flour – just enough to prevengin extractxcessive sticking. Begin to knead the dough directly in the bowl. Fold the dough over itself, press down with the heels of your hands, and rotate. Continue this process for about 2-3 minutes until the dough starts to come together into a cohesive ball. It should still feel slightly sticky, which is perfectly normal.
Step 3: Kneading for Elasticity
For a truly excellent pizza crust, a little kneading goes a long way. Turn the dough out onto a lightly floured surface. This is where you’ll continue kneading to develop the gluten, which is crucial for a chewy and structured crust. Knead the dough for approximately 5-7 minutes. You’ll want to push the dough away from you with the heels of your hands, then fold it back towards you. Rotate the dough as you go. The dough will gradually become smoother and more elastic. You’ll know it’s ready when it springs back slowly after you gently press it with your finger. If the dough becomes too sticky during this process, add a tiny bit more self-rising flour to your hands or the work surface, but be careful not to add too much, as this can make the crust tough.
Step 4: Resting the Dough (Optional but Recommended)**
While this dough is designed for speed, allowing it to rest can further improve its texture and make it easier to handle. If you have the time, cover the kneaded dough ball loosely with a clean kitchen towel or plastic wrap and let it rest at room temperature for about 15-20 minutes. This brief rest allows the gluten to relax, making the dough more pliable and less likely to spring back when you’re trying to shape it. If you’re short on time, you can proceed directly to shaping, but be aware that it might be slightly more resistant to stretching.
Step 5: Shaping Your Pizza Crust
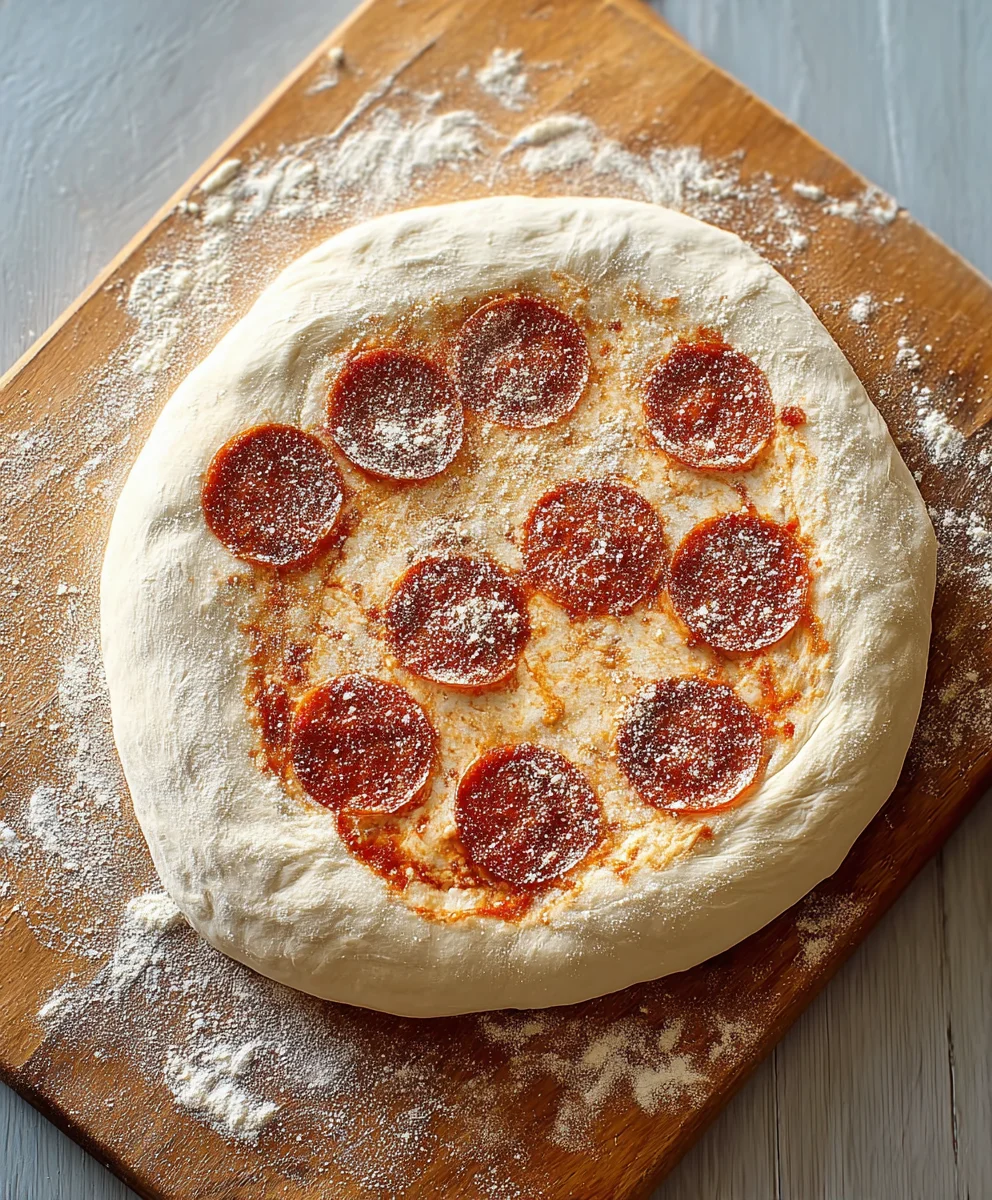
Now for the fun part! Preheat your oven to a high temperature, typically between 450-475°F (230-245°C). This high heat is essential for achieving a crispy pizza crust. Lightly dust your work surface and your rolling pin (or your hands) with a little more self-rising flour. You can either roll the dough out with a rolling pin to your desired thickness and shape, or for a more rustic feel, gently stretch it with your hands. Start from the center and work your way outwards, being careful not to create thin spots that might tear. Aim for a circle or any shape that fits your baking pan or pizza stone. Remember, the thickness of your crust will affect baking time. A thinner crust will cook faster and be crispier, while a thicker crust will be chewier. If you find the dough is shrinking back too much, let it rest for another 5 minutes before continuing to shape. Once shaped, carefully transfer your pizza dough to a pizza peel dusted with cornmeal or onto a baking sheet lined with parchment paper. Now you’re ready to add your favorite toppings and bake your delicious homemade pizza!
Conclusion:
Congratulations on mastering the art of the 2 Ingredient Pizza Dough! You’ve now unlocked a world of quick and effortless pizza nights. This simple dough is incredibly versatile, making it a weeknight savior. Remember, the magic lies in its simplicity, allowing you to focus on your favorite toppings and create pizzas that are truly your own. Don’t be afraid to experiment! Bake it until golden brown and bubbly, then slice it up and enjoy the satisfaction of homemade pizza, made easier than ever before.
For serving suggestions, this 2 Ingredient Pizza Dough is perfect for classic margherita, loaded veggie pizzas, or even a sweet dessert pizza with fruit and chocolate. Think of it as your blank canvas for culinary creativity! We encourage you to try different toppings and flavor combinations. You might be surprised at how delicious and satisfying a pizza made with just two ingredients can be. Enjoy the process and the delicious results!
Frequently Asked Questions about 2 Ingredient Pizza Dough:
Q1: Can I make the 2 Ingredient Pizza Dough ahead of time?
Yes, you can! Once you’ve mixed and kneaded the dough, you can wrap it tightly in plastic wrap and refrigerate it for up to 2-3 days. Allow it to come to room temperature for about 30 minutes before rolling it out for the best results.
Q2: What are some good variations for the 2 Ingredient Pizza Dough?
While the base is two ingredients, you can certainly add extra flavor to the dough itself! For a garlic-herb crust, try adding a teaspoon of dried Italian herbs and a pinch of garlic powder to the flour. For a cheesy twist, incorporate some grated Parmesan cheese into the dough. You can also experiment with different flours, though the classic all-purpose yields the best results for this simple recipe.
Easy Two-Ingredient Pizza Dough Recipe
A surprisingly versatile and incredibly simple pizza dough made with just two ingredients: Greek yogurt and self-rising flour.
Ingredients
-
2 cups non-fat plain Greek yogurt
-
3 cups self-rising flour
-
Pinch of salt (optional, for flavor enhancement)
-
1 tablespoon olive oil (for coating bowl and hands)
-
Cornmeal (for dusting pizza peel)
-
Water (if yogurt is too watery)
Instructions
-
Step 1
Combine the yogurt and flour. Add the 2 cups of non-fat plain Greek yogurt to a large mixing bowl. If the yogurt is watery, drain it first. Gradually add the 3 cups of self-rising flour in batches, mixing as you go. -
Step 2
Bring the dough together. Start mixing with a spoon or spatula until a shaggy dough forms. Then, lightly flour your hands and knead in the bowl for 2-3 minutes until the dough forms a cohesive ball. It should feel slightly sticky. -
Step 3
Knead for elasticity. Turn the dough onto a lightly floured surface and knead for 5-7 minutes until it’s smooth and elastic. It should spring back slowly when gently pressed. -
Step 4
Rest the dough (optional). Cover the dough loosely and let it rest at room temperature for 15-20 minutes to relax the gluten, making it easier to handle. -
Step 5
Shape your pizza crust. Preheat your oven to 450-475°F (230-245°C). Lightly flour your surface and roll or stretch the dough to your desired thickness and shape. -
Step 6
Prepare for baking. Transfer the shaped dough to a pizza peel dusted with cornmeal or a baking sheet lined with parchment paper. Add your favorite toppings and bake until golden brown and cooked through.
Important Information
Nutrition Facts (Per Serving)
It is important to consider this information as approximate and not to use it as definitive health advice.
Allergy Information
Please check ingredients for potential allergens and consult a health professional if in doubt.