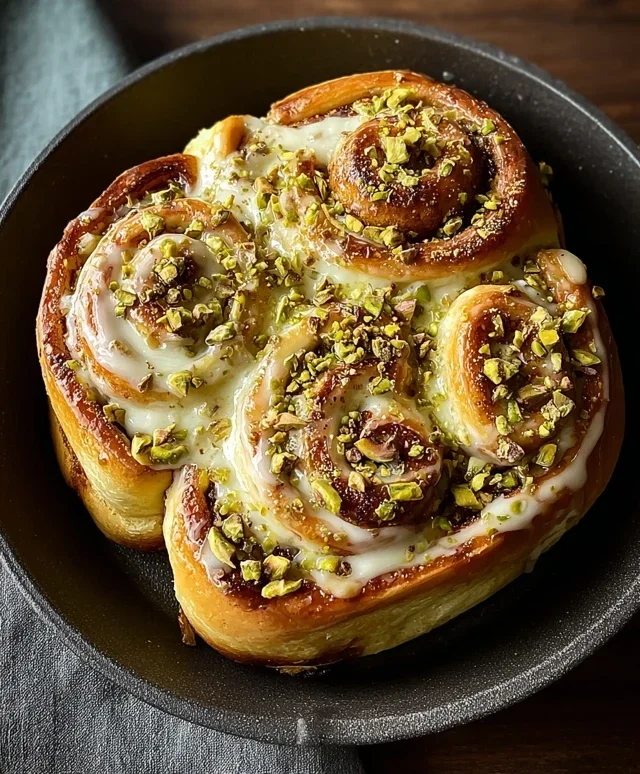
Red Velvet Cinnamon Rolls – Cream Cheese Icing
Red Velvet Cinnamon Rolls with Cream Cheese Icing are not just a treat; they’re an experience. Imagin extracte waking up to the aroma of warm cinnamon mingling with the subtle hint of cocoa and a whisper of vanilla, all wrapped in that iconic, luscious red hue. We all know and adore classic cinnamon rolls, but these red velvet cinnamon rolls take that comfort food perfection to a whole new level. It’s the perfect marriage of two beloved desserts, offering a playful twist on a timeless favorite. The velvety texture of the dough, infused with that signature red velvet flavor, combined with the sweet, spiced filling, and then crowned with a tangy, sweet cream cheese icing, creates a symphony of flavors and textures that’s simply irresistible. Get ready to bake up a batch of pure joy!
What You’ll Need:
To create these stunning red velvet cinnamon rolls, gather your ingredients.
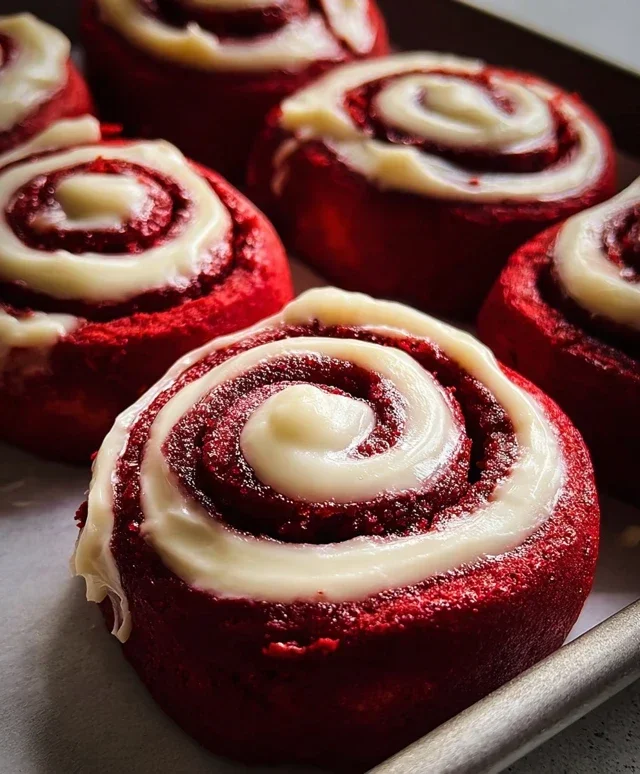
Red Velvet Cinnamon Rolls with Cream Cheese Icing
Get ready to indulge in a decadent treat that combines the classic comfort of cinnamon rolls with the irresistible allure of red velvet cake. These Red Velvet Cinnamon Rolls are a showstopper, featuring a vibrant crimson dough swirled with a sweet cinnamon-sugar filling, all crowned with a luscious cream cheese icing. Perfect for holidays, special occasions, or just because, these rolls are sure to become a new favorite. The process might seem a little involved, but I promise the end result is more than worth the effort. Let’s dive into creating these beautiful and delicious rolls!
Ingredients:
Making the Dough
The foundation of any great cinnamon roll is a soft, pliable dough. We’ll start by activating our yeast. In a large bowl, combine the warm milk and the active dry yeast. Give it a gentle stir, and then let it sit for about 5-10 minutes. You’ll know the yeast is active when it becomes foamy and bubbly on the surface. This indicates that the yeast is alive and ready to work its magic in leavening our dough. While the yeast is proofing, in a separate medium bowl, whisk together the ¼ cup granulated sugar, ¼ cup melted unsalted butter, the large egg, egg yolk, and 1 tablespoon of vanilla extract. Once the yeast is foamy, pour this wet mixture into the bowl with the yeast and stir to combine.
Now it’s time to introduce the dry ingredients. In another bowl, whisk together the 3 cups of all-purpose flour, ¼ cup unsweetened cocoa powder, and 1 teaspoon of salt. Gradually add the dry ingredients to the wet ingredients, mixing until a shaggy dough forms. This is where the red velvet magic begin extracts! Add 1-2 teaspoons of red gel food coloring to the dough. Gel food coloring is best because it provides intense color without adding too much liquid. Knead the dough on a lightly floured surface for about 8-10 minutes, or until it’s smooth and elastic. You can also use a stand mixer with a dough hook for about 6-8 minutes on medium speed. The dough should be slightly sticky but manageable. Place the dough in a lightly oiled bowl, cover it with plastic wrap or a clean kitchen towel, and let it rise in a warm place for about 1 to 1.5 hours, or until it has doubled in size.
Assembling the Rolls
Once the dough has doubled, gently punch it down to release the air. On a lightly floured surface, roll out the dough into a large rectangle, approximately 12×18 inches. Aim for an even thickness. Now, let’s prepare the filling. In a medium bowl, combine the ½ cup softened unsalted butter, 1 cup brown sugar, and 2 tablespoons of ground cinnamon. Mix these ingredients together until well combined, forming a thick, spreadable paste. Generously spread this cinnamon-sugar mixture evenly over the rolled-out dough, leaving about a ½-inch border along one of the longer edges. This border will help seal the rolls.
Starting from the opposite long edge (the one without the border), tightly roll up the dough. Try to keep the roll as uniform as possible for even baking. Once rolled, pinch the seam to seal it securely. Now, using a sharp knife or dental floss (which surprisingly makes cleaner cuts!), slice the log into 12 equal portions, about 1.5 inches thick. Place the cinnamon rolls cut-side up into a greased 9×13 inch baking dish. Make sure they have a little room to expand. Cover the dish loosely with plastic wrap or a kitchen towel and let them rise for another 30-45 minutes, or until they are puffy. While the rolls are having their second rise, preheat your oven to 350°F (175°C).
Baking and Icing
Once the rolls have puffed up and your oven is preheated, it’s time to bake! Place the baking dish into the preheated oven and bake for 20-25 minutes, or until the tops are golden brown and the centers are cooked through. You want them to be beautifully golden on the outside, with a slightly gooey center.
While the cinnamon rolls are baking, we’ll prepare the luscious cream cheese icing. In a medium bowl, beat together the 4 oz softened cream cheese and the ¼ cup softened unsalted butter until smooth and creamy. This is best done with an electric mixer, either a hand mixer or a stand mixer. Add a splash of milk or a tablespoon of heavy cream if you want a thinner consistency, and a teaspoon of vanilla extract for added flavor. Gradually beat in about 1 cup of powdered sugar, adding more as needed to reach your desired frosting consistency. You’re looking for a smooth, spreadable, but not too runny, glaze.
As soon as the cinnamon rolls come out of the oven, while they are still warm, generously spread the cream cheese icing over the top. The warmth of the rolls will help the icing melt slightly and create a truly decadent coating. Let them cool for a few minutes before serving, allowing the icing to set a little. These Red Velvet Cinnamon Rolls are best enjoyed warm, so don’t delay in diggin extractg into this delightful creation!

Conclusion:
I truly hope you’ve enjoyed learning how to create these spectacular Red Velvet Cinnamon Rolls with Cream Cheese Icing! This recipe is a fantastic fusion of two beloved comfort treats, delivering a vibrant visual appeal and an explosion of delicious flavors. The rich, slightly tangy red velvet dough perfectly complements the warm, spiced cinnamon filling, and the creamy, sweet cream cheese icing brings it all together in a symphony of taste and texture. They’re not just visually stunning but incredibly satisfying, perfect for a special occasion, a weekend brunch, or simply a delightful treat any day of the week.
Serve these beauties warm, perhaps with a cup of coffee or a glass of milk, for the ultimate indulgence. For even more enjoyment, consider a sprinkle of chopped pecans on top of the icing for added crunch, or a swirl of extra red velvet cake crum extractbs for a decadent finish. Don’t be afraid to experiment! You could even add a hint of espresso powder to the cream cheese icing for a mocha twist.
I wholeheartedly encourage you to give this Red Velvet Cinnamon Rolls recipe a try. They might seem a little involved, but the results are absolutely worth it. Prepare to impress yourself and anyone lucky enough to share them with you!
Frequently Asked Questions:
Can I make the dough for the Red Velvet Cinnamon Rolls ahead of time?
Absolutely! You can prepare the dough up to the point of the first rise, cover it tightly, and refrigerate it for up to 24 hours. Allow it to come to room temperature for about an hour before proceeding with rolling and filling. This makes morning baking much more manageable!
My cream cheese icing is too thin. What can I do?
Don’t worry, it’s an easy fix! If your icing is too thin, gradually add more powdered sugar, one tablespoon at a time, mixing well after each addition until you reach your desired consistency. Conversely, if it’s too thick, a tiny splash of milk or heavy cream can thin it out.
Can I freeze the baked Red Velvet Cinnamon Rolls?
Yes, you can! Once cooled completely, you can freeze them individually wrapped in plastic wrap, then placed in an airtight container or freezer bag. To reheat, unwrap and warm gently in a low oven or microwave. You might want to add a fresh dollop of icing after warming.
Red Velvet Cinnamon Rolls with Cream Cheese Icing
Decadent red velvet cinnamon rolls swirled with a rich cinnamon-sugar filling, topped with a classic cream cheese icing.
Ingredients
-
1 cup warm milk (110°F)
-
2 ¼ tsp (1 packet) active dry yeast
-
¼ cup granulated sugar
-
¼ cup unsalted butter, melted
-
1 large egg
-
1 egg yolk
-
1 tbsp vanilla extract
-
3 cups all-purpose flour
-
¼ cup unsweetened cocoa powder
-
1 tsp salt
-
1-2 tsp red gel food coloring
-
½ cup unsalted butter, softened
-
1 cup brown sugar
-
2 tbsp ground cinnamon
-
4 oz cream cheese, softened
-
¼ cup unsalted butter, softened
Instructions
-
Step 1
In a large bowl, combine warm milk, yeast, and granulated sugar. Let stand for 5-10 minutes until foamy. -
Step 2
Stir in melted butter, egg, egg yolk, and vanilla extract. Gradually add flour, cocoa powder, salt, and red gel food coloring. Mix until a soft dough forms. -
Step 3
Knead the dough on a lightly floured surface for 6-8 minutes until smooth and elastic. Place in a greased bowl, cover, and let rise in a warm place for 1 hour, or until doubled in size. -
Step 4
Punch down the dough and roll it into a 12×18 inch rectangle. Spread softened butter evenly over the dough. Mix brown sugar and cinnamon, then sprinkle evenly over the buttered dough. -
Step 5
Roll up the dough tightly, starting from one of the long sides. Slice the roll into 12 equal pieces. Place slices in a greased baking dish. -
Step 6
Cover and let rise for another 30 minutes. Bake in a preheated oven at 375°F (190°C) for 20-25 minutes, or until golden brown. -
Step 7
While rolls are baking, beat softened cream cheese and softened butter until smooth. Gradually beat in powdered sugar (not listed in ingredients, assumed for icing) and vanilla extract (not listed in ingredients, assumed for icing) until desired consistency is reached. -
Step 8
Spread cream cheese icing over warm cinnamon rolls.
Important Information
Nutrition Facts (Per Serving)
It is important to consider this information as approximate and not to use it as definitive health advice.
Allergy Information
Please check ingredients for potential allergens and consult a health professional if in doubt.